You pulled the beef out when the outside looked perfect, but the first slice reveals a center that’s still cold and blue. Or maybe you waited until the juices ran clear, only to find the meat is now dry, gray, and tough. These kitchen heartbreaks usually happen because of one small mistake: the thermometer probe wasn’t in the right spot.
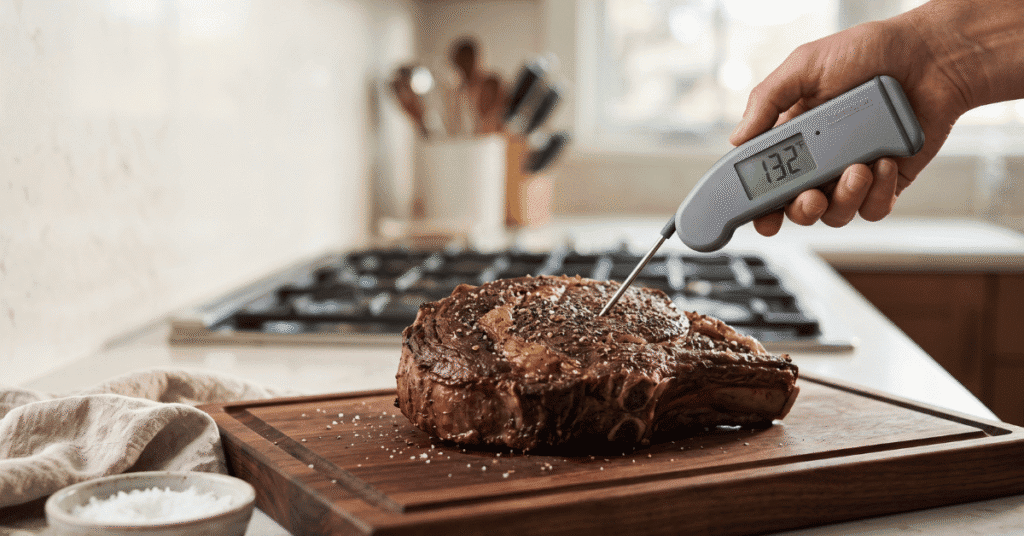
Quick Answer: To insert a meat thermometer correctly, push the probe into the thickest part of the roast, avoiding fat, bone, or the roasting pan. The sensor must reach the very center of the muscle to give an accurate internal temperature. For most roasts, this means entering from the side or the top until the tip sits in the middle of the largest muscle mass.
Why Placement is the Secret to a Perfect Roast
Getting the temperature right isn’t just about food safety; it’s about texture and flavor. When you cook a large piece of meat, heat moves from the outside in. The exterior will always be significantly hotter than the core.
If your thermometer stays too close to the surface, it will give a high reading while the middle of the roast is still raw. Conversely, if the tip hits a pocket of fat or rests against a bone, the reading will be false.
Bone conducts heat differently than muscle. In some cases, the bone heats up faster than the meat, leading you to think the roast is done earlier than it really is. Fat acts as an insulator and can also throw off the data.
By hitting the “thermal center”, the point furthest from the heat source, you get the only number that actually matters.
According to the USDA Food Safety and Inspection Service, using a food thermometer is the only reliable way to verify that you have eliminated harmful bacteria. For beef, pork, and lamb roasts, the minimum safe internal temperature is 145°F followed by a three-minute rest. If you miss the center, you might pull the meat at 145°F only to have the core sitting at a dangerous 120°F.
The Physics of the Thermal Center
Every roast has a cold spot. In a perfectly uniform cylinder of meat, that spot is the exact geometric center. But roasts aren’t perfect shapes.
A standing rib roast is tapered, and a leg of lamb has varying thickness.
You are looking for the part of the meat that will take the longest to cook. On a prime rib, that’s the center of the large “eye” muscle. On a pork shoulder, it’s the middle of the thickest section away from the blade bone.
If you find the coldest part of the meat and it reaches your target temp, you know the rest of the roast is safely cooked as well.
Understanding Sensor Types
Not all thermometers work the same way, and knowing where your sensor is located changes how you insert it.
- Thermocouples: These usually have the sensor at the very tip of the needle. They are great for thin cuts but work perfectly for roasts because you only need to worry about where the tip is.
- Thermistor/Digital Probes: These often have the sensor in the first half-inch of the probe. You still want the tip in the center, but you need to make sure at least an inch of the probe is submerged in the meat.
- Dial/Bimetal Thermometers: These are the old-school round clocks with thick stems. The sensor is actually a coil that runs two to three inches up the stem. If you don’t bury the stem deep enough, the thermometer averages the temp of the meat and the hot air in the oven, giving you a useless reading.
How to Position the Probe Step-by-Step
Inserting the thermometer should be done before the meat goes into the oven if you are using a leave-in probe, or at the end of the cooking time if you use an instant-read device.
1. Identify the Thickest Section
Look at the roast from the top and the sides. Find the area where the meat is deepest. Avoid the ends of the roast, as they will heat up much faster than the middle.
If the roast has an irregular shape (like a brisket or a whole turkey), focus on the largest muscle.
2. Aim for the Center of the Muscle
You want the tip of the probe to sit in the dead center of the largest muscle group. For a rolled or tied roast (like a porchetta or a boneless leg of lamb), aim for the very middle of the spiral. If you are using a leave-in probe, try to insert it through the side of the roast.
This keeps more of the probe inside the meat, which prevents “heat conduction error” where the metal stem carries oven heat down into the sensor.
3. Avoid Obstacles
If you feel the probe hit something hard, you’ve likely hit a bone. Back it out and angle it slightly differently. Bone can be 10 to 15 degrees hotter than the surrounding meat.
Similarly, if the probe slides in far too easily, you might be in a pocket of fat. Fat doesn’t hold moisture like muscle does and won’t give an accurate representation of the meat’s “doneness.”
4. Verify with an Instant-Read
Even if you use a leave-in probe that stays in the oven, it’s a good idea to check two or three different spots with a handheld instant-read thermometer near the end of the cook. Push the probe past the center and slowly pull it back out. Watch the digital display; the lowest temperature you see is the true internal temp of the roast.
Handling Different Roast Shapes
Different types of meat require slightly different angles. A flat brisket is treated differently than a spherical top-round roast.
Narrow or Flat Roasts
For roasts like a beef tenderloin or a thin pork loin, inserting the probe from the top can be tricky because the probe might go all the way through and touch the pan. Instead, insert the thermometer through the side (longitudinally). This allows the entire sensing area to stay inside the meat even if the roast is only three inches thick.
Bone-In Roasts
With a standing rib roast (Prime Rib), you should insert the probe from the top or side, aiming for the center of the large muscle. Make sure the tip is at least an inch away from the rib bones. For a bone-in leg of lamb, aim for the thickest part of the “fleshy” side, avoiding the central leg bone.
Poultry Roasts
If you are roasting a whole chicken or turkey, the rules change slightly. The legs and thighs need to reach a higher temperature (175°F) than the breast (165°F) to be palatable. Insert the probe into the thickest part of the thigh, making sure not to hit the pelvic bone.
Then, check the thickest part of the breast.
The Importance of the “Pull Temperature”
You shouldn’t wait until the thermometer hits your final target temperature to take the roast out of the oven. This is because of “carryover cooking.”
When you remove a roast from the heat, the surface is much hotter than the center. That heat continues to travel inward even after the roast is on the counter. A large beef roast can rise by as much as 10 to 15 degrees while it rests.
If you want a medium-rare roast (final temp of 135°F), you should pull it out of the oven when the thermometer reads 120°F or 125°F.
If you don’t account for this, your perfectly inserted thermometer will tell you the meat is 135°F in the oven, but by the time you carve it, it will be 150°F and overcooked.
Common Mistakes to Avoid
Even seasoned cooks sometimes get a “false positive” on their temperature. Here are the most frequent errors:
- Touching the Pan: If the tip of your probe touches the roasting pan or the metal rack, it will read the temperature of the metal, which can be 400°F. Always make sure there is meat between the probe tip and the pan.
- Checking Too Early: Opening the oven door repeatedly to check the temp drops the ambient temperature and increases cooking time. If you don’t have a leave-in probe, wait until the estimated cooking time is about 75% finished before your first check.
- Misjudging the Sensor Location: On many analog thermometers, the sensor is an inch or two up the stem. If you only put the tip in, the thermometer is mostly measuring the air.
- Not Calibrating: Thermometers can drift over time. Once a year, stick your probe in a glass of crushed ice and water. It should read 32°F (0°C). If it doesn’t, you need to adjust your target temps or get a new tool.
Frequently Asked Questions
Can I leave the thermometer in the meat while it cooks?
It depends on the type. Digital “probe” thermometers with a wire cord and analog “leave-in” meat thermometers are designed for the oven. However, “instant-read” digital thermometers will melt or break if left inside a hot oven.
Always check the manufacturer’s instructions to see if your model is heat-resistant.
Where do I stick the thermometer in a boneless roast?
In a boneless roast, the center of the meat is usually where the “eye” of the muscle is located. If the roast is tied with twine, aim for the geometric center of the cylinder. Because there are no bones to worry about, you have more freedom to insert the probe from the side to ensure it reaches the deepest part.
Is it okay to poke multiple holes in the roast?
Many people worry that poking holes will let all the juices leak out. While a few drops might escape, it’s not enough to dry out the meat. Re-positioning a thermometer a few times is much better than serving an undercooked or overcooked meal.
To minimize juice loss, leave the probe in place rather than taking it in and out.
Why does my thermometer give different readings in different spots?
Heat is never perfectly even. One side of your roast might be closer to the oven’s heating element, or one part of the muscle might be thinner. Always go by the lowest reading you find in the thickest part of the meat to ensure the entire roast is safe to eat.
Worth Remembering
Getting the probe into the center of the roast is a skill that pays off every single time you cook. It removes the guesswork and the “poke test” methods that often lead to mistakes. Remember to aim for the thickest muscle, stay away from the bone, and pull the meat about 10 degrees before your final goal to allow for carryover cooking.
If you use a leave-in probe, you’ll be able to watch the temperature rise in real-time, which helps you plan the rest of your dinner side dishes. A simple check with an instant-read at the end provides the final peace of mind.


1 thought on “How to Insert a Meat Thermometer in a Roast Correctly”