You’re halfway through smoking a brisket for the big game when your digital display suddenly reads “HHH” or jumps from 100°F to 450°F in three seconds. That sinking feeling hits, your meal is on the line, and your gear just quit. Most of the time, the digital base unit is fine; it’s the thin, wire-tethered probe that has given up the ghost.
Quick Answer: To replace a meat thermometer probe, identify your device’s brand and model to find a compatible probe with the correct jack size (usually 2.5mm or 3.5mm). Unplug the old, damaged probe from the transmitter port and firmly insert the new one until it clicks. Always test the new probe in a cup of crushed ice and water to verify it reads close to 32°F (0°C) before you start cooking.
Why thermometer probes fail and when to swap them
A meat thermometer probe is a sensitive piece of electronic equipment that lives a very rough life. It spends hours inside a hot, smoky chamber, gets splashed with rendered fat, and often suffers through aggressive cleaning. The internal component, called a thermistor, relies on precise electrical resistance to tell the base unit what the temperature is.
When the wiring inside the braided cable or the sensor in the tip breaks down, the electrical signal gets garbled.
Moisture is the number one killer of these components. While the stainless steel probe tip is waterproof, the point where the wire enters the probe often isn’t. If water gets into that junction during a soak in the sink, it creates a short circuit.
High heat is the second culprit. Most consumer-grade probes are rated for temperatures up to 482°F or 572°F. If your grill flares up or you let the wire touch a glowing charcoal ember, the internal insulation melts instantly.
You should consider a replacement if you see physical fraying on the mesh cable or if your display shows “LLL,” “HHH,” or an obviously wrong temperature like 200°F when the meat is cold. Because these parts are consumable, many Pitmasters keep two or three spares in their grill kit. It’s a lot cheaper to buy a new $15 probe than to buy a whole new $80 wireless system.
Identifying the right jack and plug size
Before you buy a replacement, you have to know what kind of connection your base unit uses. Most modern digital thermometers use a standard mini-jack, similar to old-style headphone plugs. However, there are two common sizes: 2.5mm and 3.5mm.
Using the wrong size will either not fit at all or will sit loosely in the port, causing intermittent readings.
Check the manufacturer’s manual or the product listing on the official brand website. Some brands, like ThermoWorks or Maverick, use proprietary connectors or specific resistance levels (known as NTC or K-Type thermocouples). A probe that looks right might not translate the temperature correctly if the internal electronics don’t match the base unit’s programming.
If you use a K-Type probe on a standard thermistor unit, it won’t work.
Distinguishing between ambient and meat probes
When shopping for a replacement, don’t grab the first one you see. There are two distinct types of probes. Internal meat probes have a sharp, pointed tip designed to slide easily into a roast or a steak.
Ambient probes (or pit probes) usually have a blunt, rounded tip and often come with a small metal clip to attach to the grill grate.
Meat probes are designed to read the temperature at the very tip. Ambient probes are calibrated to measure the air temperature surrounding the food. While they might look similar, their response times and housing are built for different tasks.
If you need to monitor your smoker’s temperature, make sure the replacement you buy is specifically labeled as an ambient or “pit” probe to get the most accurate air-flow readings.
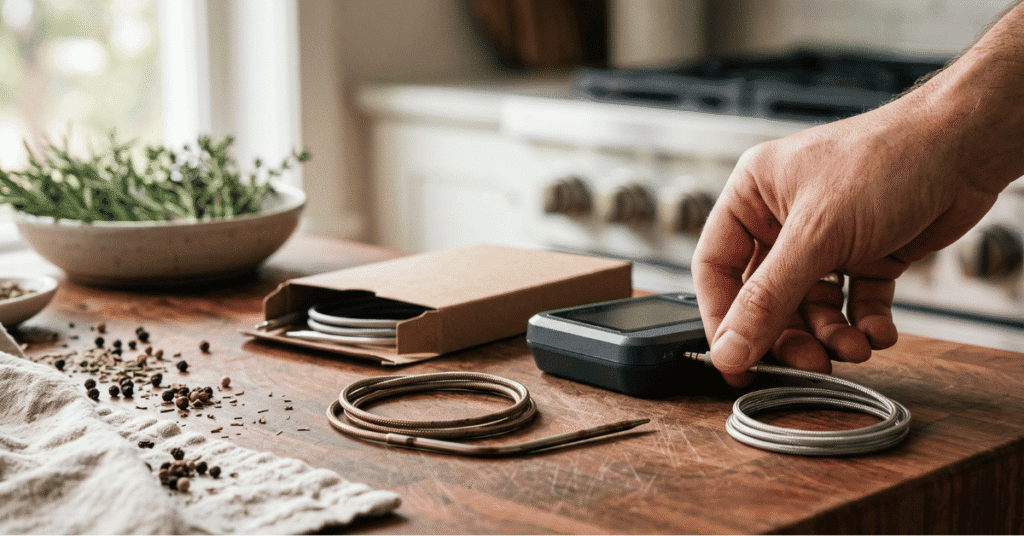
How to perform the replacement and calibrate
Replacing the part itself is the easiest step, but verifying that it works is the most critical. You don’t want to trust a fresh-out-of-the-box probe with an expensive prime rib without checking it first. Manufacturers sometimes have “duds” in their batches, and shipping can be hard on delicate sensors.
- Power down the unit: Turn off your transmitter and receiver.
- Remove the old probe: Grasp the plastic or rubber housing of the plug (not the wire) and pull it straight out of the port.
- Inspect the port: Look inside the hole on the base unit for any debris, corrosion, or moisture. If it’s dirty, a quick blast of compressed air or a dry cotton swab can clear it out.
- Plug in the new probe: Push the new jack firmly into the port. You should feel a distinct click or feel it seat fully. If there is a gap between the plug and the unit, it isn’t in all the way.
- Turn it on: Power the unit back up. It should immediately display the current room temperature.
Once the new probe is connected, perform an ice bath test by fills a glass with crushed ice and adding just enough water to fill the gaps. Stir it for a minute, then insert the probe tip into the center of the ice. It should read within 1 to 2 degrees of 32°F (0°C).
If it’s significantly off, check your connection or see if your base unit has a “Cal” (calibration) button to fine-tune the offset.
Dealing with specialty and wireless probes
Not all replacements are as simple as a plug-and-play wire. Some of the newer technology on the market involves truly wireless probes that house the battery and Bluetooth transmitter inside the probe handle itself. If one of these fails, you usually have to replace the entire stick, as the internal batteries and electronics are hermetically sealed to withstand high temperatures.
For these wireless versions, the “replacement” process involves unpairing the old, broken probe from your smartphone app and pairing the new serial number. Because these don’t have wires, they are prone to different issues, such as internal sensor degradation from being left in a “hot spot” on the grill where the temp exceeded the safety limit (usually around 527°F for the ceramic handle). If your wireless probe won’t charge or connect, it’s likely time for a swap.
Common pitfalls during probe replacement
The most frequent mistake people make is buying a “universal” probe that isn’t actually universal. While the plug might fit, the temperature curve inside the thermometer might be different. One brand might read a specific resistance as 150°F, while another brand sees that same resistance as 165°F.
This 15-degree difference is enough to ruin a meal.
- Forcing the plug: If the jack doesn’t slide in easily, you likely have the wrong size (2.5mm vs 3.5mm). Forcing it can snap the internal soldering on the motherboard of your thermometer.
- Ignoring the O-ring: High-end waterproof probes often have a tiny rubber O-ring on the plug. If your new probe comes with one, make sure it stays seated; otherwise, steam from your grill could enter the transmitter and fry the electronics.
- Twisting the wire: When you get a new probe, it often comes tightly coiled with a zip tie. Don’t pull it straight out. Carefully unroll it. Kinking the wire right out of the box can cause micro-fractures in the internal copper, leading to a “no probe” error message.
- Submerging the new wire: Even if the package says “waterproof,” treat the wire-to-probe junction as a weak point. When testing your new replacement in an ice bath or cleaning it after the first use, never dunk the entire cable. Wipe the stainless steel part with a soapy cloth and keep the wire dry.
Summary of Probe Types and Jack Sizes
| Feature | Standard Thermistor | K-Type Thermocouple | Truly Wireless |
|---|---|---|---|
| Typical Plug | 2.5mm or 3.5mm jack | Two-prong flat plug | No plug (Bluetooth) |
| Common Use | Backyard BBQ / Roasts | Professional / Fast read | Rotisserie / Deep frying |
| Durability | Moderate (hates water) | High (industrial) | Sensitive to high ambient heat |
| Cost | Low ($10 – $20) | Medium ($20 – $40) | High ($80+) |
Frequently asked questions
Can I use a probe from a different brand if the plug fits?
It’s risky. Even if the plug fits, the base unit is calibrated to a specific resistance-to-temperature scale. Unless the manufacturer explicitly states they use a standard 10k or 100k ohm thermistor that matches your unit, you might get dangerously inaccurate readings.
It’s always best to stick with parts made for your specific model.
Why does my new probe read “HHH” right out of the box?
This usually means there is a short circuit. Check the plug to ensure it is pushed all the way into the transmitter. If it is fully seated and still shows an error, the probe may have been damaged during shipping, or there could be a fault in the transmitter port itself.
Try a different port on your unit to see if the problem follows the probe.
Is it possible to repair a probe wire instead of replacing it?
Generally, no. The wires are shielded with stainless steel mesh and insulated with high-heat materials like Teflon or fiberglass. Trying to solder these back together usually changes the electrical resistance, which makes the temperature readings inaccurate.
Given the low cost of a replacement, a repair isn’t worth the risk of food poisoning or a ruined dinner.
How many times can I replace a probe before the base unit fails?
The base unit (the transmitter) usually lasts for many years because it stays outside the high-heat zone. The ports are rated for thousands of plug-in cycles. As long as you keep the transmitter dry and the batteries haven’t leaked and corroded the contacts, you can replace the probes as many times as needed.
Worth remembering
Keeping your thermometer in top shape is the difference between a perfect medium-rare steak and an overcooked piece of leather. Probes are essentially the “tires” of your grill setup, they wear out with use and eventually need a change. By matching the right plug size and verified sensor type, you can extend the life of your digital thermometer for years.
Before you head out to the grill, take those few extra minutes to test your new probe in ice water. That small step provides the peace of mind that your gear is actually telling you the truth. If you find yourself replacing probes every few months, take a look at how you’re cleaning and storing them; keeping them out of the sink and avoiding tight kinks in the wire will save you a lot of money in the long run.


2 thoughts on “Guide to Meat Thermometer Probe Replacement 2026”