You should clean your air fryer after every single use. A quick wash of the basket and tray prevents grease from baking onto the nonstick coating during the next cook. How often you clean an air fryer beyond that basic wipe-down depends entirely on what you cook and how often you run it.
A deeper scrub of the heating element and interior walls is needed every few weeks for daily users, or every couple of months if you only pull the appliance out a few times a week. Knowing exactly how often should you clean an air fryer keeps the machine running safely, stops old food flavors from transferring to fresh meals, and protects the nonstick surfaces from peeling early. This guide breaks down the daily routine, the deep cleaning schedule, and the specific warning signs that mean your machine needs attention right now.
Why Grease Buildup Changes Everything About Your Air Fryer
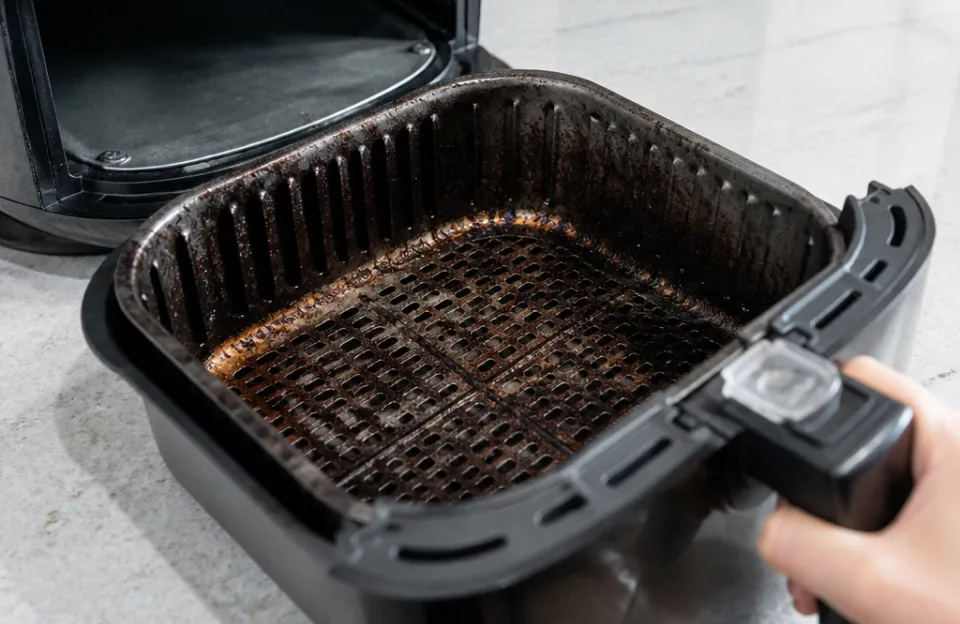
Air fryers work by pushing extremely hot air around food at high speed. That rapid circulation is what gives you crispy edges without submerging food in oil. The trade-off is that tiny droplets of fat and moisture get blown directly onto the heating coil, the fan blades, and the interior walls.
Over time, those droplets polymerize. They turn into a sticky, hard layer of baked-on carbon.
Once that carbon layer forms, the machine has to work harder to reach temperature. The fan pushes air through a narrower space. The heating element radiates heat unevenly because it's insulated by grime.
You might notice your food taking longer to brown, or you might smell something acrid when you first turn the unit on. That smell is old grease burning off before your food even starts cooking.
Food safety is the other major factor. According to the FDA's food safety guidelines, bacteria thrive in warm environments where food residue collects. An unwashed air fryer basket sitting on the counter between uses is a breeding ground.
Even though the high cooking temperatures kill active bacteria, the leftover residue can still harbor pathogens or cause cross-contamination if you switch from cooking raw chicken to roasting vegetables without washing the basket first.
The difference between a quick rinse and a real wash
Rinsing the basket under warm water while it's still slightly warm from cooking removes loose crumbs. It doesn't remove the invisible film of aerosolized fat. A real wash involves hot water, dish soap, and a soft sponge.
If you only rinse, that fat film bakes harder during the next cycle. Within a week of daily rinsing instead of washing, you'll start seeing dark spots on the bottom of the basket that won't scrub away easily.
How cooking fatty foods accelerates the timeline
If you mostly cook frozen french fries or roasted vegetables, your air fryer stays relatively clean. The moment you start cooking bacon, chicken wings, or sausages, the math changes. Rendering fat splatters aggressively inside the chamber.
When I'm testing timing for things like getting sausage perfectly browned, the amount of grease left behind is substantial. Cooking high-fat proteins means you need to wash the basket immediately after it cools, rather than letting it sit until the next day.
The Daily Routine: Washing the Basket and Tray After Every Use
The removable parts are the only things you should wash after every single session. This includes the perforated basket, the solid drip tray beneath it, and any racks or dividers your specific model uses. Never put these parts in the dishwasher unless the manufacturer's manual explicitly states they are dishwasher safe.
The harsh detergents and prolonged heat in a dishwasher degrade nonstick coatings much faster than hand washing does.
Wait until the basket and tray are cool enough to handle safely. Plunging a hot nonstick pan into cold water causes thermal shock. The metal expands and contracts rapidly, which can warp the base or cause the nonstick coating to flake off in sheets.
Once cool, fill your sink with hot water and a few drops of standard dish soap. Let the parts soak for five to ten minutes if there is stuck-on food.
Use a soft sponge, a microfiber cloth, or a nylon-bristle brush to wipe the surfaces clean. Never use steel wool, abrasive scouring pads, or stiff wire brushes. Those materials scratch the coating instantly.
Once scratched, food sticks to those grooves permanently, and the exposed metal underneath begins to rust. Rinse thoroughly with warm water and dry completely with a towel before putting the parts back into the machine. Storing a wet basket inside the closed chamber traps moisture and promotes mold growth.
For stubborn bits of breading or melted cheese, don't scrape them with a metal spatula. Fill the basket with hot soapy water and let it sit for twenty minutes. The water softens the starches and fats, allowing them to wipe away with minimal pressure.
How Often Should You Clean an Air Fryer Heating Element
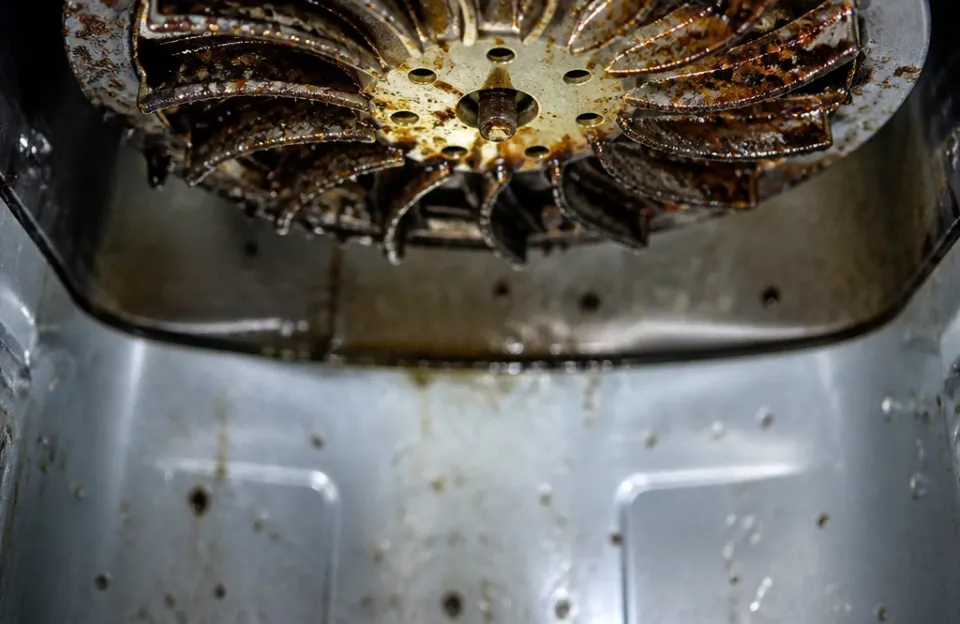
The heating element sits at the top of the cooking chamber, usually hidden behind a metal guard or exposed directly above the food. Because hot air rises and the fan blows grease upward, this component gets coated faster than people expect. You should inspect the heating element once a month if you use the air fryer three or more times a week.
If you use it daily, check it every two weeks.
Unplug the machine and let it cool completely before looking inside. Turn the unit upside down or tilt it back so you have a clear view of the top interior. You're looking for dark brown or black spots on the metal coil.
A light golden tint is normal oxidation. Thick, crusty black patches mean grease has carbonized.
To clean the element, dampen a soft cloth or a soft-bristled brush (like an old toothbrush) with warm water and a tiny drop of dish soap. Gently wipe the coil. Do not apply heavy pressure, as the element is fragile and can bend or snap.
Wipe away the soap residue with a separate damp cloth. Leave the basket out and let the interior air dry completely before plugging it back in.
Ignoring the heating element is one of the most common reasons air fryers start smoking during preheating. That smoke is literally burning grease. Beyond being unpleasant, accumulated grease near electrical components presents a fire hazard.
Regular inspection takes less than two minutes and prevents expensive repairs or replacements.
Deep Cleaning the Interior Walls and Fan Area
While the basket gets washed daily and the element gets wiped monthly, the interior walls and the area around the fan need a thorough deep clean every three to six months. This timeline assumes average home use. If you frequently cook battered foods or items coated in flour, you might need to do this every two months.
Flour dust gets pulled into the fan intake and coats the back wall in a paste-like layer when mixed with humidity.
Start by unplugging the cooled machine. Remove the basket and tray. Take a damp microfiber cloth and wipe down the entire inside of the cooking chamber.
Pay special attention to the corners and the seam where the bottom meets the walls. Grease pools in these crevices. For tougher buildup on the walls, make a paste of baking soda and water.
Apply it to the greasy spots, let it sit for fifteen minutes, then wipe it away with a damp cloth. Baking soda acts as a mild abrasive that cuts through fat without scratching the metal or painted interior.
Avoid spraying liquid cleaners directly into the chamber. Liquids can seep through the seams into the electronics housed in the outer shell, causing short circuits. Always apply your cleaner to the cloth first, then wipe the machine.
The exterior needs attention too. Wipe the outside casing with a damp cloth weekly to remove kitchen dust and fingerprints. If your model has a digital touchscreen, use a dry microfiber cloth to prevent streaking.
Keep the air intake vents on the back or sides clear of obstructions. Pushing the air fryer flush against a backsplash blocks airflow, causing the internal fan to overwork and the motor to overheat.
Signs Your Machine Needs Attention Sooner Than Planned
Schedules are helpful baselines, but your air fryer will tell you when it needs cleaning regardless of the calendar. Recognizing these signals prevents permanent damage to the appliance and keeps your food tasting right.
| Warning Sign | What It Means | Required Action |
|---|---|---|
| White or blue smoke during preheat | Carbonized grease burning on the heating element | Unplug, cool, and scrub the top coil immediately |
| Food tastes bitter or metallic | Old oil residue transferring flavor to new meals | Deep clean the basket, tray, and interior walls |
| Uneven browning on one side | Blocked airflow from debris near the fan or walls | Inspect the fan area and wipe the interior chamber |
| Longer cooking times than usual | Insulation from grease buildup slowing heat transfer | Thoroughly degrease the heating element and walls |
| Rattling or grinding noises | Debris caught in the fan blades or loose grease chunks | Unplug, invert carefully, and remove trapped particles |
If you see smoke, turn the machine off immediately. Don't just open the window and wait for it to pass. Smoke means grease is actively burning near an electrical heating source.
Wait for it to cool, unplug it, and perform a deep clean before using it again.
Another subtle sign is stickiness. If your nonstick basket suddenly requires significantly more effort to release food, the coating might be degrading due to harsh cleaning methods, or it might be covered in a microscopic layer of polymerized oil. Try soaking it in hot water with a half-cup of white vinegar for thirty minutes.
The acid helps break down mineral deposits and light grease films. If it's still sticky after that, the nonstick coating itself may be failing, which is a different issue related to lifespan rather than cleaning frequency.
Adjusting the Schedule Based on What You Cook
Not all air frying sessions create the same mess. Understanding how different foods behave inside the chamber lets you adjust your cleaning frequency intelligently rather than blindly following a rigid rule.
High-fat proteins. Bacon, pork belly, skin-on chicken thighs, and sausages render massive amounts of liquid fat. That fat splatters violently under the high-speed fan. After cooking these items, you must wash the basket and tray immediately once cool.
Wipe the interior walls with a paper towel to catch the fine mist of grease before it hardens. Skipping this step guarantees a smoky mess the next time you turn the dial. Finding the right timing for crispy chicken drumsticks always leaves a noticeable grease ring around the basket rim.
Flour-dusted or breaded items. Whether you're making homemade onion rings or tossing wings in seasoned starch, airborne flour is inevitable. The fan pulls these fine particles upward, where they stick to the heating element and the ceiling of the chamber. If you bread foods frequently, increase your heating element inspection from monthly to bi-weekly.
Using a wet batter or a heavy flour dredge requires wiping down the interior walls after every single use. Checking guides for coating wings with flour properly shows how much excess powder inevitably falls through the grate.
Vegetables and lean proteins. Roasting broccoli, zucchini, or lean chicken breasts generates very little splatter. The moisture evaporates cleanly. If this makes up the bulk of your cooking, you can comfortably stretch your deep cleaning schedule to every four to six months, provided you still wash the basket daily.
Timing how long to roast zucchini slices proves that lighter produce leaves almost zero residue behind.
Frozen convenience foods. Pre-packaged frozen fries, nuggets, and tater tots are flash-fried at the factory. They contain their own oils that release during reheating. While they don't splatter like raw bacon, they leave a fine oily film on the basket over time.
Wash the basket after every use, but you likely won't need to deep clean the interior walls as often as someone cooking raw, fatty meats. Getting the exact timing for frozen potato wedges means dealing with that starchy, oily dust settling on the tray.
Mistakes That Ruin the Nonstick Coating
Knowing how often should you clean an air fryer matters less if you're using the wrong tools when you do it. The nonstick coating on the basket and tray is the most vulnerable part of the entire appliance. Once it's gone, food bonds permanently to the metal, and the basket becomes nearly impossible to clean.
Never use aerosol nonstick cooking sprays directly in the basket. These commercial sprays contain propellants and emulsifiers (like soy lecithin) that bake into a gummy, rock-hard residue at air fryer temperatures. This residue bonds to the nonstick coating and requires aggressive scraping to remove, which destroys the surface.
If you need oil, pour a small amount of liquid oil into a pump spray bottle, or toss your food in oil in a separate bowl before placing it in the basket. Pairing cooked wings with a good dipping sauce is great, but getting sugary glazes baked onto the basket ruins the finish fast.
Avoid stacking heavy pots or pans on top of the air fryer basket when storing it inside the drawer or cabinet. The weight compresses the metal mesh and chips the coating against the solid tray below. Store the basket inside the machine with the tray properly seated to protect both surfaces.
Don't use bleach or oven cleaner on any part of the air fryer. These harsh chemicals eat through the nonstick polymers and can leave toxic residues that vaporize when heated. Stick to dish soap, baking soda, and white vinegar.
If you ever wonder about the actual nutritional impact of your meals, keeping chemical cleaners far away from your cooking surfaces is the first step.
Frequently asked questions
Can I put my air fryer basket in the dishwasher?
Most manufacturers advise against it, even if the box claims the parts are dishwasher safe. The high heat and caustic detergents used in dishwashers break down nonstick coatings much faster than hand washing. To keep your basket slick and functional for years, wash it by hand in the sink with warm soapy water and a soft sponge.
Is it safe to leave the air fryer dirty overnight?
Leaving grease and food particles in the basket overnight allows bacteria to multiply, especially if the food was raw meat. The grease also hardens as it cools, making it significantly harder to scrub off the next morning. Wash the removable parts as soon as they are cool enough to touch safely.
Why does my air fryer smell like burning plastic?
A faint smell during the very first use is normal as factory coatings burn off. If the smell happens later, it usually means grease has accumulated on the heating element or fan housing and is burning. Unplug the machine, let it cool completely, and thoroughly wipe down the top interior and the heating coil with a damp cloth.
Do I need to clean the air fryer if I only use parchment paper liners?
Parchment liners catch a lot of drips, but they don't seal the basket. Fine grease mist still circulates through the air and coats the walls and heating element. You still need to wipe down the interior periodically and wash the basket, even if you use liners for every meal.
How do I get burnt sugar off the air fryer tray?
Burnt sugar or marinade requires soaking. Fill the tray with very hot water and a generous squirt of dish soap. Let it sit for at least thirty minutes to soften the caramelized sugars.
Use a nylon scraper or a wooden spoon edge to gently lift the softened residue. Never use metal utensils to chip away burnt sugar, as you will gouge the nonstick surface underneath.
Keeping your machine running safely
Sticking to a consistent cleaning rhythm takes very little time compared to replacing a ruined appliance. Wash the basket and tray after every use, check the heating element once a month, and deep clean the interior walls every few months based on how fatty your meals are. Pay attention to smoke, smells, and sticking food.
Those are your earliest warnings. Treat the nonstick coating gently, skip the aerosol sprays, and your air fryer will keep circulating hot air efficiently for years.


1 thought on “How Often Should You Clean an Air Fryer? Expert Guide”