Cleaning an air fryer fan takes about 20 to 30 minutes and requires only basic household supplies. The job involves unplugging the appliance, flipping it over to access the underside, wiping away grease from the exposed blades, and drying everything completely before plugging it back in. You don't need special tools or technical skills.
If you cook greasy foods often, like when you crisp up chicken wings or fry thick bacon strips, oil splatters travel upward with the hot air. That vaporized grease settles on the fan blades near the heating element. Over time, the buildup slows the motor down, causes rattling noises, and can even produce smoke during cooking.
Learning how to clean an air fryer fan prevents these problems and keeps your food tasting fresh instead of burnt.
Why Grease Collects on the Fan Blades
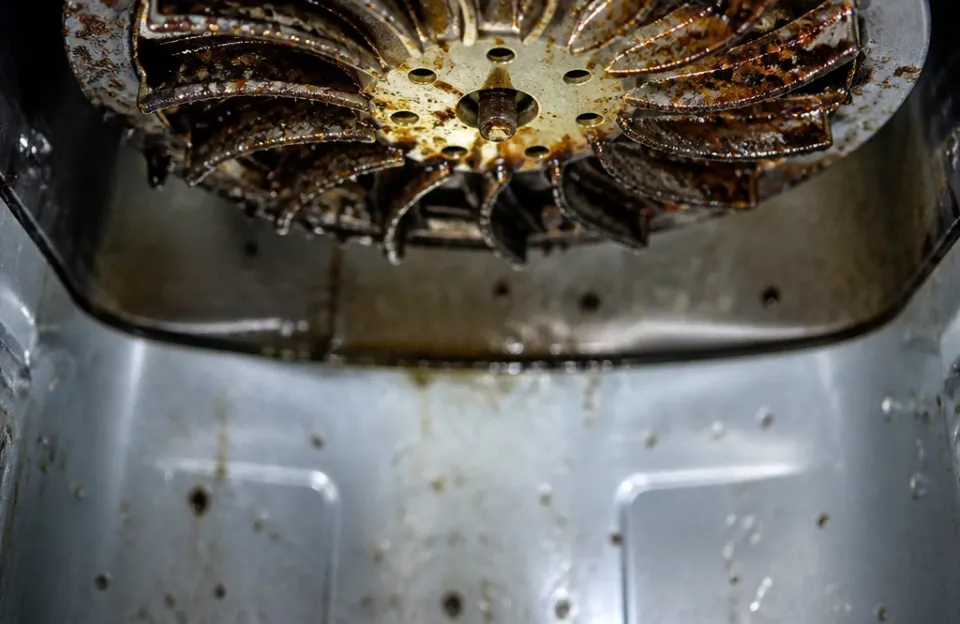
The fan inside an air fryer sits directly above the heating coil. It spins rapidly to push hot air down around the food in the basket. This constant circulation is what gives you that deep-fried crunch without submerging anything in oil.
But moving air also moves grease.
When fat renders off meat or drips from coated vegetables, tiny droplets become airborne. The fan pulls them up. As the appliance cools after cooking, those droplets solidify on the metal blades.
A thin film might not cause issues right away. After several weeks of heavy use, though, the layers stack up. Thick grease throws off the balance of the spinning blades.
An unbalanced fan vibrates, makes noise, and puts extra strain on the small electric motor driving it.
Ignoring this buildup affects more than just the machine's lifespan. Old, baked-on oil turns rancid. The next time you turn the unit on, that stale smell blows directly onto your dinner.
If you've ever wondered why a batch of reheated leftovers tasted slightly off, a dirty fan might be the culprit. Knowing how to clean an air fryer fan removes that old residue before it ruins your meals.
Supplies for Reaching the Upper Heating Area
You don't need expensive specialty cleaners for this task. Most of what works best is already in your kitchen cabinets. Avoid harsh chemical degreasers, as their fumes linger in enclosed appliances and transfer to food later.
- Soft microfiber cloths. These grab grease without scratching the metal or the non-stick coating found on some internal parts.
- Cotton swabs. Standard Q-tips reach the tight gaps between the fan blades and the central hub where a cloth won't fit.
- A soft-bristled brush. An old, clean toothbrush works perfectly for loosening dried, sticky spots.
- Dish soap. A few drops of standard liquid dish soap mixed into warm water cuts through cooking oils safely.
- Baking soda. For stubborn, baked-on grease, a paste made from baking soda and water provides gentle abrasion.
- White vinegar. Useful for a final wipe-down to cut any remaining soapy film.
- A Phillips-head screwdriver. Only needed if your specific model requires removing a bottom cover plate to expose the fan. Check your owner's manual first.
Keep a dry towel nearby too. Moisture and electrical components don't mix, so having something ready to dry the area immediately after cleaning matters.
Getting Inside Your Specific Model Safely
Before touching any part of the interior mechanism, unplug the machine from the wall outlet. Never rely solely on the power button. Wait at least 30 minutes after your last cooking session to let the heating coil and surrounding metal cool completely.
Touching a hot element causes severe burns.
Once the unit is cool, pull out the cooking basket and the crisper plate. Set them aside in the sink. Look up into the empty cavity.
In most standard basket-style models, the fan and heating element are visible right there at the top. If yours has a protective mesh screen covering them, check whether it clips in or screws down. Some screens pop off with gentle pressure from a flathead screwdriver wedged under the edge.
Others require removing two or three small screws.
For oven-style air fryers, the fan is usually mounted on the back wall behind a perforated panel. You may need to unscrew that rear panel to reach the blades. Always consult the manufacturer's instructions for your exact model.
Disassembling parts that aren't meant to come apart voids warranties and risks damaging wiring. If you regularly cook large batches, like when you prepare salmon fillets or roast whole potatoes, grease accumulates faster, making safe access to these upper areas a frequent necessity.
Wiping Away Baked-On Oil From the Air Fryer Fan
This is the core task. With the fan exposed, dampen a microfiber cloth in your warm, soapy water. Wring it out until it is barely moist.
You want enough moisture to dissolve the grease, but no dripping water that could run down into the motor housing.
Wipe each blade individually. Start at the center hub and stroke outward toward the tip. Turning the fan gently by hand as you go lets you reach every angle.
Don't force it to spin fast. Slow, deliberate movement keeps your fingers clear and prevents bending a blade.
For spots where the grease feels hard or tacky, dip your soft-bristled brush into the soapy water and scrub lightly. The bristles work the soap into the crevices. Use cotton swabs dipped in the same solution to trace the edges where the blades meet the central mount.
Grease loves to pool in those corners.
Rinse your cloth frequently in clean water. Wiping with a dirty cloth just smears the oil around rather than lifting it away. Once the visible grime is gone, take a second cloth dampened only with plain water and wipe the blades again to remove soap residue.
Tackling Stubborn Residue With a Baking Soda Paste
Sometimes soapy water isn't enough. If you haven't cleaned the fan in months, or if you frequently cook heavily battered items using flour coatings or baking soda rubs, the grease bakes into a hard, dark crust.
Mix two tablespoons of baking soda with just enough water to form a thick paste. Apply it directly to the worst spots on the blades using your finger or a cotton swab. Let it sit for 10 to 15 minutes.
The alkaline nature of baking soda breaks down the polymerized fats without needing harsh chemicals.
After the waiting period, use your damp toothbrush to gently scrub the paste into the hardened grease. It should start flaking off or dissolving into a brown sludge. Wipe it away with a damp cloth.
Repeat the application on any spots that remain stuck.
Once the heavy buildup is cleared, do a final pass over the entire fan assembly with a cloth lightly misted with white vinegar. The vinegar neutralizes the baking soda, lifts any lingering soap film, and leaves the metal clean. Follow up immediately with a dry cloth.
Drying the Motor Area Before Plugging Back In
Water left on or near the fan motor causes rust, short circuits, or complete failure. Rushing this step undoes all your careful cleaning.
After your final wipe-down, leave the appliance open and upside down (if you flipped it to access the fan) or propped open for at least two hours. Air circulation dries the hidden crevices better than a towel can. Pointing a standard room fan at the opening speeds this up significantly.
Do not use a hair dryer on a hot setting. Forced heat can warp plastic components or damage thermal sensors located near the heating element. Room-temperature airflow is safest.
Before reassembling any covers or screens you removed, visually inspect the area. Look for any remaining moisture pooling in corners. Run a dry cotton swab along the base of the fan blades one last time.
If the swab comes away bone dry, the unit is ready to be put back together. Screw any panels back into place firmly, but don't overtighten small screws into plastic housings, as they strip easily.
| Cleaning Method | Best Used For | Time Required | Risk Level |
|---|---|---|---|
| Damp soapy cloth | Light, recent grease buildup | 10 to 15 minutes | Low |
| Baking soda paste | Hardened, baked-on crusts | 25 to 35 minutes | Low |
| Vinegar wipe | Removing soap residue and odors | 5 minutes | Very low |
| Compressed air | Loose dust and crumbs only | 2 minutes | Medium |
Compressed air appears on this list because people often ask about it. Canned air blows loose debris around, but it doesn't dissolve grease. Worse, the propellant can leave a chemical residue on the heating element, and the forceful blast can bend thin fan blades or push moisture deeper into the motor.
Stick to manual wiping for actual grease removal.
Signs Your Fan Needs Attention Sooner Than Expected
Most manuals suggest general maintenance every few weeks, but the fan specifically needs cleaning based on what you cook, not just how often you cook. Heavy grease producers demand more frequent checks.
Listen to your machine. A healthy air fryer fan produces a steady, smooth hum. If you hear a rhythmic clicking, a high-pitched whine, or a wobbling vibration, grease has likely built up unevenly on the blades, throwing off the balance.
Stop using it immediately and clean the fan. Running an unbalanced fan damages the motor bearings permanently.
Smell is another indicator. If you notice a faint burning odor or a smell like old frying oil when you first turn the unit on, the fan blades are coated. The initial heat warms that old grease before the exhaust clears it out, blowing the scent directly into your kitchen.
Pay attention to cooking performance too. If food takes longer to crisp than it used to, or if the top of your meal browns unevenly while the bottom stays soggy, the fan might be struggling to push air efficiently through a layer of grime. If you're trying to get perfectly timed drumettes or evenly cooked sausages, restricted airflow ruins the result.
What Happens If You Skip Cleaning the Fan Entirely
Neglecting the upper heating area leads to compounding problems. The immediate effect is reduced efficiency. A grease-coated fan blade has altered aerodynamics.
It pushes less air per rotation. The heating element then runs hotter than intended because the cooling airflow is restricted, which triggers the thermal cutoff switch prematurely or, worse, fails to trigger it at all.
Long-term neglect creates a fire hazard. While modern air fryers have multiple safety mechanisms, accumulated grease sitting millimeters away from a heating coil that reaches 400°F is a risk. The grease can eventually smoke, ignite, or melt onto the element, creating a mess that destroys the appliance.
There's also the hygiene factor. Stagnant grease attracts pests and breeds bacteria. When you cook something simple, like warming leftover pizza, you expect a clean environment.
A filthy fan circulates contaminated air over everything in the basket.
Handling Different Appliance Designs
Not every air fryer looks the same inside, and knowing how to clean an air fryer fan depends heavily on your specific design.
Basket-style units with exposed top elements. These are the most common. The fan faces downward into the cooking chamber. Gravity works against you here, as grease drips down from the fan onto the element below.
Cleaning requires tilting the unit carefully or working from underneath with a flashlight to see the blade angles clearly.
Oven-style units with rear fans. These resemble miniature toaster ovens. The fan is vertical on the back wall, usually behind a metal grate. Access is generally easier because you open the front door and unscrew the back panel.
However, the fan blades are often smaller and more numerous, requiring more patience with cotton swabs.
Dual-basket models. Each basket typically has its own independent fan and heating element. You must repeat the entire cleaning process for both sides. Don't assume the side you use less frequently is clean; ambient heat and shared exhaust paths still deposit grease everywhere.
If you own a premium multi-function model, like a versatile glass unit or a larger capacity machine, the internal layout might include additional shrouds or ductwork directing the air. Remove only what the manual explicitly permits. Forcing plastic clips designed to stay sealed will break the airflow path and ruin the cooking performance.
Frequently asked questions
Can I spray degreaser directly onto the fan?
No. Aerosol sprays introduce liquid directly into the motor housing and electrical connections. Even "safe" kitchen degreasers leave chemical residues that vaporize when heated, contaminating your food.
Always apply your cleaning solution to a cloth or brush first, then transfer it to the blades manually.
How often should I clean the air fryer fan?
For average home use involving mixed foods, checking and wiping the fan once a month is sufficient. If you cook high-fat items like bacon, skin-on poultry, or heavily oiled vegetables several times a week, inspect and clean the blades every two weeks. Visible grease accumulation is your best indicator.
Will taking the bottom cover off void my warranty?
It depends entirely on the manufacturer. Some brands design their units with removable bottom plates specifically for user maintenance. Others seal the motor compartment and state clearly in the manual that opening it voids the warranty.
Always read your specific warranty terms. If the fan is only accessible by breaking a factory seal, contact the manufacturer for authorized service instead of doing it yourself.
My fan makes a loud rattling noise even after cleaning. What now?
If you've thoroughly removed all grease and the rattling persists, the issue is likely mechanical rather than cosmetic. The motor bearings may be worn out, a blade might be physically bent, or a mounting screw has shaken loose. Continued use risks further damage or electrical failure.
At this point, the appliance needs professional repair or replacement.
Is it safe to use steam to loosen the grease?
Introducing steam into the upper cavity is highly risky. Steam penetrates much deeper than a damp cloth, easily reaching the motor windings and circuit boards. While it effectively melts grease, the likelihood of causing an electrical short or permanent water damage outweighs the convenience.
Stick to targeted application of warm soapy water or baking soda paste.
Keeping the Airflow Clear Long Term
Maintaining a clean fan is easier than restoring a neglected one. Wiping the interior ceiling of the cooking chamber after greasy meals prevents excess vapor from reaching the blades in the first place. Leaving the basket out for a few minutes after cooking allows residual heat to burn off minor splatters rather than letting them cool and stick.
Understanding how to clean an air fryer fan is a basic ownership skill. It protects your investment, keeps your kitchen smelling neutral, and guarantees the rapid air circulation that makes the appliance useful. Twenty minutes of careful wiping with a damp cloth and a cotton swab saves you from buying a replacement unit six months early.
Keep your supplies handy, listen to the motor, and address buildup before it hardens into a problem.