Air fryer tilapia cooks in 8 to 10 minutes at 400°F and produces a crispy exterior with a moist, flaky interior. This method uses rapid air circulation to mimic frying without submerging the fish in oil, making it significantly faster than baking and less messy than pan-searing. You can cook fresh or frozen fillets, though fresh yields the best texture for breading applications.
The key to success lies in moisture management and temperature verification. Tilapia is lean and mild, which means it dries out quickly if overcooked but also lacks the fat content that protects thicker cuts like salmon. Using an instant-read thermometer removes the guesswork entirely.
The FDA recommends cooking finfish to an internal temperature of 145°F, measured at the thickest part of the fillet. Hitting this mark precisely ensures safety without sacrificing texture.
Why Rapid Air Circulation Works Better for Lean White Fish
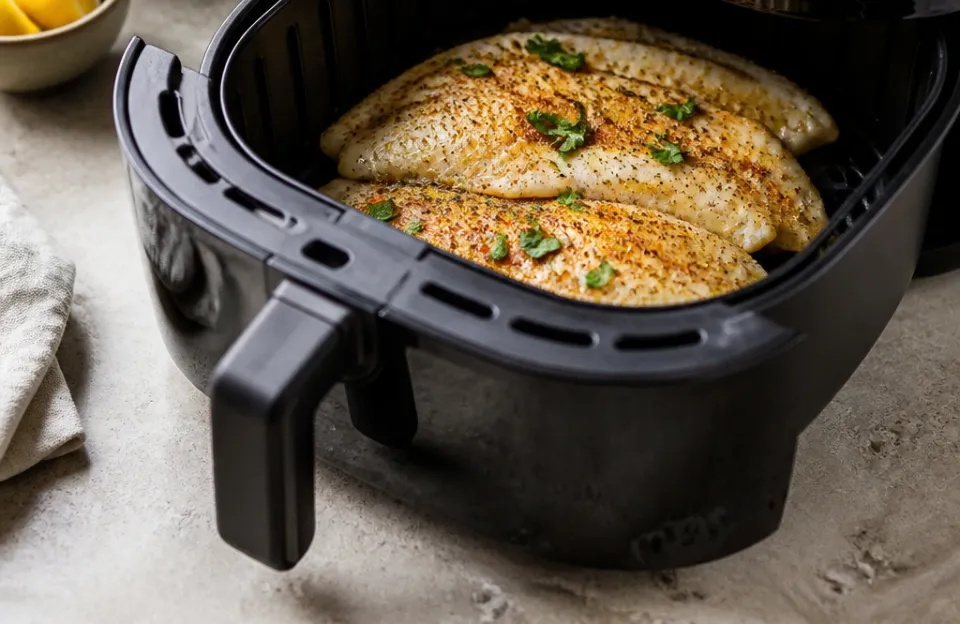
Tilapia presents a specific challenge because its low fat content offers little margin for error. Traditional oven baking often exposes the fish to prolonged heat as the appliance struggles to maintain consistent airflow around a wet protein. The result is frequently rubbery or dry flesh.
An air fryer solves this by forcing superheated air directly across the surface of the fillet. This creates a Maillard reaction on the outside while the interior steams gently in its own moisture.
The compact cooking chamber also matters. Heat recovery happens almost instantly when you open the basket, unlike a conventional oven that loses significant thermal energy. This speed is what preserves the delicate structure of white fish.
You get browning without the extended exposure that breaks down muscle fibers into a mealy consistency. For anyone who has struggled with bland or tough baked tilapia, the mechanical difference in heat transfer explains why the results diverge so sharply.
Managing Moisture Before Cooking Starts
Surface water is the enemy of crispness. Tilapia fillets often arrive vacuum-sealed with added liquid or sit in ice melt at the grocery store. Patting them dry with paper towels takes thirty seconds but changes the outcome completely.
A wet surface steams instead of searing, preventing any seasoning or coating from adhering properly.
This step applies even if you plan to use a wet batter. Removing excess surface moisture allows your binding agent to grip the fish rather than slide off during cooking. Think of it as prep work that pays dividends in every bite.
Skipping it guarantees a soggy finish regardless of how hot your machine runs.
Essential Tools and Ingredients for Perfect Texture
You do not need specialized equipment beyond the air fryer itself, but a few items make the process reliable. Non-stick spray or parchment liners prevent sticking, which is the most common failure point with delicate proteins. Tongs with silicone tips help flip fillets without tearing them apart mid-cook.
For monitoring doneness, a fast digital probe eliminates variance between machines. Models like the Thermomaven 1 Sec Professional Digital Meat Thermometer give readings before heat escapes the basket. Waiting ten seconds for a slower thermometer lets the residual heat continue cooking the fish, potentially pushing it past 145°F.
Speed matters when working with thin fillets where five degrees separates perfect from dry.
| Tool | Purpose | Why It Matters for Tilapia |
|---|---|---|
| Instant-read thermometer | Verify 145°F internal temp | Prevents overcooking lean flesh |
| Silicone-tipped tongs | Flip without tearing | Preserves structural integrity |
| Parchment liner | Prevent sticking | Avoids lost crust and mess |
| Paper towels | Remove surface moisture | Enables crisping and adhesion |
| Oil spray bottle | Even fat distribution | Promotes uniform browning |
Seasoning choices should complement rather than mask the mild flavor. Lemon pepper, smoked paprika, garlic powder, and dried herbs all work well. Salt draws out moisture, so apply it just before cooking rather than during prep.
If using a wet marinade, limit soak time to fifteen minutes maximum. Extended exposure to acid or salt begins to denature proteins, creating a mushy texture that no amount of high heat can fix. This principle applies broadly across seafood prep, similar to how you might approach an air fryer chicken wings marinade where timing prevents texture degradation.
Step-by-Step Method for Fresh Fillets
Preheat your air fryer to 400°F for three minutes. Cold baskets add unpredictable variables to cook time, especially with thin proteins that spend less than ten minutes under heat. While the unit warms, pat your fillets thoroughly dry and season both sides evenly.
Arrange fillets in a single layer with space between each piece. Overcrowding blocks airflow and creates steam pockets that prevent browning. Cook in batches if necessary rather than stacking.
Set the timer for eight minutes initially. Open the basket at the five-minute mark to flip each fillet gently. This ensures even color development on both surfaces.
Check temperature immediately after flipping. Insert the probe into the thickest section. If you read 130°F or higher, close the basket and check again in two-minute intervals.
Most standard fillets finish between eight and ten minutes total. Thicker portions may need twelve. Trust the number over the clock.
Visual cues like flaking are subjective and often indicate the fish is already past ideal doneness.
Adapting the Process for Frozen Fillets
Frozen tilapia requires adjustments to both time and technique. Do not attempt to bread frozen fish directly. The coating will separate as ice crystals melt, leaving you with bare spots and pooled liquid.
Instead, cook frozen fillets plain or with oil and spices only.
Increase cook time to twelve to fourteen minutes at 375°F. The lower temperature allows thawing and cooking to happen simultaneously without burning the exterior. Flip at the seven-minute mark.
Check temperature at ten minutes. Frozen fish releases more water during cooking, so expect some pooling in the basket bottom. Drain this liquid halfway through if possible to improve surface texture.
If you want breaded frozen tilapia, thaw it first in cold water for twenty minutes. Pat dry completely before proceeding with the fresh fillet method above. This extra step preserves the crunch factor that makes air frying worthwhile.
Rushing the thaw guarantees disappointment.
Achieving a Crispy Coating Without Deep Frying
Breaded air fryer tilapia delivers satisfying crunch with minimal oil. The secret is a proper dredging station and adequate fat on the surface. Dry flour alone will not brown in circulating air.
You must introduce fat either through egg wash, mayo, or direct oil spraying.
Set up three shallow dishes. First holds seasoned flour. Second contains beaten egg or mayonnaise thinned with water.
Third holds panko breadcrumbs mixed with grated parmesan or cornmeal for extra texture. Dredge each dry fillet in flour, shake off excess, dip in the wet mixture, then press firmly into crumbs. The pressing step is non-negotiable.
Loose crumbs fall off during cooking and burn on the basket floor.
Spray the coated fillets generously with oil before placing them in the preheated basket. Spray again after flipping. Panko needs direct fat contact to achieve golden color.
Without it, you get pale, dry breading that tastes raw. This technique mirrors what works for extra crispy chicken wings, where surface fat activation determines final texture quality.
Alternative Binders for Different Dietary Needs
Egg allergies or vegan preferences require substitution. Mayonnaise works surprisingly well as a binder and adds richness that egg lacks. Mustard provides tang and adhesion.
Greek yogurt offers protein and moisture. Each alternative behaves slightly differently, so test one fillet before committing to a full batch.
Gluten-free options include crushed rice cereal, almond flour, or chickpea flour. These brown faster than wheat-based crumbs, so reduce temperature to 375°F and monitor closely. Almond flour burns easily due to high fat content.
Chickpea flour holds up better but has a distinct bean flavor that pairs best with cumin and coriander seasoning profiles.
Common Problems and How to Fix Them Mid-Cook
Sticking happens when the basket isn't properly prepared or when fillets are moved too early. Let the fish cook undisturbed for at least four minutes before attempting to flip. Proteins naturally release from hot surfaces once they've formed a crust.
Forcing them loose tears the flesh. Prevention through parchment liners or adequate pre-spray is always easier than rescue.
Uneven cooking usually stems from inconsistent fillet thickness. Fold thinner tails under themselves to create uniform depth. Alternatively, remove smaller pieces earlier and let thicker ones continue.
Batch cooking by size prevents overdone edges alongside underdone centers. This sorting habit transfers well to other proteins, including when planning air fryer chicken wings meal prep where size variation affects timing.
Soggy breading indicates insufficient oil or overcrowding. Increase spray volume next time. Ensure fillets aren't touching.
If sogginess persists despite proper technique, your air fryer model may run cooler than stated. Use an oven thermometer to verify actual basket temperature matches the display. Calibration drift is common in older units.
Rubbery texture means overcooking. Lower your target pull temperature to 140°F and account for carryover heat. Rest the fish for two minutes before serving.
Residual heat will bring it to safe temperature without further protein tightening. This adjustment helps particularly with thinner fillets that cross the threshold in seconds.
Flavor Variations Beyond Basic Seasoning
Tilapia's neutrality makes it a canvas for global flavors. Mediterranean style uses oregano, lemon zest, capers, and olive oil. Serve with tzatziki and warm pita.
Asian-inspired versions benefit from ginger, soy sauce, sesame oil, and scallions. Finish with toasted sesame seeds and chili crisp.
Cajun preparation calls for blackening spice blends applied liberally before cooking. The high heat activates paprika and cayenne beautifully. Pair with remoulade and coleslaw.
Mexican street-style fish tacos use lime juice, chili powder, and cotija cheese. Cabbage slaw with crema completes the plate.
Marinades should be brief and oil-forward. Acid-heavy mixtures cure the surface rather than penetrate. Fifteen minutes maximum for citrus-based liquids.
Oil-based herb infusions can go longer since they don't alter protein structure. Reserve bold sauces for finishing rather than marinating. Drizzle chimichurri, salsa verde, or garlic butter after cooking to preserve fresh flavor notes.
This approach keeps the fish tasting clean while adding complexity at service.
Frequently Asked Questions
Can I cook multiple layers of tilapia at once?
Stacking fillets blocks airflow and creates uneven results. Always arrange in a single layer with visible gaps between pieces. If feeding a crowd, cook in sequential batches and keep finished fish warm in a 200°F oven.
The second batch will cook slightly faster since the basket retains heat.
How do I know if my tilapia is done without a thermometer?
Flake test reliability varies with fillet thickness and personal preference. Gently press the thickest part with a fork. Properly cooked fish yields easily and separates into clean flakes.
Opaque white color throughout indicates doneness. Translucent areas mean it needs more time. However, visual methods risk overcooking.
Investing in a reliable probe like the Awlkim Meat Thermometer Digital removes uncertainty entirely.
Why does my breaded tilapia taste dry despite correct temperature?
Insufficient surface fat causes dry breading even when the fish inside is moist. Panko and flour require oil to achieve proper texture. Spray coated fillets before AND after flipping.
Consider adding a tablespoon of melted butter or oil to your breadcrumb mixture for built-in richness. Lean fish needs external fat support that fattier species provide naturally.
Is air fried tilapia healthier than pan-fried?
Yes, typically. Air frying uses 70-80% less oil than shallow frying while achieving similar crispness. Calorie reduction depends on your coating and spray habits, but the method inherently reduces added fat.
Nutrient retention remains comparable since cook times are shorter than baking. For those tracking intake, this method aligns well with lighter preparations, much like choosing healthy chicken wing alternatives over traditional deep-fried versions.
Can I reheat leftover air fryer tilapia?
Reheat at 350°F for three to four minutes. Higher temperatures dry out already-cooked protein. Place fillets directly on the basket rack to restore crispness.
Microwaving makes breading soggy and should be avoided if texture matters. Leftovers store well for two days refrigerated. Beyond that, quality declines noticeably regardless of reheating method.
Getting Consistent Results Every Time
Mastering air fryer tilapia comes down to respecting its leanness and verifying doneness objectively. Dry the surface, season appropriately, avoid overcrowding, and trust temperature over timing. These fundamentals apply whether you're cooking simple weeknight dinners or experimenting with international flavor profiles.
The learning curve is short. After two or three attempts, you'll develop intuition for your specific machine and preferred fillet size. Keep notes on what worked.
Adjust based on outcomes rather than generic guidelines. Soon enough, perfectly flaky fish becomes routine rather than aspirational. That consistency is what turns a kitchen gadget into a genuine weeknight solution.