Air fryer replacement heating elements are the coiled metal tubes, usually located at the top of the cooking chamber, that generate the intense heat needed to cook food. When your appliance stops getting hot or trips the breaker every time you turn it on, a burned out element is the most common cause. You can buy air fryer replacement heating elements for many popular brands, though availability depends heavily on your specific model number.
This article covers how these parts work, why they fail, how to figure out if yours is broken, and what to consider before ordering a new one. We will also look at when swapping the part makes sense versus buying a whole new machine.
How Air Fryer Heating Elements Actually Work
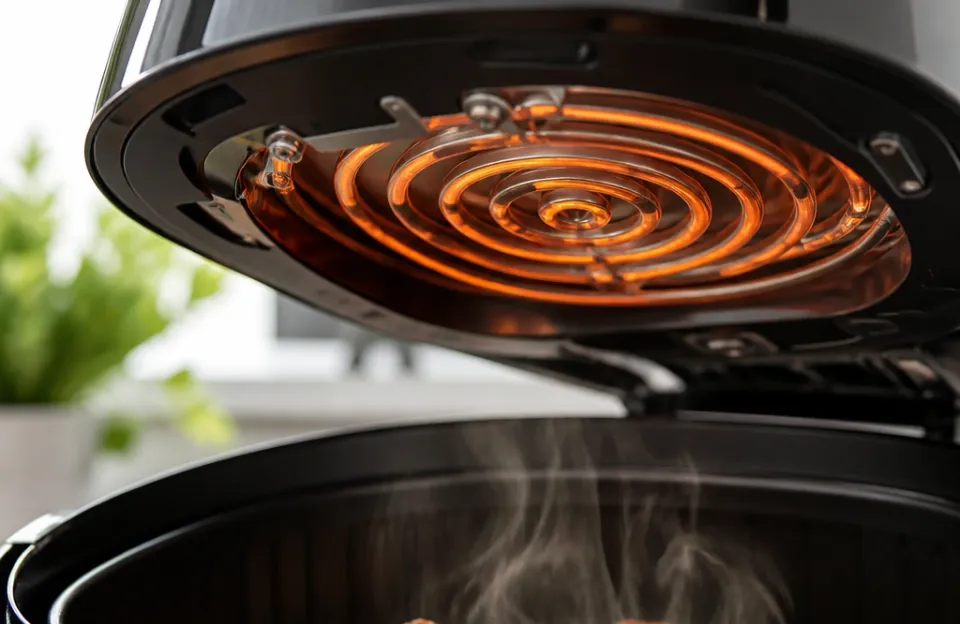
An air fryer relies on rapid air technology. A high speed fan pushes air across a heating element and circulates it around the food in the basket. The element itself is typically a nichrome wire coil wrapped inside a metal tube, often stainless steel or aluminum, with magnesium oxide powder packed between the wire and the outer tube.
That powder acts as an electrical insulator while still letting heat pass through quickly.
When you turn the machine on, electricity flows through the nichrome wire. The wire resists the current, which generates heat. That heat transfers through the magnesium oxide, into the metal tube, and finally into the rushing air.
If you want extra crispy skin on poultry, you need that element working at full capacity to push temperatures up to 400F rapidly.
Most residential air fryers use elements rated between 1400 and 1800 watts. Larger oven style models might pull 1800 watts or slightly more. The wattage dictates how fast the unit recovers its temperature after you open the basket or add cold food.
Nichrome Wire and Why It Degrades Over Time
Nichrome is an alloy of nickel and chromium. It handles high temperatures well without melting, which makes it standard for small appliances. Every time you run the air fryer, the wire expands from the heat and contracts as it cools down.
This constant thermal cycling slowly weakens the metal.
Over hundreds of cycles, microscopic cracks form in the wire. Eventually, the wire snaps. When that happens, the circuit breaks, and the element stops producing heat entirely.
Sometimes the break is visible as a dark spot or a physical gap in the coil. Other times it happens inside the sealed tube where you cannot see it.
The Role of the Fan in Element Lifespan
The heating element and the fan depend on each other. The fan pulls heat away from the coil so the element does not overheat itself. If the fan motor slows down due to worn bearings or grease buildup, the element runs hotter than its design allows.
Running too hot accelerates the degradation of the nichrome wire. It can also damage the protective coating on the outer tube. Keeping the interior clean helps the fan move air freely, which directly extends the life of the heating component.
Recognizing a Failing Air Fryer Replacement Heating Element
Diagnosing a bad element requires paying attention to how the machine behaves during normal use. A complete failure is obvious. The machine turns on, the display lights up, the fan spins, but the food stays raw.
Partial failures are trickier to spot.
If your meals take noticeably longer to cook, or if you find yourself constantly adjusting the dial to compensate for low heat, the element might be failing. Another sign is uneven cooking. If the left side of the basket browns perfectly while the right side stays pale, the coil may have a partial break or a short circuit causing uneven heat distribution.
You can verify this by checking the internal temperature. Using a fast responding kitchen thermometer to measure the air temperature inside the basket gives you hard data. If you set the unit to 400F and it only reaches 300F after ten minutes of preheating, the element is likely underperforming.
Tripped Breakers and Electrical Shorts
A failing element does not always just stop working quietly. Sometimes it causes electrical problems. If the insulation inside the tube breaks down, the live wire can touch the outer metal casing.
This creates a short circuit.
When that happens, the moment you start the cooking cycle, your home's ground fault circuit interrupter (GFCI) outlet or the main breaker panel will trip. Repeatedly resetting the breaker and trying again is dangerous. It means the element has an internal electrical fault and needs immediate replacement.
Visual Inspection for Damage
Unplug the machine and let it cool completely. Turn it upside down or remove the outer housing if you are comfortable doing so. Look at the exposed coil.
A healthy element usually looks uniform in color, ranging from dull silver to a light grey.
A damaged element often shows distinct signs. Look for blistering or bubbling on the metal tube. Check for areas that are significantly darker or charred compared to the rest of the coil.
White or green powdery residue around the terminals indicates corrosion, which increases electrical resistance and reduces performance.
Finding the Right Air Fryer Replacement Heating Elements
Sourcing the correct part is the hardest step for most people. Unlike standard toaster ovens where parts are somewhat generic, air fryers have highly specific internal layouts. An element that looks identical might have different terminal spacing, a different wattage rating, or mounting brackets that do not line up.
Start with the exact model number printed on the sticker underneath or behind your appliance. Search for that model number plus "heating element" or "replacement part." Third party appliance parts websites are usually the best place to look. Major manufacturers rarely sell individual internal components directly to consumers.
| Attribute | OEM Part | Aftermarket Part |
|---|---|---|
| Fitment | Exact match for your model | May require minor bracket modification |
| Wattage | Matches original factory spec | Varies; must check label carefully |
| Price | Higher cost | Usually cheaper |
| Availability | Often discontinued for older units | More widely stocked for popular models |
| Warranty | Typically carries manufacturer backing | Depends on the third party seller |
Checking Voltage and Wattage Ratings
You must match the electrical specifications exactly. If your original element was 120V and 1500W, the replacement must be the same. Installing a higher wattage element will draw more current than the internal wiring and thermal fuse are designed to handle.
This creates a serious fire risk.
Installing a lower wattage element is safer electrically, but your air fryer will never reach its intended maximum temperature. Food will cook slower, and recipes designed for high heat will fail. Always read the stamp or printed label on the old part before ordering.
Physical Dimensions and Mounting Points
Measure the diameter of the coil, the overall width, and the distance between the two electrical terminals. Even a difference of a few millimeters in terminal spacing means the wires will not reach, or they will pull too tight against the connections.
Look at how the element attaches to the housing. Some screw in directly. Others use metal clips or slide into ceramic blocks.
Take photos of your original setup before disassembling anything. These photos become your reference guide when comparing potential replacements online.
Swapping Out the Broken Component Safely
Replacing the element involves opening the appliance chassis and working near high voltage connections. If you have never repaired a small appliance before, understand the risks involved. Unplugging the unit is mandatory.
Never work on an appliance while it is connected to power.
- Unplug the air fryer and wait at least thirty minutes for residual heat to dissipate.
- Remove the screws holding the outer shell together. Keep them organized in a small container.
- Locate the heating element assembly at the top of the unit.
- Disconnect the wires attached to the element terminals. Take a photo of which wire goes to which terminal first.
- Remove the screws or clips holding the element in place.
- Extract the old element carefully without bending the surrounding fan blades.
- Position the new air fryer replacement heating element into the mounting slots.
- Secure it with the original screws or clips.
- Reattach the wires to the correct terminals. Tighten the terminal nuts firmly so there is no loose connection.
- Reassemble the outer shell.
After reassembly, plug the unit into a GFCI protected outlet for the first test run. Turn it on empty and set it to a low temperature. Listen for unusual buzzing or arcing sounds.
If everything sounds normal, increase the temperature and let it run for five minutes. If you plan to prep batches of wings ahead of time, you need to trust that the repaired unit holds steady temperatures safely.
Dealing with Corroded Terminals
Sometimes the element is fine, but the spade connectors or wire terminals have corroded. High heat and cooking vapors accelerate oxidation on bare metal contacts. If the terminals look black or crusty, clean them with fine sandpaper or a wire brush before installing the new part.
If the wires themselves are brittle or cracked near the connection point, cut back the damaged section and crimp on a new high temperature spade connector. Standard vinyl insulated connectors will melt inside an air fryer. Use un insulated metal connectors or ones rated specifically for high heat applications.
Repair Versus Buying a New Appliance
Not every broken air fryer deserves a repair. The math depends on the cost of the part, the original price of the machine, and your comfort level with electrical work.
Replacement elements typically range from fifteen to forty dollars depending on the brand and availability. If you own a basic fifty dollar air fryer, spending thirty dollars on a part plus shipping might not make financial sense. The labor involved in taking the whole thing apart adds hidden costs in your own time.
For premium models that originally cost over one hundred and fifty dollars, replacing a twenty dollar element is a clear win. Oven style air fryers with multiple racks and larger capacities also justify repairs because buying a new unit is significantly more expensive.
Safety Standards and Certification Marks
Any replacement part you buy should carry recognized safety certifications. Look for marks from testing laboratories like UL (Underwriters Laboratories) or ETL. These marks indicate the component has been tested to meet specific electrical safety standards.
Uncertified parts sold cheaply on overseas marketplaces might lack proper internal insulation. They could use thinner gauge wire that overheats faster. While saving a few dollars upfront is tempting, an uncertified heating element inside a plastic housing sitting on your kitchen counter introduces unnecessary risk.
When the Thermal Fuse Blows Instead
Before assuming the element is dead, check the thermal fuse. This small safety device sits in line with the heating element. Its job is to permanently break the circuit if the temperature exceeds safe limits, preventing fires.
Thermal fuses are cheap, usually costing less than five dollars. If your element tests fine with a multimeter showing continuity, but the machine still produces zero heat, the thermal fuse likely blew. Replacing the fuse restores power to the element.
However, a blown fuse usually points to an underlying problem, like a stuck fan or blocked airflow vent, which you must fix before the new fuse blows immediately.
Factors That Shorten Element Lifespan
Understanding why elements fail helps prevent premature breakdowns of your new part. Heat is the primary enemy, but how that heat is managed determines longevity.
Grease accumulation is a major factor. When fats splatter upward during cooking, they land on the heating coil. As the element heats up, that grease bakes onto the metal surface.
Over time, this carbonized layer acts as an insulator. The element struggles to transfer heat into the air, causing the internal wire temperature to rise dangerously high while the cooking chamber stays too cool. Wiping down the upper interior gently after heavy cooking sessions prevents this buildup.
Another issue is running the appliance empty for extended periods. While preheating is normal, leaving an air fryer running at maximum temperature with no food inside to absorb the radiant energy forces the element to work harder. The internal thermostat cycles rapidly, subjecting the nichrome wire to extreme thermal stress.
Moisture also plays a role. Storing the appliance in a damp garage or leaving wet food dripping directly onto the exposed element can cause localized cooling spots. Rapid temperature changes in specific sections of the coil create stress fractures much faster than even heating does.
If you frequently cook items coated in a wet marinade, shake off excess liquid before placing them in the basket to protect the overhead components.
Voltage Fluctuations in Your Home
Elements are designed for standard household voltage, typically 120V in North America. If your home experiences frequent brownouts or voltage spikes, the element suffers. Low voltage causes the element to draw more amperage to maintain its wattage output, generating excess heat in the wiring.
High voltage spikes can instantly overwhelm the thin nichrome wire.
Using a surge protector rated for high wattage appliances provides some buffer against spikes, though most standard power strips cannot handle 1500W loads safely. Plug air fryers directly into wall outlets whenever possible.
Common Mistakes During Replacement
Rushing through the repair leads to avoidable errors. Here are the most frequent issues people encounter when swapping out heating components:
- Forgetting to unplug the unit before removing screws. This is a severe shock hazard.
- Mixing up the wire connections. Reversing the live and neutral wires on a simple resistive element usually works, but it violates wiring standards and can confuse future troubleshooting.
- Overtightening the terminal nuts. The ceramic insulators around the terminals are fragile. Cracking them exposes live metal to the grounded chassis.
- Pinching wires during reassembly. If a wire gets trapped between the plastic outer shell and the metal inner frame, the insulation wears through over time, causing a short.
- Ignoring the fan. If the element burned out because the fan seized, putting in a new element without fixing the fan guarantees the new part will fail quickly.
Always double check your work visually before plugging the unit back in. Trace every wire from its origin to its termination point. Ensure nothing touches the heating coil directly except the designated mounting hardware.
Frequently asked questions
Can I use a universal heating element in my air fryer?
Universal elements exist for some appliances, but they rarely fit air fryers properly. The compact size and specific mounting brackets of air fryer chambers mean you almost always need a part shaped exactly for your model. Using a mismatched element risks poor airflow, electrical shorts, or physical interference with the fan blade.
How long does a typical air fryer heating element last?
With regular daily use, a quality element lasts between two and five years. Units used occasionally can last much longer. Heavy commercial use or consistently cooking greasy foods without cleaning the interior will shorten that lifespan significantly.
There is no fixed expiration date; it depends entirely on thermal cycles and maintenance.
Is it worth repairing an out of warranty air fryer?
It depends on the original cost. If the machine cost over one hundred dollars and the replacement part is under thirty dollars, repairing it is usually economical. For budget models under fifty dollars, the cost of the part plus shipping often approaches the price of a new unit, making replacement the better option.
Will a bad heating element affect food safety?
Yes. A failing element that cannot reach the target temperature leaves food in the bacterial danger zone for too long. If you rely on your air fryer to cook poultry safely, verifying the final internal temperature with a reliable dual probe tool becomes absolutely necessary when you suspect the appliance is underperforming.
Do I need special tools to replace the element?
Basic hand tools are sufficient. You typically need a Phillips head screwdriver, a flathead screwdriver for prying plastic clips, and a small wrench or nut driver for the terminal connections. A multimeter is highly recommended for testing continuity on both the old element and the thermal fuse before ordering new parts.
Where can I find the model number for ordering parts?
The model number is usually printed on a silver or white sticker located on the bottom of the appliance, or sometimes on the back near the power cord entry point. It is often labeled as "Model," "MOD," or "Item No." Write down the entire string of letters and numbers to get accurate search results.
Before You Start Taking Things Apart
Replacing a burned out element can breathe life back into a reliable kitchen appliance, saving you from buying something new. The process requires patience, basic hand tools, and a strict respect for electrical safety. Always confirm the exact model number and match the voltage and wattage ratings precisely before ordering any air fryer replacement heating elements.
If the math does not favor a repair, or if the chassis is cracked and the fan is failing alongside the coil, retiring the unit is the safest choice. For those who proceed with the fix, keeping the interior free of baked on grease afterward will give your new component the longest possible run. And once it is repaired and tested, getting back to basics, like tracking the nutritional profile of your meals, is a lot easier when your equipment actually holds the right temperature.