Air fryer replacement handles are aftermarket parts made to swap out a broken, melted, or loose handle on your air fryer basket or main drawer. They come in heat-resistant plastic, silicone-coated metal, and stainless steel. You can buy them directly from the original manufacturer or through third-party sellers who make parts that fit specific popular models.
If your handle snapped off or feels wobbly every time you pull the basket out, replacing it is usually a ten-minute job. You just need the right size screws and a handle rated for high heat. This guide covers what these parts are made of, how to figure out which one fits your machine, and how to install it without cracking the basket.
Why Air Fryer Handles Break Down Over Time
Air fryers run at temperatures between 350°F and 400°F for extended periods. The handle sits right next to that heat source. Even with insulation gaps built into the design, repeated heating and cooling cycles wear down the materials.
Plastic becomes brittle. Screws loosen as the housing expands and contracts. Silicone grips peel away from the metal core underneath.
Most factory handles use a glass-filled nylon or phenolic resin. These plastics tolerate high heat better than standard polymers. Phenolic resins, according to plastics industry standards, resist continuous temperatures up to 300°F before degrading.
But the air escaping an air fryer vent often exceeds that limit near the basket rim. Over months of daily use, the material loses its structural integrity. You'll notice white stress marks near the screw holes first.
Then the handle flexes more than it should. Eventually, it snaps when you lift a heavy load of food.
A failing handle is a safety issue. Dropping a basket full of hot oil or food causes burns. It also damages the non-stick coating inside the drawer.
Replacing it early prevents both problems.
Heat Stress vs Mechanical Wear
Two different forces destroy these handles. Heat stress comes from the cooking temperature. It changes the chemical structure of the plastic, making it stiff and prone to snapping under pressure.
Mechanical wear comes from how you use the machine. Yanking the basket out by one side of the handle puts uneven torque on the mounting screws. Shaking the basket vigorously to flip fries loosens the hardware over time.
Cheap aftermarket handles often fail faster because they use standard ABS plastic instead of heat-rated resins. ABS softens around 220°F. If you cook at 400°F, an ABS handle will warp within a few uses.
Always check the material rating before buying.
When the Mounting Holes Strip Out
Sometimes the handle itself is fine, but the plastic posts it screws into have stripped out. This happens when screws are overtightened during assembly or when the surrounding plastic gets too hot and softens. A replacement handle won't fix stripped mounting posts.
You either need to fill the holes with a high-heat epoxy and redrill them, or replace the entire outer basket shell.
Materials Used for Replacement Parts
The material dictates how long your new handle lasts and how it feels in your hand. Manufacturers generally stick to three options. Each has tradeoffs depending on how often you cook and what temperatures you prefer.
| Material | Max Continuous Temp | Durability | Feel | Cost |
|---|---|---|---|---|
| Phenolic Resin | 300°F – 350°F | High | Hard, smooth | Moderate |
| Glass-Filled Nylon | 350°F – 400°F | Very High | Slightly textured | Higher |
| Silicone-Wrapped Steel | 450°F+ | Highest | Soft grip, heavy | Highest |
| Standard ABS Plastic | 200°F – 220°F | Low | Smooth, cheap | Lowest |
Phenolic resin is the most common OEM material. It's dark, hard, and doesn't conduct heat well. Your fingers stay cool even after a long cook cycle.
Glass-filled nylon is lighter and slightly more flexible. It handles higher peak temperatures without warping. Silicone-wrapped steel is rare for baskets but common for the main oven door.
It stays completely rigid, though the silicone sleeve can tear if you scrape it against the counter edge.
Avoid any listing that doesn't specify the plastic type. "Heat resistant plastic" means nothing without a temperature rating. If you frequently cook wings or other items that require maximum heat, like when you want extra crispy skin, you need a handle rated for at least 400°F.
Finding the Exact Fit for Your Model
Air fryer handles are not universal. The distance between the two screw holes, the curvature of the base plate, and the depth of the mounting posts vary by brand and capacity. A handle meant for a 5.8-quart Cosori won't bolt onto a 4-quart Ninja.
Start with your model number. It's printed on a silver sticker on the back or bottom of the unit. Search that exact string along with "replacement handle." Buying directly from the manufacturer's parts portal guarantees a fit.
Brands like Philips, Ninja, Cosori, and Instant Pot sell individual components for their current and recent models.
Third-party sellers on Amazon and eBay offer cheaper alternatives. To use them safely, measure your old handle before throwing it away. Use calipers or a metric ruler.
Measure the center-to-center distance between the screw holes. Measure the overall width. Measure the height of the mounting bracket that slots into the basket.
Compare those numbers to the seller's diagram. If the measurements are off by even two millimeters, the screws will cross-thread or the handle will sit crooked.
Some older or discontinued models don't have dedicated replacements available anymore. In those cases, people sometimes adapt a handle from a similarly sized toaster oven or pressure cooker lid. This requires drilling new holes and using washers to distribute the weight.
It works in a pinch, but voids any remaining warranty and isn't recommended for heavy daily use.
If you rely on your machine for weekly routines, like batch cooking dinners, waiting for the correct part is better than forcing a mismatched one that might snap mid-shake.
Removing the Broken Handle Safely
Unplug the machine and let it cool completely. Do not attempt this while the unit is warm. The plastic is softer when heated, and you risk stripping the screw heads or cracking the basket rim.
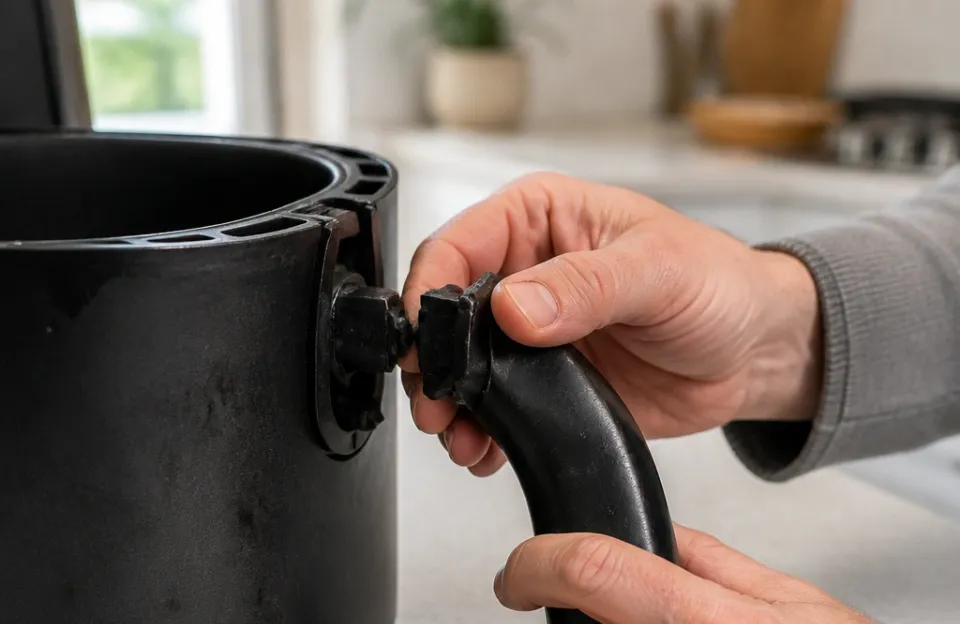
Flip the basket upside down on a towel. Look at the underside where the handle attaches. You'll see two or three screws.
They are almost always Phillips head, though some European brands use Torx (star-shaped) security bits. Select the correct screwdriver size. Using a driver that's too small strips the screw head instantly.
Turn the screws counterclockwise. If they resist, don't force them. Apply a drop of penetrating oil to the threads and wait five minutes.
Heat cycling often causes mild corrosion on metal screws seated in plastic. Once the screws are out, pull the handle straight away from the basket. Don't twist it.
Twisting snaps the fragile plastic alignment pins that keep the handle centered.
Keep the screws, washers, and any small metal brackets. You'll likely need to reuse them. Replacement handles rarely include new hardware unless you buy an official OEM kit.
Put the pieces in a small cup so they don't roll under the fridge.
While the handle is off, inspect the exposed area. Grease builds up in the gap between the handle base and the basket wall. Wipe it down with warm soapy water.
Accumulated grease acts as an insulator, trapping heat against the plastic and accelerating failure. Keeping this area clean extends the life of the new part. A quick wipe down matters just as much as checking your probe thermometer accuracy before cooking.
Installing the New Air Fryer Replacement Handle
Place the new handle against the mounting area. Line up the screw holes. Insert the alignment pins first if your model uses them.
These little plastic nubs slide into corresponding holes in the basket shell to prevent lateral movement.
Insert the screws by hand. Turn them clockwise until they catch the threads. Do not use a power drill.
Power drivers apply too much torque and crack the plastic housing immediately. Use a manual screwdriver. Tighten the screws until they are snug, then stop.
Overtightening compresses the plastic and creates stress fractures that show up weeks later.
Give the handle a firm tug once installed. It shouldn't wiggle, rattle, or flex upward. If there's play, remove the screws and check if a washer is missing.
Washers spread the clamping force over a wider area. Without them, the screw head pulls directly through the plastic.
Reassemble the basket and do a test run empty. Set the machine to 400°F for ten minutes. Smell the air near the handle.
A faint plastic odor during the first run is normal for new phenolic resin. Smoke or a strong chemical smell means the material isn't rated for your machine's operating temperature. Turn it off immediately.
Once cooled, check the tightness of the screws again. Thermal expansion during that test run may have shifted things slightly. Retighten by hand if needed.
After that, the installation is complete.
Universal vs Brand-Specific Options
You'll encounter two categories when shopping: brand-specific OEM parts and "universal" aftermarket handles. Understanding the difference saves you money and frustration.
Brand-specific parts are molded to match the exact curvature of your basket. The screw holes align perfectly. The aesthetic matches the rest of the machine.
They cost more, typically between $15 and $35 depending on the brand. But they install in minutes with zero modification.
Universal handles are flat or gently curved bars with slotted screw holes instead of fixed circular ones. The slots allow you to adjust the spacing to fit various machines. They are cheaper, usually under $15.
The downside is fitment. Because they aren't contoured to your specific basket, they often leave a gap between the handle base and the plastic shell. That gap traps steam and grease.
It also looks bulky.
Universal handles work best on square baskets with flat front faces. They struggle on round baskets or models where the handle wraps around a curved lip. If your machine has a complex shape, skip the universal option.
For anyone tracking nutrition closely, maintaining a fully functional appliance means you can reliably prepare lighter meals without worrying about equipment failure mid-cook, which helps when monitoring overall calorie counts for dietary goals.
Upgrading to a Cooler-Grip Material
Replacing a broken handle gives you a chance to upgrade the material. If your original handle was basic plastic and always felt hot to the touch, look for a silicone-overmolded replacement.
Silicone doesn't conduct heat the way solid plastic or metal does. An overmolded handle has a rigid plastic core for strength, wrapped in a thick layer of food-grade silicone for grip and insulation. Your fingers stay noticeably cooler when pulling the basket out at 400°F.
Check the durometer rating if listed. A lower durometer means softer silicone. Too soft, and the handle squishes uncomfortably when you lift a heavy load of food.
Too hard, and it defeats the purpose of the upgrade. Medium-firm silicone provides the best balance of comfort and support.
Make sure any upgraded material is food-safe. The FDA regulates materials that contact food environments, and while the handle is exterior, it sits close enough to the cooking chamber that off-gassing matters. Stick to reputable sellers who explicitly state their products are BPA-free and food-grade.
This kind of upgrade pairs well with other kitchen improvements, like switching to a reliable dual-probe setup so you spend less time hovering over the appliance and grabbing the handle repeatedly.
Fixing a Loose Handle Without Replacing It
Sometimes the handle isn't broken. It just rattles. Before ordering a new one, try tightening the existing hardware.
If the screws tighten but the handle still wiggles, the internal plastic bosses might be worn down.
Remove the screws and wrap a single layer of PTFE (Teflon) plumber's tape around the threads. Screw them back in. The tape adds bulk to the threads, creating a tighter fit in the worn plastic hole.
This is a temporary fix. It buys you a few weeks until the replacement part arrives.
Another trick involves heat-resistant washers. If the screw head is sinking too deep into the handle plastic, place a small stainless steel washer between the screw head and the handle surface. It stops the screw from pulling through.
Ensure the washer is stainless steel, not zinc-plated. Zinc coatings degrade and release fumes at high temperatures.
Never use superglue or standard wood glue to reattach a snapped handle. Cyanoacrylate (super glue) melts and releases toxic fumes well below air frying temperatures. High-heat epoxy exists, but it makes future removal nearly impossible if you ever need to clean the area or replace the part properly.
Signs Your Handle Is About to Fail
Catching a failing handle before it snaps prevents dropped food and burns. Look for these warning signs during your regular cleaning routine.
White stress lines near the screw holes indicate the plastic is bending beyond its elastic limit. Once those lines appear, the structural integrity is compromised. The handle might hold for another week or another month, but it will break.
A squeaking sound when you pull the basket out means the mounting posts are rubbing against the shell due to looseness. Tighten the screws. If the squeak persists, the plastic is worn down.
Discoloration is another clue. If a black handle turns brown or gray near the base, it's experiencing thermal degradation. The polymer chains are breaking down.
It will become brittle soon.
Pay attention to how the basket feels when loaded. If you have to support the bottom of the basket with your other hand because the handle feels flimsy, stop using it until you install air fryer replacement handles. Relying on muscle memory to compensate for a weak part leads to accidents when you're distracted.
Maintaining your equipment goes hand in hand with good prep habits. Just as you wouldn't skip marinating your proteins for better results, you shouldn't ignore hardware wear that affects how safely the appliance operates.
Frequently Asked Questions
Can I use a handle from a different brand on my air fryer?
Only if the screw hole spacing and basket curvature match exactly. Measure the center-to-center distance of your original mounting holes. Compare it to the donor handle.
Even a two-millimeter difference prevents proper installation and risks stripping the plastic posts.
Are silicone replacement handles safe at 400 degrees?
Food-grade silicone withstands temperatures up to 450°F or 500°F without melting or off-gassing. However, verify that the rigid core inside the silicone is also heat-rated. Some cheap handles use a low-temp plastic core wrapped in silicone, which will still warp internally at high heat.
Do I need special tools to swap out the handle?
Standard Phillips or Torx screwdrivers are usually all you need. Avoid power drills entirely. The plastic housing cracks easily under mechanical torque.
Keep the original screws and washers, as replacement kits rarely include new hardware.
Why did my new handle start smelling like burning plastic?
The material is likely not rated for your machine's operating temperature. Standard ABS plastic softens around 220°F. If you bought an unbranded handle that didn't specify a heat-resistant resin like phenolic or glass-filled nylon, it cannot survive a 400°F cooking cycle.
Remove it immediately.
Will replacing the handle void my warranty?
Using official OEM parts from the manufacturer keeps your warranty intact. Installing third-party or universal handles usually voids the warranty for the basket assembly. If your machine is still under coverage, contact the manufacturer for a replacement part first.
How do I clean grease out of the handle mounting area?
Remove the handle completely. Soak a cloth in warm water with dish soap and wipe the exposed plastic and metal. Avoid abrasive scrubbers that scratch the basket finish.
Dry the area thoroughly before reinstalling the handle to prevent moisture from accelerating screw corrosion.
Getting Your Machine Back in Shape
A broken handle turns a convenient appliance into a hazard. Swapping it out is straightforward as long as you match the measurements and use heat-rated materials. Take your time measuring the old part, resist the urge to overtighten the screws, and run an empty test cycle before cooking food again.
Keeping the mounting area free of grease buildup extends the lifespan of whatever part you install. Treat the hardware with the same attention you give the cooking process, and the machine will last for years.