Air fryer chicken tenders cook in 10 to 12 minutes at 400°F and come out crispy on the outside while staying juicy inside. You don’t need to preheat for most models, though doing so can shave off a minute or two of cook time. The key is spacing them in a single layer so hot air circulates properly, which prevents steaming and ensures even browning.
This guide covers the exact method for getting consistent results, including breading options, seasoning adjustments, and how to avoid the most common texture problems. We’ll also look at safe internal temperatures, storage times, and how this method compares to oven baking or deep frying when you’re cooking for a crowd or meal prepping.
Why Air Frying Works Better for Tenders Than Other Methods
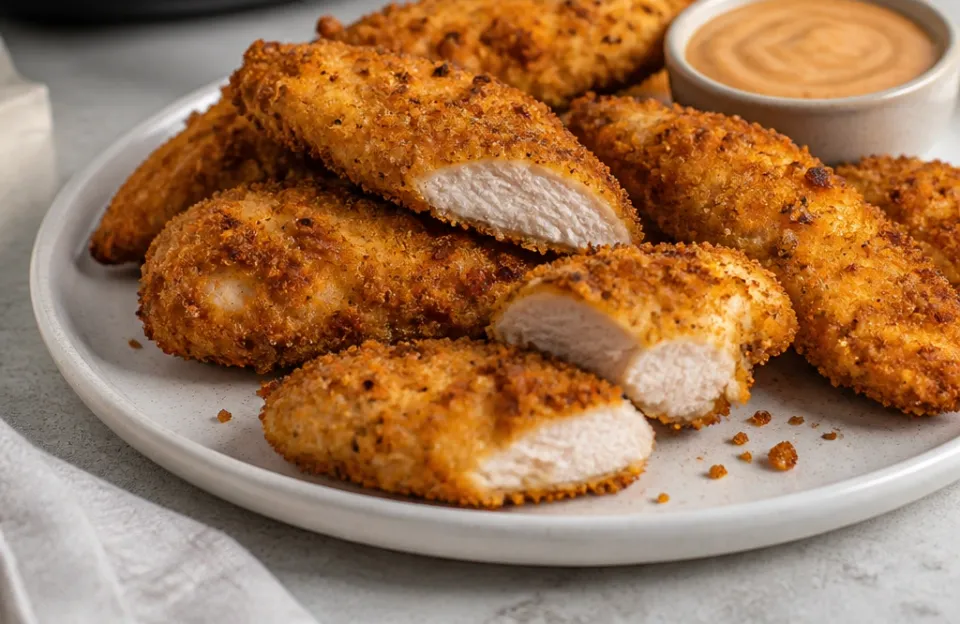
Chicken tenders are small and lean, which makes them unforgiving. They dry out fast if overcooked and turn rubbery if undercooked. An air fryer solves both issues by circulating superheated air around each piece individually.
This creates a Maillard reaction on the surface quickly, sealing in moisture before the interior has time to toughen up.
Deep frying submerges the meat in oil, which adds significant fat and calories. Oven baking works but takes longer and often yields uneven crispness because the heat source is stationary. The air fryer’s fan-driven convection mimics deep frying without the oil bath.
According to the USDA Food Safety and Inspection Service, poultry must reach 165°F regardless of cooking method, but the speed of air frying means you hit that target faster with less carryover cooking risk.
Managing Moisture in Lean Poultry
Tenders lack the fat content of thighs or wings. That means you have a smaller window between perfectly cooked and dried out. Patting the raw chicken completely dry before seasoning is non-negotiable.
Surface moisture turns to steam in the basket, which softens the breading instead of crisping it. A paper towel takes ten seconds and makes a measurable difference in final texture.
You can also brine tenders briefly in salt water for 20 to 30 minutes before cooking. This adds moisture directly into the muscle fibers through osmosis. Just pat them dry again afterward so the coating adheres.
Skipping this step won’t ruin the dish, but it does reduce your margin for error if you accidentally go a minute too long.
Choosing Between Fresh and Frozen
Fresh tenders give you more control over texture and seasoning penetration. Frozen ones work fine in an air fryer but require different timing. Cook frozen tenders at 400°F for 14 to 16 minutes, flipping halfway through.
Don’t thaw them first unless you plan to bread them yourself. Pre-breaded frozen tenders are designed to go straight from freezer to basket.
The trade-off is convenience versus customization. Frozen saves prep time. Fresh lets you adjust salt levels, spice blends, and coating thickness.
Both produce safe, edible results when you follow temperature guidelines rather than relying solely on clock time.
Getting the Coating Right Every Time
The coating determines whether your air fryer chicken tenders are crunchy or soggy. Three components matter: the dry base, the wet binder, and the outer crust. Each serves a distinct function, and skipping any one leads to patchy coverage or breading that falls off mid-cook.
Start with seasoned flour as your first layer. It sticks to the damp chicken and gives the egg wash something to grip. Season this flour generously.
Unseasoned flour tastes chalky no matter how well-spiced your outer layer is. Dip the floured tender into beaten egg or buttermilk next. Let excess drip off for a few seconds.
Too much liquid creates gummy spots where the outer crumbs can’t adhere properly.
Press panko breadcrumbs, crushed crackers, or seasoned flour onto the wet surface firmly. Panko stays crunchier than regular breadcrumbs because its larger flakes create more surface area for browning. Regular fine crumbs compact and can turn dense.
If you want extra crunch, mix in grated parmesan or cornstarch with your outer coating. Cornstarch absorbs residual moisture during cooking and fries up glass-shatter crisp.
Oil Application for Proper Browning
Air fryers use minimal oil, but zero oil means pale, dry breading. Spray or brush a thin coat of neutral oil over the breaded tenders before cooking. Avocado oil or light olive oil works best due to higher smoke points.
Extra virgin olive oil can burn at 400°F and impart bitter notes.
Apply oil after breading, not before. Oil underneath the coating prevents adhesion. Oil on top promotes even color development.
A silicone brush gives you precise control. Aerosol sprays work too, but check the label. Some contain lecithin or propellants that damage nonstick basket coatings over time.
Pump-style oil sprayers avoid this issue entirely.
Seasoning Layers for Depth
Salt only in the outer coating tastes superficial. Salt in the flour, salt in the egg wash, and salt in the crumbs builds flavor throughout. Same principle applies to spices.
Paprika, garlic powder, onion powder, and black pepper benefit from being distributed across all three layers rather than dumped on top at the end.
If you’re making garlic parmesan wings alongside tenders for a mixed platter, season the tenders more conservatively. Wings have skin and fat that carry bold flavors better. Tenders absorb seasoning more directly, so heavy-handed spicing can overwhelm the mild meat.
Taste one test piece before committing the whole batch if you’re experimenting with new blends.
Cooking Times and Temperature Targets
Set your air fryer to 400°F for standard fresh tenders. This temperature balances exterior crispness with interior juiciness. Lower temps like 375°F extend cook time and increase drying risk.
Higher temps like 425°F brown the outside before the center reaches safe temperature.
Cook for 10 to 12 minutes total, flipping halfway through at the 5 or 6-minute mark. Flipping isn’t optional. The heating element sits above the basket in most models.
Without turning, the tops brown while bottoms stay pale and soft. Use tongs to flip gently. Forks pierce the coating and release juices.
Thickness varies between brands and packages. Thin tenders may finish in 9 minutes. Thick ones need 13.
Visual cues help: golden brown color, firm texture when pressed, and clear (not pink) juices when cut. But visual cues aren’t reliable enough for food safety. Always verify with a thermometer.
Using Thermometers Accurately
Insert the probe into the thickest part of the largest tender. Avoid touching bone if present. Digital instant-read thermometers give results in seconds.
Dial thermometers lag and can misread in thin cuts. When checking multiple pieces, test at least two or three from different areas of the basket. Hot spots exist in every air fryer model.
We’ve found that keeping a reliable digital thermometer next to the air fryer removes guesswork entirely. Pull tenders at 160°F to 162°F. Carryover cooking raises the internal temp another 3 to 5 degrees while resting.
Waiting for 165°F in the basket means overshooting by the time you serve. Resting for 3 to 5 minutes on a wire rack also keeps the bottom crust from steaming against a plate.
Batch Size and Airflow Limits
Overcrowding is the single biggest cause of failed batches. Tenders need space between them. Touching pieces steam instead of fry.
Cook in batches if necessary. Most standard baskets fit 6 to 8 tenders comfortably in a single layer. Larger capacity models handle 10 to 12.
Keep cooked batches warm on a wire rack set over a sheet pan in a 200°F oven while finishing remaining rounds. Stacking hot tenders on a plate traps steam and softens the crust within minutes. The wire rack preserves airflow underneath.
This matters especially when serving guests who expect uniform texture across the whole platter.
Storage, Reheating, and Meal Prep Applications
Leftover air fryer chicken tenders last 3 to 4 days refrigerated in an airtight container. Store them uncovered for the first hour to let residual heat escape, then seal. Trapped warmth creates condensation that sogs the coating.
Separate layers with parchment paper if stacking is unavoidable.
Reheat in the air fryer at 350°F for 3 to 4 minutes. Microwaving works for speed but destroys texture. Oven reheating at 375°F for 8 to 10 minutes is acceptable but slower.
The air fryer restores crispness because it re-crisps the coating while warming the interior. Flip once during reheating for even results.
Freezing for Later Use
Freeze cooked tenders in a single layer on a parchment-lined tray until solid, about 2 hours. Transfer to freezer bags afterward. This prevents clumping.
Frozen cooked tenders keep quality for 2 to 3 months. Reheat directly from frozen at 375°F for 8 to 10 minutes, flipping halfway. No thawing needed.
Raw breaded tenders freeze less successfully. The coating absorbs moisture during freezing and thawing, leading to gummy texture after cooking. If you want freezer-ready raw portions, freeze unbreaded tenders instead.
Bread them fresh when you’re ready to cook. This approach mirrors how we handle chicken wing meal prep for batch cooking weekends.
Calorie and Nutrition Context
Air frying reduces fat content significantly compared to deep frying. A typical breaded tender cooked in oil absorbs 3 to 5 grams of added fat. Air-fried versions use less than 1 gram from spray oil alone.
For those tracking intake, our chicken wing calorie breakdown shows similar savings apply across poultry cuts when switching from oil-submerged to air-circulated cooking.
Protein content remains unchanged. Breading adds carbohydrates. Panko contributes roughly 5 to 7 grams per tender.
Almond flour or crushed pork rinds lower carb counts for specific dietary needs. Adjust coatings based on nutritional goals rather than assuming all breaded versions are equivalent.
Troubleshooting Texture Problems
Soggy breading usually means insufficient oil, overcrowding, or wet chicken. Check all three. Did you pat the meat dry?
Did you space pieces apart? Did you apply oil to the coating surface? Fixing any one of these often resolves the issue.
Persistent sogginess suggests your air fryer model runs cool. Try increasing temperature by 10°F next time.
Breading falling off points to inadequate binding. The flour-egg-crumb sequence must be followed in order. Skipping flour means egg slides off bare meat.
Skipping egg means crumbs have nothing to stick to. Pressing crumbs firmly matters too. Loose crumbs shed during flipping.
Burnt outsides with raw insides mean temperature is too high or tenders are too thick. Reduce heat to 375°F and extend time by 2 to 3 minutes. Or butterfly thick tenders to create uniform thickness.
Uneven sizing causes uneven cooking. Sorting by size before cooking helps. Put smaller pieces in one batch, larger in another.
Avoiding Dryness Through Timing
Dry tenders result from overcooking, not from the air fryer itself. Lean meat has little buffer. Set a timer for the minimum recommended time first.
Check early. You can always add minutes. You can’t subtract them.
Pulling at 160°F and resting accounts for carryover. Trusting the clock over the thermometer is the most common mistake beginners make.
If dryness persists despite correct temps, try brining or marinating beforehand. Acidic marinades tenderize but can mush the surface if left too long. Limit acidic marinades to 2 hours max.
Dairy-based marinades like buttermilk work longer without texture damage. Our chicken wing marinade guide covers timing ratios that transfer directly to tenders.
Basket Maintenance and Performance
Residue buildup affects airflow and heat distribution. Clean the basket after every use. Soak in warm soapy water if grease has baked on.
Avoid abrasive scrubbers on nonstick surfaces. Degraded nonstick coating causes sticking, which tears breading during removal. Replace baskets when coating chips visibly.
Some models benefit from parchment liners to prevent sticking and ease cleanup. Cut liners to fit the basket floor without covering sides. Blocked side vents restrict airflow.
Never use wax paper. It melts at air fryer temperatures. Silicone mats rated for 450°F+ are safe alternatives.
Check manufacturer specifications before using any accessory.
Frequently Asked Questions
Can I cook air fryer chicken tenders without breading?
Yes. Season bare tenders with oil and spices, then cook at 400°F for 8 to 10 minutes. They won’t be crispy but will be fully cooked and juicy.
This works well for salads, wraps, or low-carb meals where crunch isn’t the goal. Internal temperature still needs to reach 165°F.
How do I make gluten-free air fryer chicken tenders?
Substitute rice flour or almond flour for wheat flour in the dredge. Use crushed gluten-free crackers or certified GF panko for the outer layer. Verify all seasonings are gluten-free.
Cross-contamination matters if sharing equipment with gluten-containing foods. Dedicated baskets or thorough cleaning between uses prevents issues.
Why are my tenders white and pale instead of golden?
Insufficient oil or low temperature causes pale breading. Apply oil spray to the coated surface before cooking. Confirm your air fryer is actually reaching 400°F with an oven-safe thermometer placed inside the basket.
Some units run 20 to 30 degrees below their display setting.
Is it safe to cook frozen breaded tenders without thawing?
Yes. Cook frozen pre-breaded tenders at 400°F for 14 to 16 minutes, flipping halfway. Do not thaw first.
Thawing introduces moisture that compromises the factory-applied coating. Always verify internal temperature reaches 165°F regardless of package instructions, as home air fryer performance varies.
Can I use this method for chicken breasts cut into strips?
You can, but results differ. Breast meat is denser and thicker than true tenders. Cut strips uniformly to 1-inch width for even cooking.
Expect 12 to 14 minutes at 400°F. Brining becomes more important with breast meat due to lower natural moisture. True tenders come from the pectoralis minor muscle and cook faster.
Before You Start Cooking
Air fryer chicken tenders succeed or fail based on technique, not equipment. Dry the meat. Season every layer.
Space pieces apart. Flip halfway. Verify temperature with a thermometer.
These five actions cover nearly every failure point. Once the method feels automatic, experiment with coatings and seasonings confidently.
For those expanding beyond tenders, our honey garlic chicken wings recipe uses similar principles with adjusted timing for skin-on cuts. Mastering one poultry application transfers directly to others. Keep notes on what works in your specific model.
Air fryers vary enough that personal benchmarks beat generic charts every time.