You pulled the chicken breast off the grill, certain it was ready. But when you cut into it, the center was still pink and cold. Or maybe your holiday roast turned out dry and tough as boot leather despite your expensive digital probe.
These cooking disasters happen to almost everyone, and they usually stem from a few simple mistakes with your tools.
Quick Answer:
To get accurate readings, insert your thermometer probe into the thickest part of the meat while avoiding bone, fat, and the pan. Always calibrate your device in an ice bath, pull meat a few degrees before your target to account for carryover cooking, and wash the probe by hand without wetting the electronics. Correcting these simple habits is the best way to safeguard your food against bacteria while keeping it juicy and tender.
When learning how to cook safely, avoiding the 7 Common Meat Thermometer Mistakes (And How to Avoid Them) will keep your meals safe and delicious.
Why Precision Temp Tracking Matters
Your thermometer is the only reliable window into what is happening deep inside the muscle fibers of your food. Many home cooks try to rely on clock time or visual cues like the color of the juices. But these methods are highly unreliable because every piece of meat has a different shape, water content, and starting temperature.
As meat cooks, the proteins tighten and squeeze out water. If you go too far, the moisture is gone forever. If you do not go far enough, harmful bacterial pathogens like Salmonella or E. coli can survive.
Using a temperature tool seems simple. You stick the metal rod in, read the screen, and eat. But small physical issues can throw off a reading by ten degrees or more.
In the kitchen, ten degrees is the difference between a juicy medium-rare steak and a dry, gray slab.
How Heat Moves Through Your Meat
Heat travels from the outside of your food inward. The outer surface heats up fast because it directly touches the hot air or metal pan. The center is the last part to get hot.
If your probe is off by just a quarter of an inch, it might read the hot outer layers instead of the cold center. This gives you a false high reading. You think your food is safe, but the middle is still raw.
The Physics of Carryover Cooking
Once you take food off the stove, it keeps cooking. The heat trapped on the outside of the meat moves toward the cooler center. This causes the internal temperature to rise even after the meat leaves the heat source.
If you keep the meat on the fire until it hits your exact target, it will overcook on the counter. Letting your food rest is a vital part of the process that allows the juices to settle and redistribute throughout the muscle fibers.
The 7 Common Meat Thermometer Mistakes (And How to Avoid Them)
We have gathered the most frequent errors home cooks make when trying to measure temperature, along with simple steps to fix them.
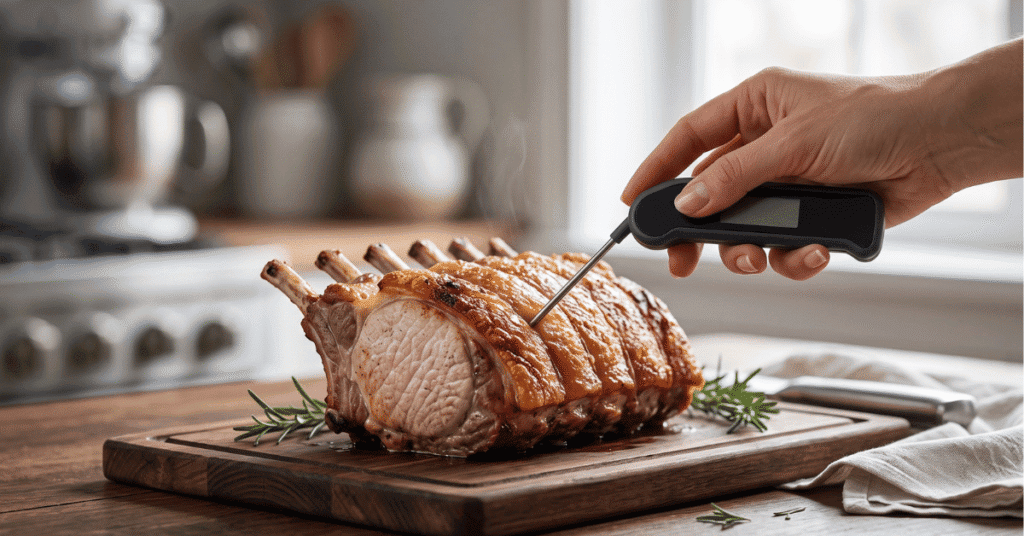
1. Striking Bone or Fat Instead of Lean Meat
If your thermometer probe hits bone or a pocket of fat, the temperature reading will be incorrect. Bones conduct heat much faster than muscle tissue, which leads to a falsely high reading. Conversely, fat acts as an insulator, which can show you a colder temperature than the actual meat.
- How to avoid it: Always aim for the deepest, thickest part of the muscle tissue. If you cook a chicken breast, slide the metal probe into the side of the breast rather than straight down from the top. Keep the tip away from any bone or visible fat deposits. Slide it in, check the number, and pull it back slightly to see if the temperature drops. The lowest number you find is your true internal temperature.
2. Touching the Hot Pan or Cooking Grates
If you push the probe too far through the meat, the tip might touch the bottom of your roasting pan or the metal grates of your grill. Metal is a direct heat conductor and is much hotter than the food itself. This gives you an incredibly high reading that can cause you to pull raw food off the heat too early.
- How to avoid it: Slow down when you insert the tip. You can hold your fingers on the probe to mark how deep it should go before you push it in. If you are baking a whole turkey, verify that the tip is right in the center of the thigh meat, not pushing all the way through to touch the metal pan underneath. Keep your hand steady and slide the probe in slowly so you can feel the resistance of the food.
3. Missing the Carryover Cooking Window
If you pull your food off the grill at your exact target temperature, you will overcook your meal every single time. Heat continues to travel toward the center of the meat even after you set it on the cutting board. This carryover rise can add as much as 10 degrees Fahrenheit to large cuts of beef, pork, or poultry.
- How to avoid it: Remove your meat from the heat about five degrees before your ideal final temperature. For large roasts, pork shoulders, or whole turkeys, pull them 5 to 10 degrees early. Cover the food loosely with foil and let it rest. The heat will even out, bringing the food up to the perfect temperature naturally on your countertop.
4. Forgetting the Dimple on Dial Probes
Many old-school dial thermometers have a tiny dimple on the side of the metal rod. This dimple marks the end of the sensor area. People often assume that only the very tip of the thermometer reads the temperature, but dial thermometers measure the average heat along the entire lower two to three inches of the probe.
- How to avoid it: If you use a dial-style bimetal thermometer, you must insert it at least two to three inches deep to get an accurate reading. If you try to check a thin smash burger with a dial thermometer, you will get a incorrect temperature because part of the sensor is still in the open air. For thin cuts of meat like pork chops, chicken cutlets, or burger patties, use a digital instant-read thermometer instead, which measures temperature right at the tip.
5. Skipping Regular Temperature Calibration
Thermometers are sensitive instruments that can lose accuracy over time. Drops, bangs, and exposure to extreme heat cycles can knock the internal sensors out of alignment. If your sensor is off by just three or four degrees, your chicken might be unsafe, or your pork chop might dry out.
- How to avoid it: Run an ice bath check on your kitchen tools at least once every six months. It takes just a couple of minutes and uses simple items you already have in your freezer. This simple habit prevents the 7 Common Meat Thermometer Mistakes (And How to Avoid Them) by making sure your readings are actually real.
6. Submerging the Whole Unit to Clean It
You cooked a great meal, and now it is time to wash up, so you drop your digital thermometer into a sink full of hot water. This is an easy way to ruin the digital display or short out the internal wires. Water easily sneaks into the battery compartment or the joint where the metal probe meets the plastic body.
- How to avoid it: Never dunk a digital thermometer in water unless the manufacturer specifically states it is fully waterproof. Instead, wipe down the metal probe with a sponge damp with hot, soapy water. Use a damp cloth to clean the plastic housing, then dry it with a clean towel immediately. Never put your thermometer in the dishwasher.
7. Overcooking Meat Out of Fear
Many home cooks look up the minimum safety numbers and overcook their meat to be absolutely sure. While food safety is highly important, sticking to a single static number from a chart can lead to dry, unappetizing food if you do not understand how pasteurization works.
- How to avoid it: Learn how heat kills bacteria over time. For example, according to USDA guidelines, chicken is safe at 165 degrees instantly. But it is also fully safe at 155 degrees if held at that temperature for just 50 seconds. Use your thermometer to track the target, and let the meat rest to keep it moist and safe at the same time.
How to Calibrate Your Meat Thermometer
You must verify that your tool reads correctly before you trust it with your health. The easiest way to check this is with a glass of ice water.
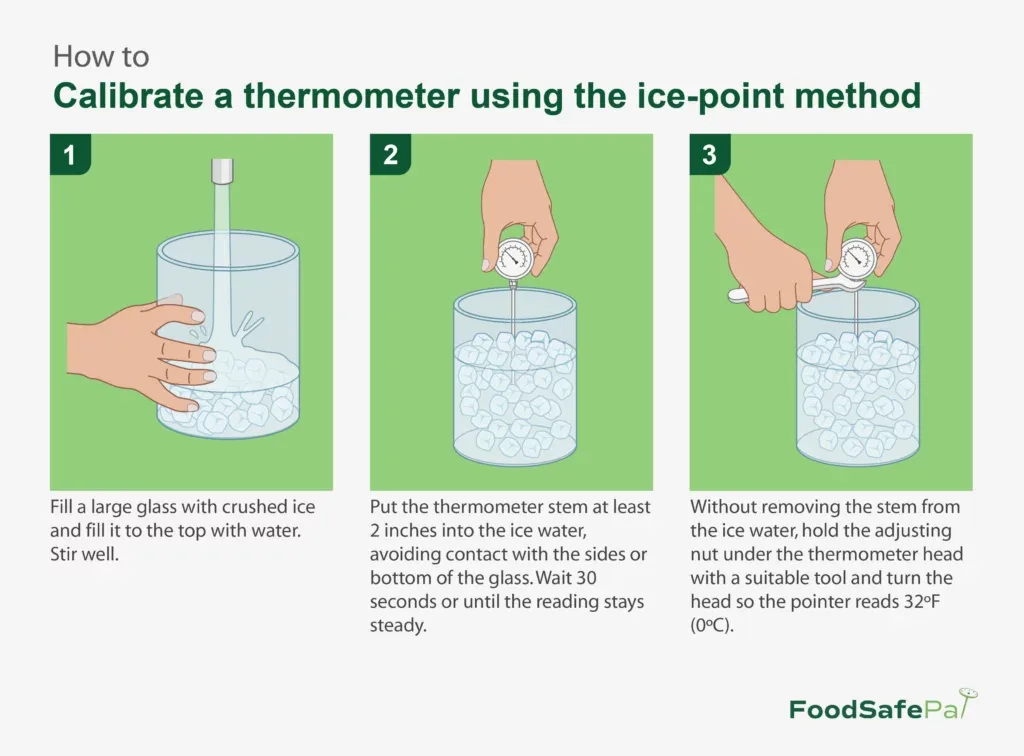
Image source: Bing (Web (fair-use with source credit))
Follow these quick steps to calibrate your tool at home:
- Fill a tall glass to the top with crushed ice. (Crushed ice works much better than large cubes because it leaves fewer warm pockets of water).
- Pour in cold water until the glass is full, then stir the mixture thoroughly.
- Let the glass sit for two minutes so the water temperature stabilizes throughout.
- Insert the thermometer probe into the center of the ice slurry.
- Stir the mixture gently with the probe to make sure you get an even reading. Keep the tip of the probe away from the bottom and sides of the glass.
- Wait for the digital display to stop changing. It should read exactly 32 degrees Fahrenheit (0 degrees Celsius).
- Adjust if needed. If your thermometer does not read 32 degrees, press the “Calibrate” button to adjust it to 32, or turn the hex nut under the dial on manual models. If your model cannot be calibrated, write down the offset so you can add or subtract those degrees when cooking.
Different Tools for Different Meats
Not all thermometers are built the same way. Selecting the right tool for your style of cooking will make your kitchen run much smoother.
- Digital Instant-Read Thermometers: These have a thin tip and show you a reading in two to three seconds. They are perfect for checking thin meats like steaks, chicken cutlets, and burger patties. Do not leave them in the oven or smoker.
- Leave-In Probe Thermometers: These have a heat-proof wire that runs from the food inside the oven to a transmitter screen outside. They are built for big roasts, whole chickens, and beef brisket. You can set an alarm to tell you when the meat hits your target temp.
- Wireless Smart Probes: These are thick metal sticks that send temperature updates to your smartphone over Bluetooth or Wi-Fi. They are great for outdoor grills, air fryers, and rotisseries where cords would get tangled around the spit.
Quick Temperature Guide
Keep this quick reference guide in mind for your final resting temperatures.
| Meat Type | Desired Cook Level | Pull Temperature (F) | Target Final Temp (F) |
|---|---|---|---|
| Beef Steak | Medium-Rare | 130°F | 135°F |
| Beef Steak | Medium | 140°F | 145°F |
| Pork Chop | Medium | 140°F | 145°F |
| Chicken Breast | Juicy & Safe | 160°F | 165°F |
| Ground Beef | Well Done (Safe) | 155°F | 160°F |
Frequently Asked Questions
Can you leave a digital instant-read thermometer inside the oven?
No, instant-read thermometers are not made to stay inside a hot oven or grill. The plastic body will melt, and the heat will destroy the delicate digital components. Only leave-in probes with heat-safe metal cords can stay inside the oven during cooking.
Why does my thermometer read a different temperature in different spots?
This happens because meat heats from the outside in, and different parts contain different amounts of fat, muscle, and bone. The heat is never completely uniform across the whole cut of meat. Always search for the lowest reading in the thickest part of the meat to guarantee the food is fully cooked.
How often do kitchen thermometers need to be calibrated?
Ideally, you should check your kitchen thermometer every six months or after any hard fall onto the kitchen floor. If you often use your tool for precision baking or thin cuts of meat, checking it once a month is a great habit. It takes less than five minutes and guarantees your cooking measurements remain exact.
Can I use an infrared laser thermometer to check if meat is cooked?
No, infrared thermometers only measure surface temperatures of food rather than the internal center. The crust of your steak might read 200 degrees while the cold center is still dangerous to eat. Always use an internal tip-style probe to check the temperature of meat.
Worth Remembering
A reliable kitchen thermometer is a fantastic tool, but it only works as well as your habits. Avoid sticking your probe near bones, calibrate the sensor twice a year, and always pull meat before your final target temp to allow for carryover heat. Now that you know the 7 Common Meat Thermometer Mistakes (And How to Avoid Them), you can step up to the grill with total confidence and serve perfect meals every time.


