Air fryer cauliflower cooks in 12 to 15 minutes at 375°F and comes out with crispy, browned edges and tender centers. The key is drying the florets thoroughly before tossing them in oil and seasoning, then arranging them in a single layer so hot air circulates freely. This method uses significantly less fat than deep frying or pan roasting while delivering superior texture.
This guide covers the exact technique for perfect results, including prep steps that prevent sogginess, seasoning combinations that stick properly, and adjustments for different air fryer models. You will also find troubleshooting for common issues like burning or steaming, plus storage and reheating advice to maintain quality. Whether you are making a weeknight side dish or meal-prepping components for the week, these details remove the guesswork from cooking this vegetable.
Why Moisture Control Determines Texture
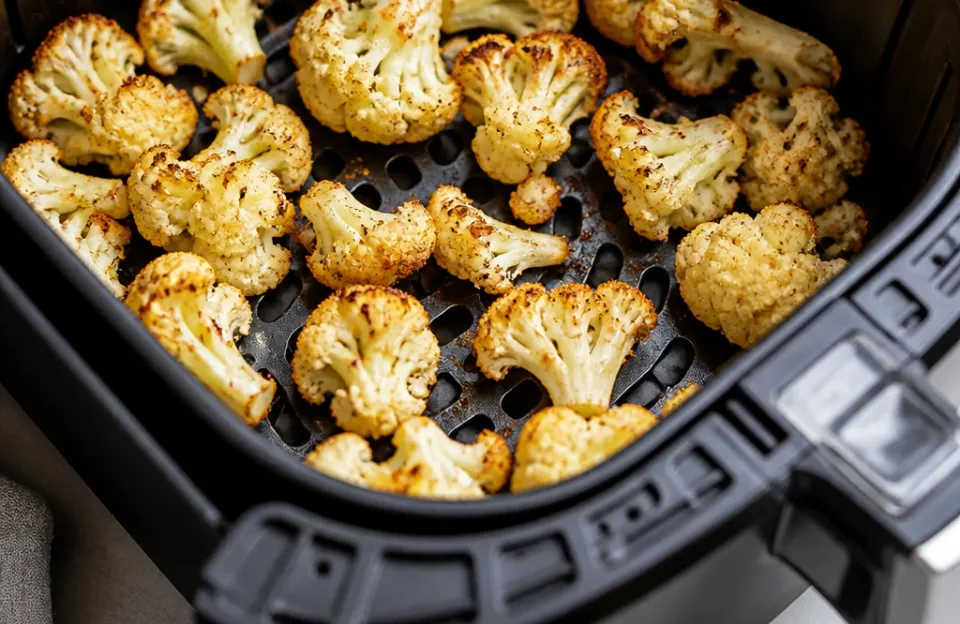
The most common reason air fryer cauliflower turns out mushy instead of crispy is excess surface water. Cauliflower naturally holds moisture in its dense cellular structure, and washing adds more to the exterior. When wet florets hit the hot air stream, that water must evaporate before browning can begin.
By the time the surface dries enough to crisp, the interior often overcooks into a soft, unappealing texture.
Drying is not optional if you want restaurant-quality results. After washing, spread the florets on clean kitchen towels or paper towels and pat them completely dry. Letting them air-dry for 10 to 15 minutes helps further.
Some cooks use a salad spinner followed by towel drying for maximum efficiency. The goal is zero visible water droplets before oil touches the vegetable.
Oil serves as a heat transfer medium and promotes Maillard browning reactions. Without adequate coating, the hot air dehydrates the surface rather than crisping it. Use 1 to 2 tablespoons of high-smoke-point oil per pound of cauliflower.
Avocado, grapeseed, or refined olive oil work best because they withstand 375°F without breaking down. Toss the florets in a large bowl rather than drizzling oil directly in the basket to guarantee even coverage.
Cutting Size Affects Cook Time Uniformity
Floret size directly impacts how evenly your air fryer cauliflower cooks. Pieces larger than 2 inches take longer to crisp and may burn on the outside before the stem softens. Pieces smaller than 1 inch cook too fast and risk becoming brittle or charred.
Aim for uniform 1.5-inch florets measured across the widest point.
Cut through the stem end first to create flat surfaces that sit stable in the basket. Flat sides make better contact with the hot metal and brown more consistently than rounded tops. Trim away thick core material, which stays tough even when fully cooked.
If you have uneven pieces from a pre-cut bag, sort them by size and cook in separate batches or add smaller pieces halfway through the cycle.
Consistent sizing also matters for food safety when pairing this vegetable with proteins. If you plan to serve it alongside garlic parmesan wings or similar items, matching doneness timing prevents one component from sitting cold while the other finishes. Planning cut size around your full menu reduces wasted energy and improves plate quality.
Step-by-Step Cooking Method
Preheat your air fryer to 375°F for 3 to 5 minutes. Preheating ensures the cooking environment reaches target temperature before food enters, which jumpstarts browning immediately. Skipping this step adds 2 to 4 minutes to total cook time and increases the chance of steaming rather than crisping during the initial phase.
Toss dried florets with oil, salt, and any dry seasonings in a large mixing bowl. Add spices after oil so they adhere properly instead of falling to the bottom of the basket. Avoid wet marinades or sauces at this stage unless the recipe specifically calls for them, as liquid introduces steam.
Place seasoned florets in the basket in a single layer with space between pieces. Overcrowding blocks airflow and creates hot spots that leave some areas raw while others burn.
Cook for 12 to 15 minutes, shaking the basket vigorously at the 6-minute mark. Shaking redistributes pieces so all sides get direct exposure to circulating air. Check doneness at 12 minutes by piercing the thickest stem with a fork.
It should slide in with slight resistance but no crunch. External color should be deep golden brown with some darker caramelized spots. If needed, add 1 to 3 minutes in 1-minute increments until desired texture is achieved.
Adjusting for Basket vs Oven Style Models
Basket-style air fryers concentrate heat in a smaller chamber and typically cook faster than oven-style models with multiple racks. If using an oven-style unit, increase temperature to 385°F or extend cook time by 2 to 4 minutes. Monitor closely during the final minutes since convection patterns differ between designs.
Rack position matters in oven-style units. Middle rack placement provides balanced top and bottom heating. Top rack positioning accelerates browning but risks burning before stems soften.
Bottom rack slows overall cooking and may require flipping halfway through. Consult your appliance manual for manufacturer-specific guidance, as wattage and fan speed vary widely across brands.
For batch cooking in either style, keep finished portions warm in a 200°F conventional oven rather than leaving them in the turned-off air fryer. Residual heat continues cooking and can push perfectly crisp florets into overdone territory. This approach maintains quality when preparing large quantities for gatherings or meal prep routines where timing multiple components is essential.
Seasoning Strategies That Stick and Brown
Dry spice blends applied before cooking develop deeper flavor than post-cook seasoning because heat activates volatile compounds and bonds them to the oil-coated surface. Garlic powder, smoked paprika, cumin, and nutritional yeast all perform well under air frying conditions. Fresh garlic burns easily at 375°F and should be reserved for finishing or used only in oil-based pastes applied after cooking.
Salt draws moisture to the surface through osmosis. Salting immediately before cooking minimizes this effect. If you salt 30 minutes ahead, pat the florets dry again before adding oil.
Kosher salt distributes more evenly than fine table salt due to larger crystal size. Flaky sea salt works best as a finish after cooking for textural contrast.
Cheese additions require timing precision. Hard grated cheeses like Parmesan can go on during the last 2 to 3 minutes of cooking to melt and crisp without burning. Soft cheeses or cheese powders should be tossed after removal from heat.
For inspiration on savory flavor profiles that complement roasted vegetables, consider how honey garlic glazes balance sweet and umami notes without overwhelming delicate produce.
Acid and Fresh Herb Finishes
Bright acidity cuts through the richness of oil and enhances perceived crispness. Lemon juice, rice vinegar, or balsamic glaze added after cooking preserves fresh flavor that would otherwise degrade under high heat. Toss gently to avoid crushing crispy edges.
Start with 1 teaspoon per pound and adjust to taste.
Fresh herbs like parsley, cilantro, or dill lose potency and turn bitter when exposed to sustained high temperatures. Chop finely and fold in just before serving. Hardy herbs like rosemary or thyme can withstand brief heat exposure and may be added during the final 2 minutes if minced very small.
Store-bought herb blends labeled "finishing" or "garnish" are formulated for post-cook application and work reliably here.
Umami boosters like soy sauce, miso paste, or fish sauce add depth without competing with browning flavors. Dilute concentrated liquids with oil or citrus to prevent localized sogginess. A ratio of 1 part umami liquid to 3 parts oil maintains proper coating consistency.
These ingredients pair especially well with Asian-inspired spice mixes featuring ginger powder, toasted sesame, or chili crisp.
Troubleshooting Common Texture Problems
Soggy cauliflower almost always traces back to insufficient drying, overcrowding, or low temperature. Verify your florets were bone-dry before oiling. Reduce batch size to allow visible gaps between pieces.
Confirm your unit actually reaches set temperature using an infrared thermometer gun aimed at the basket surface after preheating. Some budget models run 20 to 30 degrees below display readings.
Burnt exteriors with raw interiors indicate pieces that are too large or temperature that is too high. Cut florets smaller next time or reduce heat to 350°F and extend cook time. Rotate the basket more frequently to expose all surfaces evenly.
Dark-colored baskets absorb more radiant heat and may require a 10 to 15 degree reduction compared to light-colored or nonstick-coated alternatives.
Uneven browning within a single batch suggests inconsistent sizing or inadequate shaking. Sort pieces before cooking and shake at least once midway. Position thicker stem ends toward the center of the basket where airflow is strongest.
Place thinner floret tips near the edges where heat intensity is slightly lower. This arrangement compensates for natural variations in density and thickness.
Preventing Smoke and Odor Issues
Excess oil pooling in the bottom of the basket causes smoking and unpleasant burnt smells. Measure oil precisely rather than pouring freely. Line the drip tray with parchment paper designed for air fryers to catch runoff without blocking airflow holes.
Never use wax paper or plastic wrap, which melt at cooking temperatures.
Strong odors from previous cooks can transfer to mild vegetables like cauliflower. Clean the basket and tray thoroughly between uses with warm soapy water. Baking soda paste removes stubborn residue that harbors smells.
Running the empty unit at 400°F for 5 minutes after cleaning burns off lingering particles. Dedicated air fryer liners reduce cross-contamination and simplify cleanup.
Persistent smoke despite proper technique may indicate a malfunctioning heating element or failing fan motor. Unplug the unit and inspect for visible damage or debris accumulation near internal components. Contact the manufacturer if problems continue after thorough cleaning.
Continuing to use a faulty appliance poses fire risk and compromises food quality regardless of ingredient preparation.
Storage and Reheating Guidelines
Store cooled air fryer cauliflower in an airtight container lined with paper towels to absorb residual moisture. Refrigerate within two hours of cooking and consume within three days for best quality. Freezing is possible but significantly alters texture upon thawing.
Frozen portions work acceptably in soups or casseroles but lose their signature crispness entirely.
Reheating requires restoring both temperature and texture. The air fryer itself is the ideal tool for this task. Spread leftovers in a single layer and reheat at 350°F for 3 to 5 minutes, shaking once halfway.
Microwave reheating makes florets rubbery and should be avoided unless texture is irrelevant to your intended use. Conventional oven reheating at 375°F for 8 to 10 minutes works for larger batches but takes longer to restore crispness.
Food safety standards from the USDA Food Safety and Inspection Service recommend storing cooked vegetables at or below 40°F and reheating to an internal temperature of 165°F. Use a reliable digital meat thermometer to verify safe temperatures when reheating previously stored portions, especially if serving vulnerable populations. Visual cues alone cannot confirm pathogen elimination.
Repurposing Leftovers Creatively
Softened leftover cauliflower still has value beyond direct reheating. Blend into creamy soups or pasta sauces for added nutrition and body without dairy. Fold into grain bowls, tacos, or wraps where crispness is less critical.
Mash with potatoes or root vegetables for a lighter alternative to traditional mashes. Dice and add to frittatas, fried rice, or stir-fries near the end of cooking to warm through without further breakdown.
Flavor resets help distinguish repurposed portions from originals. Toss softened florets with fresh acid, herbs, or crunchy toppings like nuts or seeds before serving. Incorporate into dishes with bold sauces or dressings that mask textural changes.
Plan repurposing strategies when initially cooking to minimize waste and maximize versatility across meals throughout the week.
Batch cooking intentionally for multiple uses differs from saving accidental leftovers. Undercook slightly if planning to reheat or incorporate later, as second heating completes the process. Label containers with date and intended use to streamline meal assembly.
This forward-thinking approach aligns with efficient kitchen management practices seen in professional settings and home kitchens focused on reducing daily decision fatigue.
Frequently Asked Questions
Can I cook frozen cauliflower in the air fryer?
Yes, but expect softer texture and longer cook times. Do not thaw before cooking, as thawing releases water that guarantees sogginess. Increase temperature to 400°F and cook 18 to 22 minutes, shaking every 5 minutes.
Frozen florets never achieve the same level of crispness as fresh, but they work adequately for sauced dishes or blended applications where texture is secondary.
Why does my cauliflower taste bitter after air frying?
Bitterness usually comes from burned garlic, overcooked cruciferous compounds, or rancid oil. Use garlic powder instead of fresh minced garlic for high-heat applications. Stop cooking when florets are golden brown, not dark brown.
Taste your oil before using to ensure freshness. Rancidity develops faster in oils stored near heat sources or in clear bottles exposed to light.
Is air fryer cauliflower healthier than roasted?
Air frying typically uses 50 to 70 percent less oil than traditional roasting while achieving comparable crispness. Nutrient retention is similar between methods since both use dry heat for relatively short durations. Health differences are marginal and depend more on portion size and accompanying sauces than cooking method itself.
Choose based on preferred texture and equipment convenience rather than significant nutritional advantage.
Can I use cooking spray instead of liquid oil?
Most aerosol cooking sprays contain propellants and emulsifiers that degrade nonstick coatings over time and may impart chemical flavors at high temperatures. Pump-style oil sprayers filled with pure avocado or grapeseed oil are safer alternatives that provide controlled misting without additives. If using commercial spray, apply to food rather than directly to the basket and choose products labeled safe for nonstick surfaces.
How do I know when cauliflower is done without guessing?
Visual and tactile cues are more reliable than fixed timers. Florets should be deeply golden with some darker spots indicating proper caramelization. A fork should pierce the thickest stem with gentle pressure but meet slight resistance.
Internal temperature should reach at least 165°F for food safety. Experience with your specific appliance and preferred cut size will refine timing estimates over successive batches.
Before You Serve
Mastering air fryer cauliflower comes down to respecting moisture, maintaining consistent size, and understanding your specific appliance's behavior. The technique rewards attention to detail during prep more than any special ingredient or secret trick. Once you internalize the drying and spacing fundamentals, you can adapt seasonings and pairings endlessly without losing the foundational texture that makes this method worthwhile.
Keep notes on what works for your particular model and preferred floret dimensions. Small adjustments compound over time into intuitive skill that transcends written instructions. Share successful variations with others who struggle with the same pitfalls, and remember that occasional imperfect batches teach more than consistent success ever could.
Good cooking is iterative practice, not flawless execution on the first attempt.




