You have guests sitting at the dining table, waiting for the perfect holiday meal. You slice into your beautiful roast or roast chicken, only to find the center is still raw and pink, or so dry it resembles cardboard. That sinking feeling of disappointment is incredibly common, and it almost always traces back to a single mistake: bad probe placement.
Quick Answer: To find the true temperature of your food, place the thermometer probe in the thickest part of the meat, keeping it completely clear of bones, pockets of fat, and gristle. For poultry like chicken and turkey, insert the probe into the deepest part of the thigh muscle without hitting the bone, or into the thickest part of the breast. For steaks, chops, and roasts, aim directly for the physical center of the largest muscle group.
Why Probe Placement Matters for Safety and Dinner Quality
Placing your probe in the wrong spot can lead to inaccurate readings that ruin your meal or make your family sick. Heat moves through food via conduction, traveling from the hot exterior surfaces toward the cold center. The outermost layers of muscle tissue will always cook faster than the interior tissue, creating a thermal gradient that changes by several degrees per millimeter.
If you read the temperature just a quarter-inch too shallow, you might pull your roast out when the actual center is still in the danger zone.
Foodborne bacteria thrive in warm, damp environments. According to the USDA Food Safety and Inspection Service guidelines, raw poultry and meats carry pathogens like Salmonella, Listeria, and pathogenic E. coli. These pathogens are killed only when the cold point of the meat reaches a specific pasteurization temperature.
If your probe is misaligned, you might think you have reached a safe temperature when the core of the muscle is still lukewarm and teeming with bacteria.
Conversely, incorrect placement often leads to chronic overcooking. If you accidentally place your thermometer probe against a pocket of fat or a bone, both of which conduct heat differently than lean muscle, you will get an incorrect reading. Bones conduct thermal energy faster than raw muscle tissue, while fat pockets can insulate the probe or register high temperatures quickly.
If you pull your meat based on these false readings, you will end up with an undercooked center. If you overcorrect by cooking the meat longer to compensate, you will end up drying out the rest of the roast.
General Rules for Where to Place a Meat Thermometer in Meat, Chicken & Turkey
To master your kitchen temperatures, you must follow a few physical rules that apply to every piece of protein you cook. These core guidelines form the basis of safe meat preparation, regardless of whether you are roasting a massive Thanksgiving turkey or searing a thin pork chop on a weeknight.
First, always locate the absolute center of the thickest muscle group. This area is the thermal core, the very last part of the food to absorb heat from your oven, smoker, or grill. If you can get a safe, accurate reading at this deepest point, you know the rest of the meat is safely cooked.
Finding this spot requires you to look at the meat from multiple angles to judge its thickness and depth.
Second, you must keep the probe away from bones. Bone structure acts like a highway for heat, drawing thermal energy deep into the meat much faster than the surrounding wet muscle tissue can absorb it. If your thermometer tip rests against or near a bone, the display will show a temperature that is significantly higher than the actual heat of the surrounding meat.
This false high will trick you into ending the cook early.
Third, avoid pockets of pure fat and gristle. Fat conducts heat poorly compared to water-rich lean muscle, but once fat melts, it can reach high temperatures quickly. Gristle and connective tissue are dense and can bend thin digital probes, or cause irregular heat readings.
Safely insert the probe into clean, lean muscle tissue to get a consistent, reliable reading.
Finally, consider the angle of insertion. Shoving a probe straight down into a piece of meat from the top often leads to errors because the tip can easily pass through the center and touch the hot pan or grill below. Instead, insert the probe from the side or at an angle that keeps the sensing tip suspended directly in the middle of the thickest zone.
How to Find the Thermometer’s Sensing Area
Every meat thermometer has a specific sensory zone along its steel shaft that registers the temperature. You cannot use your tool effectively if you do not know exactly where this sensor is located.
Digital instant-read thermometers, like the ones used by professional chefs, have their sensors built into the very tip of the probe. In these high-speed tools, the thermistor or thermocouple sits in the bottom one-quarter to one-half inch of the metal stem. This design lets you pinpoint the temperature of a tiny area with immense precision.
You only need to insert the tip into the target zone to get a valid reading.
Digital Probe:
|==============================|[] <-- Sensor at the very tip (0.5 inches)
                                ^ Insert only this part into the core.

Dial/Bimetal Probe:
|===============XXXXXXXXXXXX===|   <-- Sensor along a 2-to-3-inch coil
                ^^^^^^^^^^^^
                Insert at least 2 to 3 inches deep to get a real average.
In contrast, older dial-style bimetallic coil thermometers are built differently. These models contain a coiled metallic sensing spring inside the shaft that runs two to three inches up from the tip. To get an accurate reading on a dial thermometer, you must insert the stem at least two to three inches deep into the food.
If you only insert the tip of a dial thermometer, most of the sensory coil will remain exposed to the hot air of your oven, giving you a uselessly high reading.
Checking Chicken Temp: Placing a Thermometer in Whole Poultry
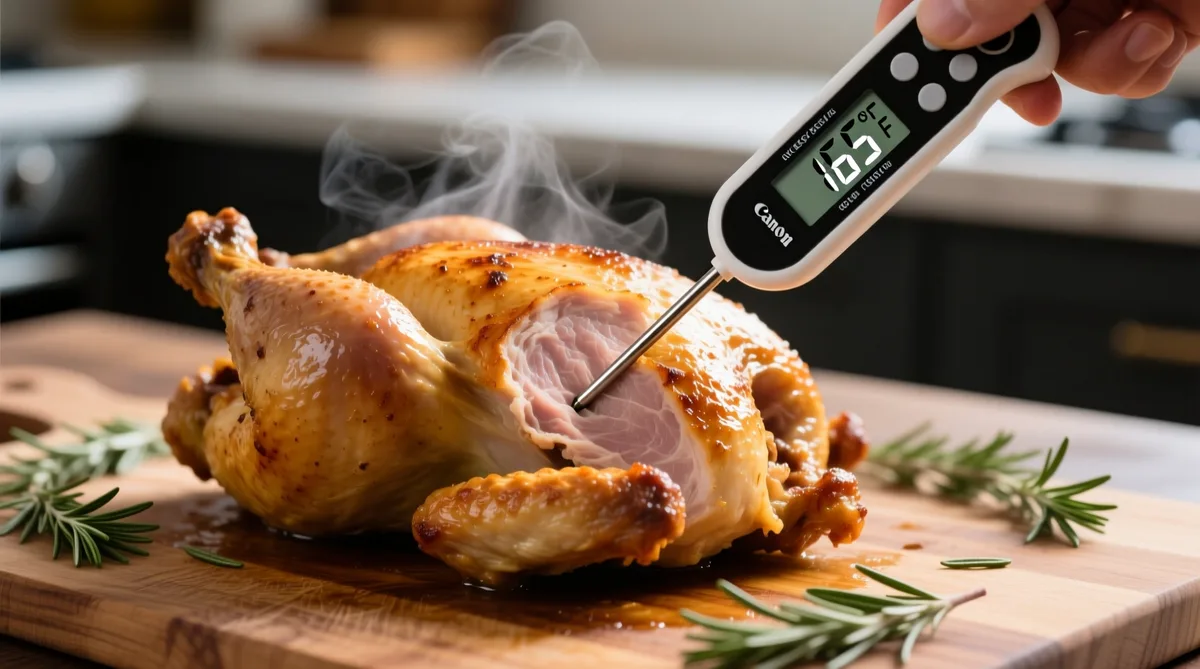
Image source: Bing (Web (fair-use with source credit))
Placing a thermometer in a whole chicken or turkey requires a specialized strategy because whole birds contain two distinct types of meat that cook at different rates. The white breast meat is lean, delicate, and prone to drying out, while the dark leg and thigh meat is rich in connective tissue that requires higher temperatures to break down.
To measure a whole bird, you must check two specific areas to run a complete safety check. The primary target is the deepest part of the thigh muscle. The thigh is located on the lower side of the bird, near the body cavity.
To locate this spot:
- Gently pull the leg away from the breast to expose the crevice between the thigh and the body.
- Insert the probe into the thickest part of the thigh, aiming parallel to the bird’s torso.
- Push the probe deep into the muscle, but make sure you do not hit the femur or hip bone.
- If you hit bone, back the probe out slightly (about a quarter of an inch) to get a true reading of the muscle tissue.
The second area you must check is the thickest part of the breast. Insert the probe from the neck end of the bird, running parallel to the breastbone. Keep the probe deep in the muscle tissue, making sure it does not slide out into the empty body cavity inside the bird.
The body cavity contains hot air, which will show a false high reading that is completely different from the actual meat temperature.
Placement in Single Poultry Cuts
Cooking individual chicken breasts, thighs, or wings poses unique challenges because these cuts can be thin, uneven, or irregularly shaped. Sliding a thermometer straight down into a thin chicken breast will only measure the temperature of your cutting board or skillet.
For individual boneless chicken breasts, use the horizontal insertion technique. Pat the breast flat with your hand, then insert the thermometer probe horizontally through the side of the breast. Slide the probe toward the center until the tip rests in the thickest middle section.
This method keeps the entire sensory area of the probe surrounded by cold muscle tissue, guarding against air interference.
       Horizontal Insertion (Steaks, Chops, Chicken Breasts):

                 Probe
       ==========> [   Thickest Part of Meat   ]
                   [          Center           ]
When dealing with bone-in chicken thighs, look for the thickest muscle section running alongside the central bone. Insert your probe from the side, angling it slightly upward into the center of the muscle block. Be careful not to let the probe touch the bone that runs through the middle of the thigh.
For thin wings and drumsticks, finding a safe reading spot can be tough. On a drumstick, insert the probe from the thick end, running parallel to the bone, stop in the center of the calf muscle, and keep the probe clear of the shinbone. Chicken wings are often too small for reliable probe placement; for these, check the thickest section of the drumette, or rely on visual signs of doneness alongside a quick check with a thin-tipped digital thermometer.
Placing a Thermometer in Large Meat Cuts
Large roasts, bone-in hams, briskets, and pork shoulders are massive thermal masses that require hours of cooking. To check these large cuts, you must navigate thick fat caps, complex bone structures, and slowly cooking centers.
For a beef roast, such as a prime rib or a tenderloin, insert your thermometer probe through the center of the cut from the side. You want the tip of the probe to rest in the dead center of the largest muscle group. If the roast has a bone, make sure you position the probe tip at least one inch away from the bone surface.
When cooking a pork shoulder (Boston butt) for pulled pork, you need to navigate around the large, flat shoulder blade bone. Insert your probe into the thickest part of the meat, well away from the scapula. When smoking pork shoulder, the meat goes through a “stall” where moisture evaporates from the surface, cooling the meat down.
Keep your probe deep in the center to monitor this stall accurately, and do not move the probe once the cook starts, or you will create a channel for hot air to enter the muscle.
For whole hams, check whether you are cooking a bone-in or boneless cut. For boneless ham, simply insert the probe into the physical center of the meat. For a bone-in ham, insert the probe into the thickest muscle area, aiming away from the large central leg bone.
If you are preparing a pre-cooked city ham, you only need to heat it to a serving temperature of 140°F, but a fresh, raw ham must reach a safe pasteurization limit of 145°F, followed by a three-minute rest.
Placement in Thin Cuts
Measuring thin cuts of meat like steaks, pork chops, and ground beef patties requires high precision. Many home cooks skip using a thermometer on these cuts because they think the meat is too thin to measure. This is a big mistake.
To measure a thin steak or pork chop, never insert the probe from the top. Instead, use clean kitchen tongs to lift the meat off the hot cooking surface. Hold the meat vertically, then insert your instant-read digital thermometer probe horizontally through the side of the cut.
Push the probe deep enough so that the entire sensory tip sits inside the center of the steak.
          Tongs Lift Method (Side Profile):

                 ( Tongs holding steak upright )
                             |  |
                             |  |
                             |  |
                        +----+==+----+
                        |    |  |    | <--- Steak held vertically
          Probe =======>|    o  o    |
                        |            |
                        +------------+
With ground meat patties, like hamburgers, the USDA recommends cooking them to 160°F because the grinding process distributes surface bacteria throughout the meat. To check their temperature, insert the probe horizontally from the side of the patty into the very center of the burger. This technique is especially important for thick, hand-pressed patties, where the center can easily remain raw while the exterior looks fully charred and cooked.
Ultimate Temperature and Placement Guide
Use this reference table to quickly locate the correct placement zone and target temperature for different types of meat.
| Meat Type | Best Placement Location | Minimum Safe Temp (USDA) | Ideal Culinary Temp | Key Placement Traps to Avoid |
|---|---|---|---|---|
| Whole Chicken & Turkey | Thickest part of thigh (near joint, avoiding bone) and thickest part of breast | 165°F | Thigh: 175°F-180°F, Breast: 165°F | Avoid hitting the thigh bone or pushing the probe into the empty cavity. |
| Chicken Breasts (Individual) | Horizontally through the side into the thickest center | 165°F | 165°F | Do not insert from the top. Keep the probe level. |
| Beef/Pork Roasts | Center of the thickest muscle, away from fat caps and bones | 145°F (with 3-min rest) | Med-Rare: 135°F, Pork Roast: 145°F | Avoid placing the probe in the thick fat cap on top of the roast. |
| Beef Steaks | Horizontally through the side into the center of the steak | 145°F (with 3-min rest) | Rare: 125°F-130°F, Med-Rare: 135°F | Do not let the probe touch the hot pan or grill grate. |
| Pork Chops | Horizontally through the side into the thickest section | 145°F (with 3-min rest) | 145°F | Keep the probe away from the bone-in rib structure. |
| Ground Meat Patties | Horizontally from the side into the center of the burger | 160°F | 160°F | Do not measure from the top down. |
| Fish Fillets | Thickest part of the fillet, avoiding the spine | 145°F | 145°F | Avoid pushing the probe completely through thin fillets. |
Common Mistakes When Measuring Meat Temperatures
Even experienced cooks can fall into bad habits that result in bad temperature readings. Knowing these common mistakes will help you avoid them in your own kitchen.
- Letting the probe touch the pan or grill grate: When you insert a thermometer straight down through a piece of meat, the metal tip often pokes out the bottom and makes contact with the hot cast iron or grill grate. This will give you a reading that is hundreds of degrees too high, causing you to pull your raw meat off the heat far too early.
- Reading temperatures across different muscle zones: Large roasts contain multiple muscles separated by layers of fat. If you insert your probe into a seam of fat rather than the clean muscle tissue, your reading will be inaccurate. Always aim for the solid, thick center of a single muscle block.
- Pulling the thermometer out too quickly: Many chefs rush during the cook and pull the probe out before the sensor can register the heat. Even fast instant-read digital thermometers require two to five seconds to stabilize. If you pull the probe out too fast, your reading will be lower than the actual temperature of the meat.
- Failing to calibrate the thermometer: Meat thermometers can lose accuracy over time. If your thermometer is off by just five degrees, it can mean the difference between a safe medium-rare steak and a dry, overcooked piece of meat. Test your thermometer regularly in an ice bath to make sure it reads exactly 32°F.
- Assuming all parts of the muscle cook evenly: Heat does not penetrate meat in a perfect, uniform circle. Air currents in your oven or hot spots on your grill can cause one side of a roast to cook much faster than the other. Always check the temperature in several different spots to find the coolest zone before you finish cooking.
- Creating a chimney effect: Pushing a large, thick wireless probe into meat can leave a wide hole behind. If you pull the probe out and insert it in a different spot, the remaining open channel lets hot air and juices flow directly into the center of the meat, which can alter your readings and dry out your dinner.
Master the Ice Bath: How to Calibrate Your Thermometer
To make sure your probe placement gives you an accurate temperature reading, you must calibrate your thermometer regularly. The easiest way to verify your tool’s accuracy is with a simple ice sugar-glass water test. This process mimics the natural freezing point of water to establish a dependable reference point.
To calibrate your thermometer using an ice bath:
Step 1: Fill a tall glass to the top with crushed ice.
Step 2: Add cold water until it reaches just below the rim of the glass.
Step 3: Stir the mixture thoroughly and let it sit for two minutes to reach 32°F.
Step 4: Submerge the probe tip at least two inches deep into the cold slush.
Step 5: Hold the probe in the center of the glass, making sure it doesn't touch the glass walls.
Step 6: Wait for the display to stabilize. It should read exactly 32°F (0°C).
If your digital thermometer reads higher or lower than 32°F, press the calibration button (often labeled “CAL”) while the probe is submerged to adjust the reading back to zero. For manual dial thermometers, use a small wrench to turn the nut located under the dial face until the needle pointer rests exactly on the 32°F mark. Calibrate your thermometer once every few months, or after any accidental drop, to keep your temperature readings perfectly accurate.
Frequently Asked Questions
Can you leave a meat thermometer in the oven while cooking?
Only leave the thermometer in the oven if it is specifically designated as a “leave-in” or oven-safe probe. Leave-in thermometers are built with heat-resistant materials and heavy braided metal cables that can withstand heat up to 500°F or more. Instant-read digital thermometers are not built to stay in the oven; their plastic heads and LCD screens will melt if exposed to prolonged heat.
Where do you put the thermometer in a rolled, stuffed roast?
For a stuffed roast, like a porchetta or a stuffed pork loin, insert the thermometer probe into the thickest part of the meat roll, rather than the stuffing in the center. The stuffing has a different density and moisture level than the surrounding muscle tissue, meaning it cooks at a different rate. However, because raw meat juices can drip into your stuffing during preparation, you must also insert the thermometer into the center of the stuffing after the meat is cooked to make sure the core reach 165°F.
Why does my thermometer show a lower temp when I push it in deeper?
When you push a thermometer deeper into a piece of meat, you are moving the sensory tip away from the hot exterior layers and closer to the cold center. The lowest temperature you see on your digital display is the correct temperature of the meat’s thermal core. Always use this lowest number to determine when your food is done, as it represents the least-cooked part of the muscle tissue.
What is the difference between a thermocouple and a thermistor?
A thermocouple uses two different wire metals joined at the tip to create a voltage signal that changes with temperature, allowing for super-fast readings (under two seconds) and a very thin sensory tip. A thermistor uses a temperature-sensitive resistor inside the probe tip, which is highly accurate and inexpensive, but takes slightly longer (three to five seconds) to stabilize its reading.
How do I measure the temperature of fish?
To measure the temperature of fish, insert the thermometer probe into the thickest part of the filet, which is usually found just behind the head of the fish. If you are cooking a whole fish, insert the probe from the top, running parallel to the spine, without letting the tip touch the bones. Fish meat is delicate, so use a thin digital probe to avoid tearing the flaky muscle fibers.
Worth Remembering
Getting a perfectly cooked meal depends on using the right tools in the right spots. Even the most expensive, advanced digital thermometer will fail if you place the probe in a pocket of fat or resting against a bone. Take your time, find the deep center of the thickest muscle, and keep your probe clear of bones and fat to make sure your food is safe and delicious.
By taking a few extra seconds to double-check your probe placement, you will prevent undercooked centers and dry, stringy meats. Keep your thermometer calibrated, stay clear of bones, and always aim for the true thermal center of your meat to make sure your meals turn out perfect every single time.


