An air fryer rack lets you cook more than one layer at a time in a machine that ships with a single basket or tray. The right choice depends on three practical questions: what fits inside your appliance, what you cook most often, and how much cleaning you are willing to do. This guide walks through each rack style, the fit checks that matter before you order, and the material and safety details you should confirm in your own manual.
How to Choose an Air Fryer Rack: the Short Answer
Start with your appliance type, then your cooking habits.
- Drawer-style basket fryer, mostly roasting and reheating: a two-tier stainless stack or a perforated mesh plate. Tall three-tier stacks and skewer stands usually need more vertical room than these baskets offer.
- Drawer-style basket fryer, mostly single servings and crispy food: a perforated mesh plate. It adds no height and keeps the cooking surface low.
- Drawer-style basket fryer, mostly messy or delicate food: a silicone liner with a raised grid. Cleanup is easier, but expect less bottom browning.
- Oven-style air fryer with slide-in shelves: a reversible wire tray or a skewer rack. These designs assume a shelf ledge and a door opening rather than a pull-out basket.
- Batch cooking and meal prep: a multi-tier stacking rack, sized to your basket height.
No rack style wins across the board. Each one trades capacity, airflow, cleanup effort and height, so the best pick is the one that matches your machine and your weekly menu. If two styles both fit your appliance, let cleanup decide: a silicone liner for saucy, sticky food, and a mesh plate or wire rack when you want crisp edges and don’t mind scrubbing.
Measure Your Basket Before You Buy
A rack that does not fit is money wasted, and a rack wedged against the basket walls blocks the air circulation that makes an air fryer work. Measure before you shop.
- Width and depth at the narrowest point. Many baskets taper toward the bottom, so a rack that drops past the top rim may jam halfway down. Measure near the base, not just at the opening.
- Interior height. Measure from the basket floor to the underside of the heating element or the top of the cooking chamber. This figure caps how tall a loaded rack can be.
- Taper. Compare the width at the top rim with the width near the base. A large difference tells you the rack must be narrower than the floor measurement suggests.
- Side clearance. Plan for a gap between the rack edge and the basket wall so air can move around it. Treat any specific gap figure as a rule of thumb and check your manual for guidance.
- Loaded height. Add the rack’s own height to the height of the food you plan to stack. A rack that fits empty may not fit with a full top tier.
- Manual checks. Look for a maximum fill line, any stated accessory height limit, and the manufacturer’s position on third-party accessories before you order.
These are measurement steps, not manufacturer specifications. Your manual is the authority on any stated limit.
For oven-style models, measure the shelf spacing and the door opening as well. Trays that rely on side ledges need those ledges to sit at a usable height.
Round Baskets and Square Baskets Need Different Measurements
A rack designed for a round basket has to clear the curve at every point, not just across the widest span. Measure the diameter across the top rim and again near the floor, then subtract for the gap you want around the edge. A rack listed by its full diameter will often foul the tapered wall before it reaches the base.
Square and rectangular baskets are more forgiving, but corners are where racks tend to rock. Check diagonal measurements as well as side-to-side width. If a listing gives only one figure, ask the seller for the full footprint or treat the fit as unresolved rather than assuming it will work.
Rack Styles Compared: Strengths and Trade-Offs
Stainless Steel Multi-Tier Stacking Racks
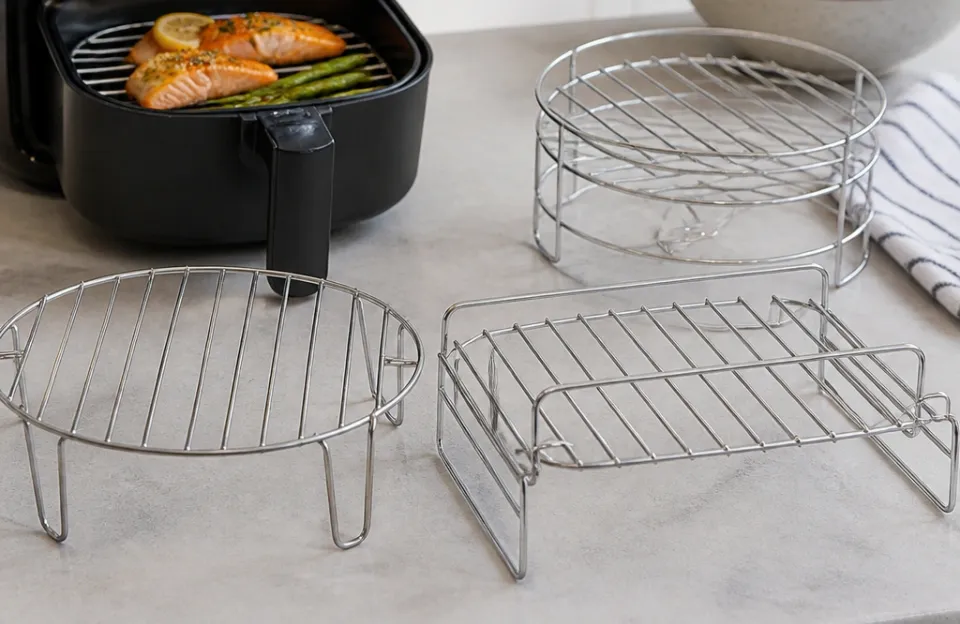
These racks use a base tray with legs that support one or two upper trays, typically in two-tier and three-tier versions. Some include side handles so you can lift the whole assembly at once.
They suit batch cooking: vegetables, reheating, and small proteins that benefit from being spread across layers instead of piled together. The trade-off is height. A three-tier rack needs real vertical room, and thick items on the top tier bring food closer to the heating element. Wire grids also have more surfaces and weld points where grease bakes on, so hand-cleaning takes patience.
Silicone Liner Racks with Raised Grids
These liners sit on the basket floor and use raised ridges or bumps to lift food slightly above drips. They wipe clean easily, protect nonstick coatings from scratches, and are a good match for delicate fish and low-mess sides.
The limitation is airflow. A silicone liner is a largely solid barrier with only small openings, so the underside of food may brown less than it would on open wire, though the exact gap depends on your appliance and load. Empty liners also shift around, which makes placing delicate items fiddly. Silicone heat ratings vary by product, so check the stated maximum before use and follow the maker’s guidance.
Perforated Mesh Crisper Plates
These are flat, rigid discs punched with many small holes, sometimes sold with raised feet. They replace or sit above the stock crisper plate and add almost no height, which makes them the easiest style to fit across basket sizes.
The perforations are intended to support airflow under the food, which suits fries, chickpeas and breaded cutlets. The catch is capacity: a mesh plate is still one layer. Fine crumbs and dry rubs can also fall through the holes and burn on the basket floor, and because these plates are rarely adjustable, the diameter has to match closely or the plate will wobble or not seat at all.
Multi-Level Skewer Racks for Kebabs
A skewer rack uses a central post with slots that hold metal skewers vertically around the column. It keeps kebabs, satay and vegetable sticks separated so each piece is exposed to moving air, and drips fall to the base rather than pooling under neighboring food. Check the maker’s stated capacity and height before loading it.
Setup takes longer than tipping food into a basket: you thread each skewer, balance the load, and unthread everything afterward. These racks need a tall chamber or an oven-style door opening, and packed skewers can shield the inner ones from airflow. Standard drawer baskets often cannot accommodate loaded skewers.
Reversible Wire Rack Trays
A reversible tray offers two surfaces in one frame: wide-spaced wires on one side for burgers and chops, a tighter grid on the other for shrimp or diced potatoes. These trays generally sit on built-in ledges in oven-style air fryers rather than round baskets.
The fold or hinge where the two sides meet is the weak point, and cheaper trays may rock or lose shape after repeated heating, so it is worth inspecting the hinge and edges when the tray arrives and returning it if the frame is not rigid. A reversible tray gives you one elevated layer with space underneath, not the multi-layer capacity of a stacking rack.
Rack Styles at a Glance
| Rack Type | Best For | Typical Material | Airflow | Cleanup Effort |
|---|---|---|---|---|
| Multi-tier stack | Batch cooking, meal prep | Stainless steel | High, if tiers are not crowded | Moderate |
| Silicone liner with raised grid | Low-mess baking, delicate fish | Food-grade silicone | Low | Very easy |
| Perforated mesh plate | Crispy single layers, fries | Stainless steel or coated aluminum | High | Easy, but holes trap crumbs |
| Skewer rack | Kebabs, vertical roasting | Stainless steel | High, if skewers are spaced | Difficult |
| Reversible wire tray | Mixed food sizes, oven-style models | Coated steel | Medium to high | Moderate |
Materials and airflow entries describe typical designs, not tested performance. The airflow column is a design description rather than a measured rating, and real performance depends on your fan, basket shape and how full you load each layer.
Verify Material and Temperature Ratings Before You Buy
Material claims are where generic advice is least reliable, because ratings differ by product. The rating that matters is the one printed on the listing or the packaging for the exact rack you are buying, not a general figure for the material.
Where to find the rating. Look on the product listing under specifications, in the downloadable manual or PDF, on the packaging, and in the care instructions. If none of those states a maximum temperature, treat the rack as unrated for air frying.
How to check it against your appliance. Find your air fryer’s maximum temperature setting in its manual or on the control panel, then confirm the rack’s stated limit is at least that high. A rack rated only for oven use at lower temperatures may not be suitable.
What to do when there is no rating. Contact the seller or manufacturer and ask for it in writing before ordering. A listing that describes a material as “heat resistant” without a number is not a rating.
Material-by-Material Guidance
- Stainless steel is common in oven-safe accessories and is the usual choice for tiered racks and skewer stands. Confirm the manufacturer’s stated maximum temperature for the specific rack.
- Silicone is often chosen because it will not scratch nonstick coatings, but heat ratings vary by product, and silicone can hold onto strong spice odors. Check the stated limit before buying, and follow the maker’s guidance on contact with the heating element.
- Aluminum and coated wire keep weight down, but thin gauges and nonstick coatings can bend or flake with heavy use. Wash coated racks by hand unless the maker says otherwise.
- Plastic components should be avoided unless the manufacturer explicitly rates them for your machine’s maximum temperature. This includes handles, feet, clips and skewer caps.
Clearance, Heating Element and Safety Checks
Adding a rack raises food toward the top heating element, so clearance is worth checking before you cook. Your manual is the authority here: follow any maximum fill line, accessory height limit or clearance guidance it gives, and keep the loaded rack below the element as instructed. If your manual is silent, contact the manufacturer rather than guessing at a safe gap. Published clearance requirements vary widely between models, and some manufacturers publish no figure at all.
Clearance means more than headroom. Several manuals also require side or rear spacing around the appliance itself, so a rack that fits under a cabinet still needs the unit’s own ventilation gap respected. Generic figures you see quoted online are not a substitute for your model’s instructions.
This is where silicone bumpers and parchment underneath the rack feet need reconciling. Bumpers and parchment protect the basket coating and can improve under-rack airflow, but they also add height and reduce overhead clearance. Account for that extra height in your loaded-height measurement, and follow your manual on what may be placed near the heating element.
Overcrowding defeats the purpose of any rack. If every gap is filled, the bottom tier steams in moisture dropping from above. Leave visible gaps on each level, and remember that probing the doneness of food on a lower tier means lifting an upper tray carefully.
Cleaning, Storage and Warranty Considerations
Dishwasher safety is product-specific. Some stainless and silicone accessories are dishwasher-safe, while coated or nonstick racks often are not, since harsh detergent and high-pressure jets can strip the coating. Check the care instructions rather than assuming.
Cleaning routine. Soak greasy racks in hot, soapy water before scrubbing, and use a nylon brush to reach between wires and weld points. Grease left in joints builds up and can turn rancid. Skip steel wool on coated racks and inside the basket.
Storage. Store racks flat or hanging. Leaning them against a crowded cabinet wall can bend the legs, and loose silicone feet and stabilizing clips go missing unless the set stays nested together.
Inspection. Check weld points periodically. A broken weld leaves a sharp wire edge that can scratch your hands or your basket coating, so retire the rack if you find one.
What to Check in Accessory Warranty Terms
Warranty terms are set by each manufacturer, and coverage for third-party accessories varies. Before you order, note these five points in the rack listing and your appliance documentation:
- The rack’s own warranty period and what it covers. Look for defects in materials and workmanship, and check whether bending, coating flaking or discoloration counts.
- Whether the rack is sold by your appliance’s manufacturer or a third party. A first-party accessory is the most direct route to a stated fit for your model.
- Any statement in your appliance warranty about non-original parts. Coverage rules differ by brand, and a generic rack may or may not affect a future claim.
- The return window and condition requirements. This matters most for fit problems you only discover on arrival.
- Your receipt and order record. Keep both, along with the listing’s stated dimensions and temperature rating, in case you need to make a claim.
Do not assume a third-party rack voids your appliance warranty, and do not assume it is covered either. Check the manufacturer’s own documentation rather than relying on forum posts or secondary summaries.
Food Safety Temperatures for Air-Fried Foods
Rack style does not change safe cooking temperatures. Use a food thermometer and check the thickest part before removing food from the heat source. The USDA Food Safety and Inspection Service publishes a safe minimum internal temperature chart for meat, poultry, seafood and other foods.
| Food | Minimum Internal Temperature |
|---|---|
| All poultry, including ground poultry | 165 °F (73.9 °C) |
| Ground meats | 160 °F (71.1 °C) |
| Beef, pork, veal and lamb steaks, chops and roasts | 145 °F (62.8 °C), with a 3-minute rest |
| Fish and shellfish | 145 °F (62.8 °C) |
| Leftovers and casseroles | 165 °F (73.9 °C) |
You can cook to higher temperatures for personal preference. Safe internal temperatures do not change between air fryer models, even though cooking times vary with appliance size and power. With stacked racks, check the food on the lowest tier as well as the top, since layers can heat at different rates.
Overcrowding is a food-safety issue as well as a texture one: USDA FSIS warns that packing the basket can prevent enough air circulation to cook food properly, so large batches may need to be split. Refrigerate leftovers within two hours to avoid the temperature danger zone between 40 and 140 °F. Keep raw meat, poultry and seafood away from cooked and ready-to-eat foods to prevent cross-contamination.
Frequently Asked Questions
Can I Use an Oven Cooling Rack as an Air Fryer Rack?
Only if your appliance manual permits it, the rack fits with space around all sides, it has no plastic or rubber coating, and its stated maximum temperature covers your air fryer’s settings. Oven cooling racks are often too wide for countertop air fryers, so measure the interior first. If the manual says nothing about non-original racks, ask the manufacturer before using one.
Do Stacking Racks Cook the Bottom Layer Evenly?
The bottom layer often cooks somewhat slower because the top tier sits closer to the heating element. Swapping trays partway through and leaving gaps between items help hot air reach lower levels. Check the lowest tier with a thermometer before serving.
Will a Metal Rack Scratch My Nonstick Basket?
Bare metal sliding across a nonstick surface can scratch it over time. Racks with silicone bumpers on the legs reduce that risk, as does lifting the rack straight out instead of dragging it. Adding bumpers or parchment reduces overhead clearance, so recheck your loaded height against the manual.
Should I Choose a Two-Tier or Three-Tier Rack?
Base it on your basket’s interior height and the thickness of your food. Three tiers suit thin items such as bacon or flatbreads in a tall chamber. Thicker items like chicken breasts or broccoli need more space per layer, so two tiers are usually the safer fit. Measure the loaded height of each option against your manual’s limit.
Are Silicone Racks Safe at Air Frying Temperatures?
Food-grade silicone accessories are sold with stated maximum temperatures, and those limits vary by product. Check the maker’s rating against the temperatures you actually use, and follow the maker’s guidance on contact with the heating element. Don’t rely on a general figure quoted for silicone in another context.
Should I Buy a Brand-Name Rack or a Generic One?
A rack sold by your air fryer’s manufacturer is the most direct route to a listed fit for your model, and browsing a wider range of replacement racks lets you compare listed dimensions before ordering. Generic racks vary in size, so check the stated measurements against your own and read reviews that mention your fryer’s brand and quart size. Before buying, confirm the manufacturer’s position on third-party accessories and how it affects your warranty.
Making the Final Choice: A Simple Decision Rule
Choosing among air fryer replacement trays and racks starts with an honest measurement of your machine and a clear look at what you cook most weeks.
Work through it in this order:
- Confirm your appliance type. Drawer basket or oven-style shelves. This alone rules out the styles that cannot seat properly.
- Measure the interior at the narrowest point, plus the height from floor to element. Compare with the rack’s listed dimensions, not the appliance’s external size.
- Match the style to your weekly menu. Batch cooking points to a multi-tier stack; crisp single layers to a mesh plate; messy food to a silicone liner; kebabs to a skewer rack.
- Verify the rating. Find a stated maximum temperature for the exact rack and check it against your air fryer’s top setting.
- Read the accessory terms. Check the rack’s warranty and your appliance maker’s guidance on non-original parts.
Begin with one versatile piece, such as a two-tier stainless stack or a perforated mesh plate, and see how your fan and heating element handle the added layer. Then confirm three things in your manual before each new accessory goes in: the maximum temperature rating, the clearance below the heating element, and the manufacturer’s guidance on third-party parts. Those checks, not marketing labels, are what keep a rack useful for years.