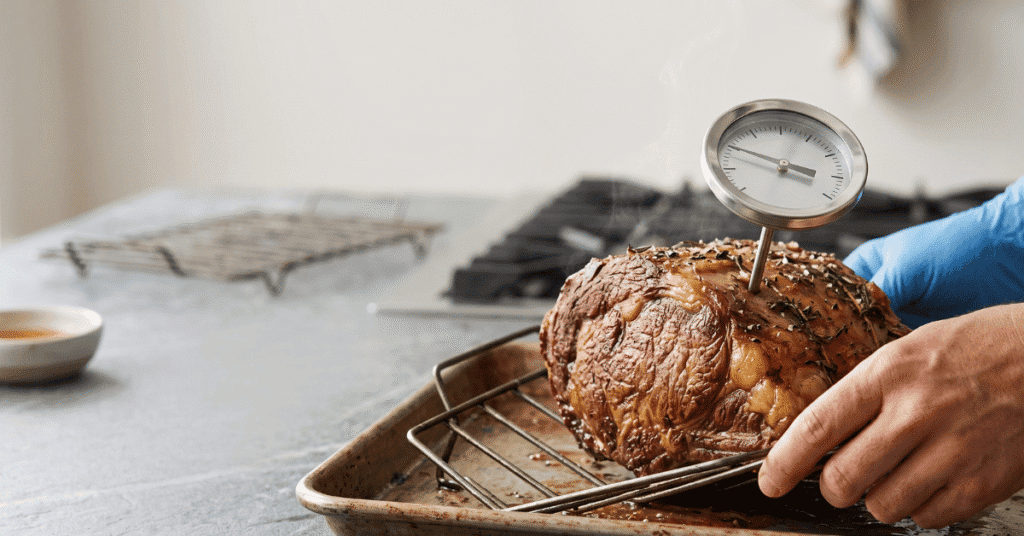
You pull the roast out of the oven, slide the metal probe into the center, and wait. The needle creeps slowly across the face, twitching between two numbers while your dinner guests watch the kitchen clock. If you misread that dial by even ten degrees, you’re either serving a dry, rubbery mess or, worse, undercooked chicken.
Quick Answer: To read a dial meat thermometer correctly, wait 15 to 20 seconds for the needle to stop moving completely. Look at the dial straight on, not from an angle, and identify the line where the red or black needle rests. Most analog thermometers use two-degree increments, so if the needle is between 160 and 170, count the small tick marks to find the exact temperature.
The mechanical secret of the dial thermometer
Analog thermometers don’t use batteries or sensors; they rely on physics. Inside the metal stem is a bimetallic coil, two different metals bonded together. As the heat increases, these metals expand at different rates, causing the coil to twist.
This physical movement turns the needle on the face of the dial.
Because this is a mechanical process, it isn’t instant. Heat has to travel through the metal casing and into the coil before the needle reflects the true temperature. This is why these tools are often called “leave-in” thermometers.
They are designed to stay in the meat while it cooks in the oven so the metal stays hot and the reading stays current.
The sensing area location
Many people assume the very tip of the probe is where the thermometer “feels” the heat. On a dial bimetallic thermometer, the actual sensing area usually starts about a half-inch from the tip and extends two inches up the stem. If you only poke the tip into a thin piece of meat, you’ll get a room-temperature reading because the rest of the coil is still exposed to the air.
Calibration and the “dimple”
Look closely at the metal stem of your thermometer. You will likely see a small indentation or “dimple” a few inches up from the tip. This marks the end of the sensing zone.
To get an accurate reading, you must submerge the probe past this dimple. If you can’t get the probe that deep into the meat, a dial thermometer might not be the right tool for that specific cut.
How to read a dial (meat) thermometer correctly in the kitchen
Reading the face of the thermometer seems easy, but heat and steam can make it tricky. Follow these steps to get the number right every time.
- Insert it deeply: Aim for the thickest part of the meat, avoiding bone, fat, or gristle. Bones conduct heat faster than meat and will give you a false high reading.
- Wait for the “settle”: Unlike digital versions that update every second, dial needles have momentum. Give it at least 15 seconds. If the needle is still shaking or drifting upward, don’t pull it out yet.
- Check your eye level: Looking at a dial from the side can cause “parallax error.” This makes the needle appear to be a few degrees higher or lower than it actually is. Look at the dial face from directly above or straight on.
- Count the tick marks: Most dials don’t show every single degree. They usually mark every 2 or 5 degrees. If there are four lines between “140” and “150,” each line represents 2.5 degrees. If there are nine lines, each one is 1 degree.
Variations in dial designs
Not every dial looks the same. Some are designed specifically for the oven, while others are “instant-read” versions that have a smaller head and a thinner stem.
Oven-safe vs. “Instant-read” analogs
An oven-safe dial thermometer has a large face (usually 2 to 3 inches) and thick glass. These are meant to stay in the meat the whole time. A dial “instant-read” thermometer is much smaller.
You shouldn’t leave these in the oven because the plastic face or the internal spring can melt or lose its tension in high heat. You insert these, wait 20 seconds for a reading, and then remove them.
Dual-scale faces (Celsius vs. Fahrenheit)
Most modern dials show both Fahrenheit and Celsius. The Fahrenheit scale is usually on the outer ring with larger numbers. If your recipe calls for 165°F (for poultry), make sure you aren’t accidentally looking at the 165 mark on the Celsius scale, which would result in severely overcooked food.
Common mistakes when using analog thermometers
Even with a steady hand, a few common errors can ruin your data.
- Touching the pan: If the tip of the probe touches the bottom of a roasting pan, you are measuring the temperature of the metal, not the meat. This will always result in a much higher reading than reality.
- The “Slow-Pull” error: If you take the meat out of the oven to read it, the cold kitchen air will immediately start cooling the probe. Read the dial while the meat is still in the oven if possible, or immediately upon pulling it out.
- Skipping the cleaning: Built-up grease on the glass face can distort the numbers. Use a damp cloth to keep the glass clear so you don’t have to squint through a “fogginess” that might lead to a misread.
- Ignoring calibration: Over time, the coil inside can lose its accuracy if the thermometer is dropped. You can check this by sticking the probe in a glass of ice water (it should read 32°F) or boiling water (it should read 212°F at sea level). Many dials have a nut on the back that you can turn with a wrench to reset the needle to the correct mark.
Meat temperature reference guide
Most dial thermometers have “target” temperatures printed right on the face, such as “Beef Rare” or “Poultry.” However, these markings are sometimes outdated or don’t account for carryover cooking. According to USDA food safety guidelines, these are the numbers you should look for on your dial:
| Meat Type | Minimum Internal Temp | Dial Reading Notes |
|---|---|---|
| Poultry (Chicken/Turkey) | 165°F (74°C) | Always check the thigh and the breast. |
| Ground Meats | 160°F (71°C) | Essential for burgers and meatloaf. |
| Fresh Beef, Pork, Lamb | 145°F (63°C) | Allow for a 3-minute rest after removal. |
| Pre-cooked Ham | 140°F (60°C) | Just needs to be warmed through. |
Frequently asked questions
Can I leave a dial thermometer in the meat while it’s in the smoker?
If it is labeled “oven-safe,” yes. The heavy-duty glass and bimetallic strip are built to withstand constant heat. However, avoid placing the dial directly in the path of a flame or near a high-heat “hot spot” in the smoker, as this can crack the glass.
Why is my dial thermometer slower than my neighbor’s digital one?
Digital thermometers use thermistors or thermocouples that send electrical signals instantly. Your dial thermometer uses a physical piece of metal that has to physically heat up and expand. It isn’t “broken”, it’s just a different technology that requires a bit more patience.
Is the needle on a dial thermometer waterproof?
The stem is waterproof, but the head (the part with the dial and glass) is often not. If you submerge the whole unit in dishwater, moisture can get trapped behind the glass, making it impossible to read. Always hand-wash the stem and wipe the face with a damp cloth instead.
Why does the needle jump when I tap the glass?
Mechanical thermometers can sometimes “stick” slightly due to friction in the internal gears. A light tap on the glass helps the needle settle into its true position. If the needle jumps significantly when tapped, it might be a sign that the internal mechanism is getting old or dirty.
Worth remembering
Getting a correct reading from a dial thermometer is about patience and positioning. You aren’t just looking at a screen; you’re watching a physical reaction to heat. Make sure your probe is deep enough to cover the sensing zone, wait for the movement to stop, and always look at the face head-on.
If you treat it with care and keep it calibrated, a simple analog dial can be just as reliable as the flashiest digital gadget in your kitchen.


