If your air fryer fan has stopped working, the most likely culprits are grease or debris seizing the blades, a blown thermal fuse, a failed fan motor, a loose fan nut or wiring, or a safety switch that is not closing. Start with the simple external checks below before you consider opening the appliance. Anything beyond that involves mains electricity, so the safe sequence and the stop conditions matter as much as the fix itself.
Air Fryer Fan Not Working? Start with These Checks
Before touching anything inside the unit, unplug the air fryer and let it cool completely. This protects you from shock and from a hot element, and it also removes the risk of an accidental start while you work.
Then run through the external checks in order:
- Seat the basket or drawer fully. A drawer that is not pushed home can leave the safety switch open, so the fan and element never start.
- Try a different outlet and confirm the plug is fully inserted. A dead outlet or a partly seated plug mimics a fan fault.
- Listen closely at startup. A hum or click with no blade movement points toward a stuck fan or a jammed motor, while total silence with a working display suggests a thermal fuse.
- Look for obvious grease buildup around the basket and visible fan area. Heavy deposits are a common reason blades stop turning.
If the display lights up but neither the fan nor the heat runs, a documented repair on one air fryer found two blown thermal fuses as the cause. That is one documented case rather than a universal pattern, but it makes a fuse check a sensible next step.
How the Fan Circulates Heat Inside Your Air Fryer
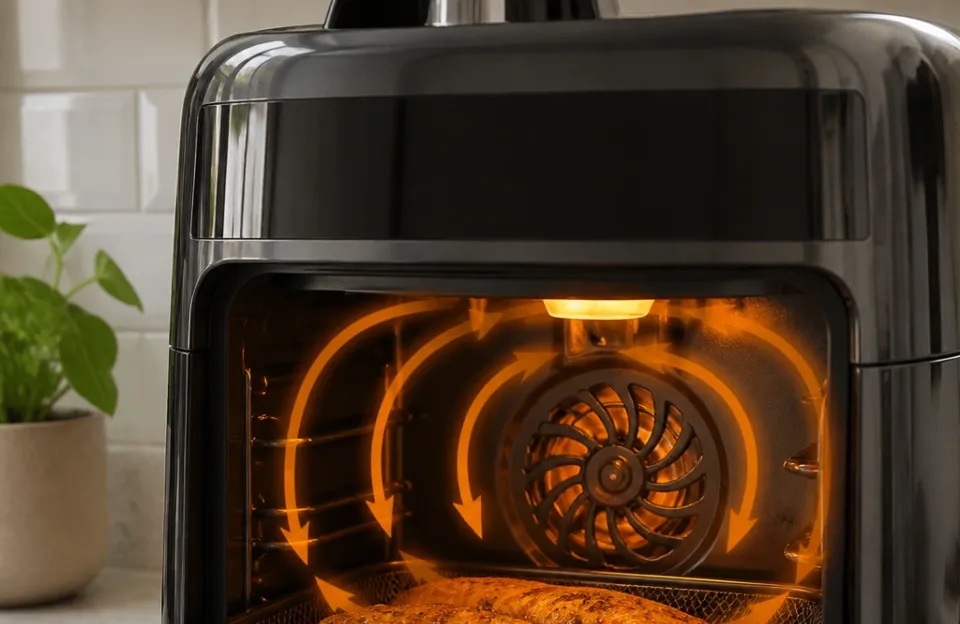
The fan is what separates an air fryer from a small oven. It drives hot air around the food so heat reaches the surface quickly and evenly. When the fan stops, the element still heats, but the heat sits in one place instead of circulating. That is why food cooks unevenly and the top of the cavity runs hotter than the rest. If uneven results are your main symptom, the airflow explanation in our guide to warming leftover pizza slices shows how much of the cooking depends on moving air.
This is also why you should stop using an air fryer whose fan has failed rather than running it and hoping for the best. Without airflow, the element’s heat is not distributed, and the unit’s thermal protection is the only thing standing between a stalled fan and an overheating failure.
Why Grease Buildup Stops the Blades from Spinning
Cooking greasy foods repeatedly leaves a film that thickens over time. Eventually the deposit can bridge the gap around the blades or stiffen the bearing until the motor can no longer turn the impeller. Regular cleaning and avoiding overloading the basket both help prevent the overheating and debris problems that lead to fuse failures. Fatty foods speed this up, so our guide to getting perfectly crisp bacon strips is a useful reminder of how much grease a single session can leave behind.
The Role of the Thermal Fuse in Protecting the Motor
A thermal fuse is a one-time safety device. When the appliance gets hotter than its rated limit, the fuse opens and cuts power, which is why the unit goes dead instead of cooking. In hot-air fryers, thermal fuse failure has been described as a very common fault, although that assessment comes from one repairer’s informal research rather than a manufacturer statistic.
Crucially, a blown fuse is a symptom, not always the disease. Replacing it without investigating why it tripped can leave you with a repeat failure. For a wider view of how a tripped fuse shows up as other symptoms, see our guide to an air fryer display not working.
Door Switches and Basket Seating Issues
Many air fryers will not run the fan or element unless the drawer switch confirms the basket is closed. In one forum thread, a drawer tray micro switch tested with good continuity, so it was ruled out rather than confirmed as the fault. Testing the switch is still worth doing because it is easy to check and cheap to rule out before you open the housing.
Diagnosing the Problem Step by Step
Work from the outside in. This order keeps you away from live circuits for as long as possible and avoids dismantling a unit over a problem you could have found at the outlet.
| Step | Check | What a Fault Looks Like | DIY or Professional |
|---|---|---|---|
| 1 | Power, plug, outlet | No lights at all | DIY |
| 2 | Basket and drawer switch | Display on, no fan or heat | DIY |
| 3 | Visible grease and blade movement | Blades stiff or stuck | DIY cleaning |
| 4 | Thermal fuse continuity | No continuity across the fuse | DIY with care, or professional |
| 5 | Motor voltage and winding | Voltage present, motor does not spin | Professional recommended |
| 6 | Wiring and connectors | Loose or discoloured terminals | Professional recommended |
Only move to steps 4 to 6 if the external checks fail and you are comfortable working inside an appliance. If you are unsure about any part of fuse testing or replacement, consult a professional.
For a structured approach to related symptoms, our guide to an air fryer timer not working follows a similar diagnostic logic.
Cleaning Seized Fan Blades Safely
Grease-seized blades are the most forgiving fault on this list, because cleaning costs nothing and does not require parts.
- Unplug the unit and let it cool completely.
- Remove the basket and any accessible guards according to your manual.
- Wipe softened grease from the visible blades with a cloth and a small amount of degreaser.
- Turn the blade gently by hand to check whether it frees up. Never force a stuck impeller, because leverage on the shaft can damage the bearing or bend the blades.
- Keep moisture away from the motor housing. Do not spray liquid into the fan area, and let everything dry fully before reassembly.
One repair report noted that the fan nut was found very loose on a unit with a fuse fault. That is a single anecdotal observation rather than a typical cause, but it is worth checking the nut if the blades wobble or rub. Cleaning frequency matters most if you cook greasy food in bulk, as with prepping large batches of wings.
Testing and Replacing a Blown Thermal Fuse
This section involves opening the appliance and working near mains wiring. If you have not used a multimeter on a live appliance before, treat this as the point to stop and hand the job to a qualified technician.
Locating the Fuse
Fuse location varies by model and manufacturer, so check your manual or contact the manufacturer for the specific type and position. In an AIGOSTAR 300010 LDX, the electrical components are reached by removing the top cover and upper housing, and the bottom cover does not need to come off. In a Princess 182024, the thermal fuses sit underneath the fan impeller and lid support. Those are model-specific examples, not universal instructions.
Discharging the Capacitor First
If your unit has a capacitor, it can hold a charge after unplugging. Discharge it with a proper discharge pen: touch the pen tip to the capacitor’s anode. Do not bridge the terminals with standard wire, a screwdriver or a wrench, because that can damage the capacitor. This guidance is general electrical practice rather than air-fryer-specific, so if you cannot positively identify a capacitor or its terminals, stop.
Testing Continuity
Set your multimeter to a resistance range suited to the fuse and test across its terminals. A good fuse reads close to zero; a blown fuse reads open. Fixed-range meters can mislead you if you pick too low a scale, which is exactly how one repairer got a false open-circuit reading on a motor before switching ranges.
Matching the Rating Exactly
Replace a blown fuse only with one of the same rating, and check the manual for the correct specifications. Ratings genuinely differ between models: a documented air fryer fuse was rated 172 degrees Celsius and 10 amps. Published ranges of 100 to 120 degrees Celsius and 10 to 15 amps appear in commercial buying guides, but they conflict with that documented example, so treat any figure as an example only and read the marking on your own fuse. Using a fuse with a higher or lower rating compromises the appliance’s safety features and can lead to more severe problems.
Joining the New Fuse
Thermal fuses are usually clamped or crimped to the wire rather than soldered, and soldering without good heat sinking can damage the fuse. Crimped butt connectors are a practical joining method, but the fuse body must be insulated because its terminal can sit at the same voltage as the circuit. Heat-shrink tubing with solder is a poor choice for this job, because the heat can damage the fuse and the solder joint may end up weak. These methods are set out in a repair guide on replacing a thermal fuse.
When the Motor Itself Is Burned Out
A fan motor that receives voltage but does not spin has failed in some way. In an AIGOSTAR 300010 LDX, the cooling fan motor received voltage at startup but would not turn, and the winding was interrupted at a thermal fuse embedded in the winding. Some fan motors carry a thermal fuse inside the winding, attached to thin winding wire that breaks easily and cannot then be repaired.
That construction matters for your decision. If the interruption is inside the winding, the practical fix is a new motor, and the job needs care with fragile wire. It also affects economics: one repairer reported that an official service center would not perform this type of fan repair because the cost of the fan plus labour exceeded the price of a new machine. That is one repairer’s account rather than a general rule, but it is a realistic scenario on budget models.
On the other side of the ledger, a premium model can justify repair. If you own a higher-end unit, such as a configuration covered in our Ninja glass air fryer review, the motor replacement math often looks different.
Wiring Faults, Door Switches, and Edge Cases
Loose connections and failing switches produce intermittent faults, which are the hardest to catch. Wiggle-test connectors with the unit unplugged, and look for discoloured or loose terminals.
Other situations that change the diagnosis:
- Dual-basket models may use separate fans, heaters and switches per side. If only one basket fails, suspect the components and switch for that side rather than a shared fuse.
- Start capacitors appear on some fan circuits. Test and replace them as components in their own right, and discharge them before handling.
- Water damage after a spill or over-enthusiastic cleaning can short a motor or switch. Do not power a wet unit; let it dry fully and have it inspected.
- Voltage mismatch matters if you move a unit between regions. A model built for a different mains voltage should not be run on your supply.
- Hidden fasteners and heat shields are common. In one thread the thermal fuse was described as hard to reach and tucked behind the heat shield.
If your unit cuts out rather than losing the fan entirely, our guide to an air fryer keeps turning off covers the overlapping causes.
Common Mistakes to Avoid
- Bypassing a blown thermal fuse with wire or a clip. This removes the appliance’s overheat protection, and a unit that overheated once will likely overheat again.
- Fitting the wrong fuse rating. A higher or lower rating compromises safety features.
- Forcing stuck blades. Leverage on a seized impeller can damage bearings and bend blades; clean and free the blades instead.
- Skipping the capacitor discharge before touching terminals.
- Ignoring the manual. Fuse location, rating and disassembly steps differ by model and should come from the manufacturer’s documentation.
- Working on a unit that is still plugged in or hot.
- Assuming a new fuse fixes the cause. If the underlying overheating is not addressed, the replacement may be a temporary fix.
Getting Your Air Fryer Working Again
Use this decision path to choose your next step:
- Fan freed by cleaning and everything runs normally: you are done. Clean more often and avoid overloading the basket.
- Fuse is blown and you can match the exact rating safely: replace it, but investigate why it tripped before you rely on the unit again.
- Fuse blows again after replacement, or the motor receives voltage without spinning: the fault is deeper, likely the motor or winding fuse. Weigh repair against replacement.
- Unit is under warranty: attempted DIY repairs are a common reason warranty claims are denied, and opening the unit yourself or using a third-party shop can lead to future claims being declined. Fan motor issues are typically covered as a manufacturing defect, so contact the manufacturer first.
- You are unsure at any stage of fuse testing or replacement: consult a professional.
To put repair economics in perspective, most air fryers last somewhere between two and five years with regular use, and a well-maintained unit can run six years or more. Typical lifespan estimates of about three to five years reflect the stress of repeated heat cycling on internal parts. If your unit is already near that range and the fault is a failed motor, replacement is often the more sensible route. If it is newer and the fault is a blown fuse or grease, a repair is likely worth it. If you are unsure whether your model still has support, our look at how long these appliances have existed gives useful context on parts availability.
For safety standards context, UL (Underwriters Laboratories) publishes appliance safety information that explains why thermal protection and correct fuse ratings matter.
Whichever path you choose, unplug first, keep moisture out of the motor housing, and never defeat a safety device to get dinner on the table.




