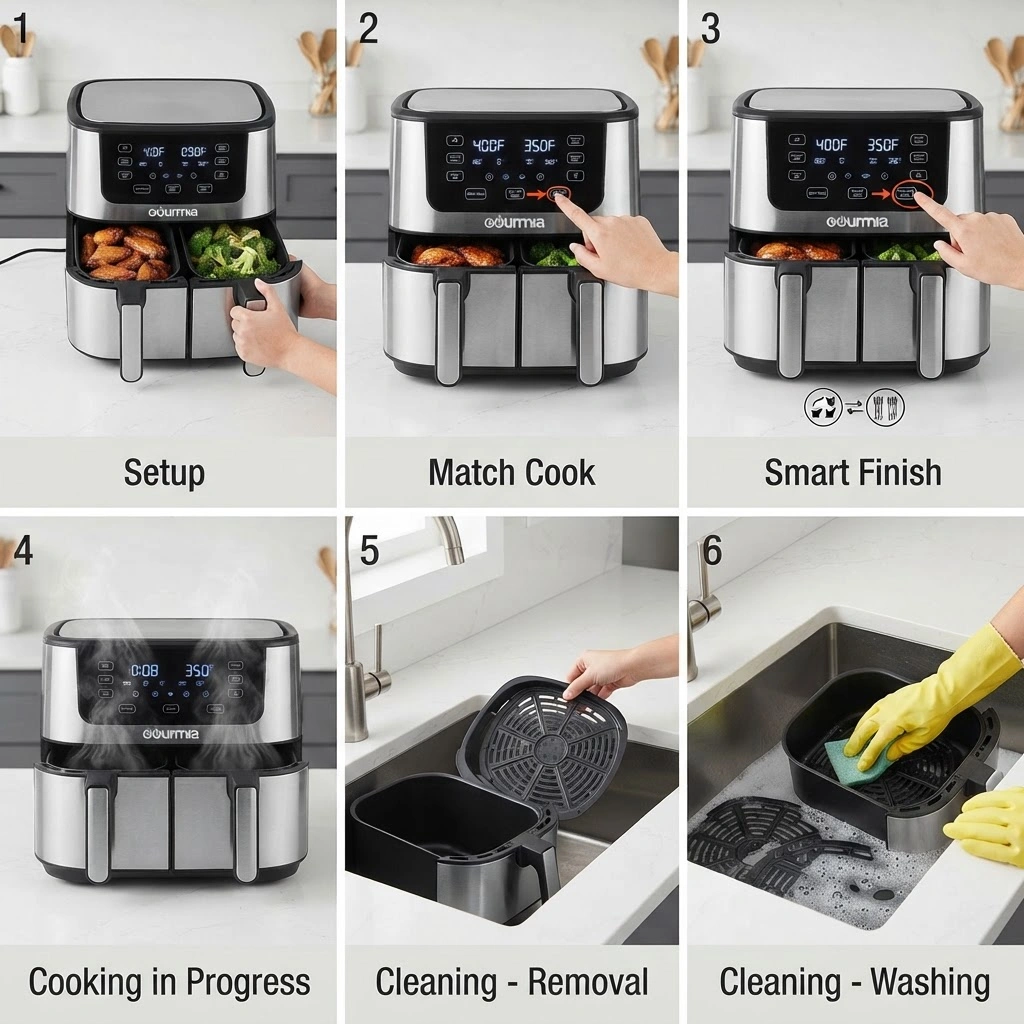
Using the Gourmia 10 Qt Dual Basket Air Fryer is a straightforward process, but getting the most out of its unique features like Match Cook and Smart Finish requires understanding a few key steps and settings. This guide will walk you through everything, from the initial setup to mastering its cooking modes and keeping it clean, ensuring you get perfectly cooked meals every time.
Setting Up Your New Gourmia 10 Qt Dual Basket Air Fryer
Before you cook your first meal, a proper setup ensures safety and optimal performance. This isn’t just about plugging it in; it involves a few important initial steps.
Unboxing and Initial Inspection
When you first unbox your Gourmia 10 Qt Dual Basket Air Fryer, take a moment to inspect all components. Carefully remove the air fryer unit, the two cooking baskets, and the two crisper trays from the packaging. Check for any visible damage, such as dents, cracks, or loose parts, which can sometimes occur during shipping.
Make sure all packing materials, including any protective plastic films or inserts, are removed from the unit itself and inside the baskets. It’s a good idea to keep the packaging materials for a short period, especially if you think you might need to return the unit.
Choosing the Right Location
Placement matters for any kitchen appliance that generates heat. Find a flat, stable, heat-resistant surface for your air fryer. Good options include a countertop, a sturdy island, or a dedicated appliance cart.
Avoid placing it directly under overhead cabinets, as the hot air vents from the back of the unit. You need to ensure adequate clearance around the air fryer, at least 5-6 inches (12-15 cm) on all sides, especially at the back where the exhaust vents are located. This allows for proper airflow, prevents heat buildup, and helps dissipate any steam or odors during cooking.
Plug the air fryer directly into a grounded wall outlet. Avoid using extension cords, if possible, as they might not be rated for the appliance’s wattage and could pose a fire hazard. If an extension cord is absolutely necessary, make sure it is a heavy-duty, grounded cord rated for at least 15 amps or higher.
First-Time Cleaning and “Burn-Off”
Before its first use, you need to clean the Gourmia air fryer. Remove the two cooking baskets and their crisper trays. Wash these parts in warm, soapy water, rinse them thoroughly, and dry them completely.
You can also place these components on the top rack of your dishwasher if they are listed as dishwasher-safe in the manual. Use a damp cloth to wipe down the exterior of the main unit. Never immerse the main unit or its power cord in water.
After cleaning, perform an initial “burn-off” cycle. This helps to eliminate any manufacturing odors or residue that might linger from the factory. To do this, insert the clean, dry baskets and crisper trays back into the unit.
Turn the air fryer on and run it empty for about 10-15 minutes at a high temperature, around 400°F (200°C). You might notice a slight plastic smell or a bit of smoke during this first run; this is normal and should dissipate. Ensure your kitchen is well-ventilated during this process by opening a window or running your range hood.
Once done, let the unit cool down completely before its first actual cooking session.
Understanding the Control Panel
The control panel of your Gourmia 10 Qt Dual Basket Air Fryer is your command center. It typically features:
- Power Button: Turns the unit on and off.
- Basket Select Buttons (1 & 2): Allows you to choose which basket’s settings you want to adjust or activate.
- Temperature Control Buttons (Up/Down): Adjusts the cooking temperature.
- Time Control Buttons (Up/Down): Adjusts the cooking time.
- Preset Cooking Functions: Dedicated buttons for common foods like fries, chicken, steak, fish, or baking. These automatically set a recommended time and temperature.
- Match Cook Button: Syncs the settings for both baskets to be identical.
- Smart Finish Button: Programs two different cooking settings to finish at the same time.
- Shake Reminder Icon: Illuminates when it’s time to shake or toss food in the baskets.
- Start/Pause Button: Begins or temporarily stops the cooking cycle.
Familiarize yourself with these buttons. The digital display will show the temperature and time for each basket. Many models will have a clear, intuitive interface that lets you easily switch between baskets to set individual parameters.
Mastering Basic Cooking with Your Dual Baskets
Your Gourmia 10 Qt Dual Basket Air Fryer allows for incredible flexibility, but understanding the fundamentals will give you the best results.
Preheating for Optimal Crisping
While some air fryer recipes suggest skipping preheating, it’s a critical step for achieving truly crispy results and ensuring even cooking. Just like a conventional oven, preheating brings the cooking chamber to the desired temperature before food is introduced. This helps to quickly sear the outside of the food, locking in moisture and creating that desirable crispy texture.
To preheat, simply set your desired temperature for the basket(s) you plan to use and let the air fryer run empty for 3-5 minutes. Some Gourmia models have a dedicated “Preheat” button, or you can just add 3-5 minutes to your total cooking time and let it run before adding food. When the unit indicates it’s ready, or after the preheat time elapses, add your food to the basket.
Setting Time and Temperature
Setting the time and temperature is the core of air frying. Most recipes will provide guidelines, but you’ll often need to adjust based on your specific food, desired crispness, and the quantity you’re cooking.
- Select Basket: Press the “Basket 1” or “Basket 2” button to select the basket you want to program.
- Set Temperature: Use the temperature up/down arrows to adjust to your target temperature. Air fryers generally cook faster than conventional ovens, so you might use slightly lower temperatures (around 25-50°F less) or shorter times.
- Set Time: Use the time up/down arrows to set the cooking duration.
- Start: Press the “Start/Pause” button.
If you’re using a preset function, select the relevant food icon (e.g., “Fries”). The air fryer will automatically apply a default time and temperature. You can usually adjust these default settings using the temperature and time arrows after selecting the preset, before hitting start.
The Importance of Shaking, Flipping, and Turning
Air fryers work by circulating hot air, but for truly even cooking and browning, most foods benefit from agitation. For smaller items like fries, chicken nuggets, or vegetables, shaking the basket halfway through the cooking time helps redistribute the food and exposes all surfaces to the hot air. For larger items like chicken thighs, fish fillets, or steak, flipping them once or twice during cooking ensures both sides get crispy and cook evenly.
Your Gourmia air fryer often has a “Shake Reminder” feature. If enabled, it will beep and display an icon on the control panel at the halfway point, prompting you to shake or flip the food. A quick shake of the basket is usually enough.
For more delicate items or larger pieces, use silicone-tipped tongs to gently turn the food.
Utilizing Match Cook for Identical Batches
The Match Cook feature is a standout for the Gourmia 10 Qt Dual Basket Air Fryer. It’s designed for those times when you’re cooking two identical batches of food, ensuring they finish at exactly the same time with the same settings.
What is Match Cook and When to Use It?
Match Cook allows you to easily sync the cooking parameters (temperature and time) of both baskets. This means you only have to set the desired cooking profile once, and it automatically applies to both baskets.
You should use Match Cook when:
- You’re cooking a large batch of the same food, splitting it between the two baskets to avoid overcrowding (e.g., two pounds of French fries, a dozen chicken wings, or diced chicken breast).
- You want both baskets to run with identical settings and finish simultaneously, simplifying the process and ensuring consistent results across the entire meal.
This feature removes the hassle of manually setting each basket and trying to remember which one is set for what, making high-volume cooking of a single item much more efficient.
Step-by-Step for Match Cook
Using the Match Cook function is designed to be straightforward:
- Prepare Your Food: Divide your food evenly between the two cooking baskets, ensuring neither basket is overcrowded. Overcrowding can lead to steaming instead of crisping.
- Select Basket 1: Press the “Basket 1” button on the control panel.
- Set Desired Program: Use the temperature and time arrows to set your desired cooking temperature and time. Alternatively, you can select a preset cooking function (e.g., “Fries”).
- Activate Match Cook: Once you’ve set the parameters for Basket 1, press the “Match Cook” button. The settings you just entered for Basket 1 will automatically copy over to Basket 2. The display should show identical settings for both baskets.
- Start Cooking: Press the “Start/Pause” button to begin cooking. Both baskets will now operate with the same settings and finish simultaneously. The air fryer will manage the cooking process for both, and if a shake reminder is active, it will apply to both baskets.
Tips for Success with Match Cook
- Even Distribution: Always ensure food is distributed as evenly as possible between the two baskets. This helps maintain consistent airflow and cooking.
- Don’t Overcrowd: Even with two baskets, resist the urge to pack them full. Air fryers work best when there’s space for air to circulate around each piece of food.
- Same Food Type: Match Cook works best when the food in both baskets is truly identical in type and size. If you put significantly different items, their cooking needs might vary despite the synced settings.
- Shake/Flip: Remember to shake or flip the contents of both baskets when prompted, or manually, to ensure even browning and crispiness.
Utilizing Smart Finish for Coordinated Meals
The Smart Finish feature is where your Gourmia 10 Qt Dual Basket Air Fryer really shines for making complete meals. It lets you cook two different items, each with its own time and temperature, and have them both finish cooking at the exact same moment.
What is Smart Finish and Its Benefits?
Smart Finish is a smart programming feature that takes the guesswork out of timing. You set separate cooking times and temperatures for Basket 1 and Basket 2. The air fryer then automatically staggers the start times of each basket so that both complete their cooking cycle at the same time.
This is invaluable when preparing meals with components that have different cooking requirements.
The main benefits include:
- Perfect Timing: No more cold side dishes waiting for the main course, or vice versa. Everything finishes hot and ready to serve simultaneously.
- Meal Coordination: Great for cooking a protein in one basket (like salmon or chicken) and a side dish in the other (such as golden potatoes or Brussels sprouts).
- Reduced Stress: Eliminates the need to constantly monitor multiple cooking appliances or manually calculate staggered start times.
Step-by-Step for Smart Finish
Here’s how to set up your Gourmia 10 Qt Dual Basket Air Fryer using the Smart Finish feature:
- Prepare Your Food: Place the first food item (e.g., chicken thighs) into Basket 1 and the second food item (e.g., asparagus) into Basket 2.
- Program Basket 1:
- Press the “Basket 1” button.
- Set the desired temperature for Basket 1 using the temperature arrows.
- Set the desired cooking time for Basket 1 using the time arrows.
- Program Basket 2:
- Press the “Basket 2” button.
- Set the desired temperature for Basket 2 using the temperature arrows.
- Set the desired cooking time for Basket 2 using the time arrows.
- Activate Smart Finish: Once both baskets are programmed with their respective settings, press the “Smart Finish” button. The air fryer will calculate the staggered start times for each basket based on the total cooking duration you’ve entered.
- Start Cooking: Press the “Start/Pause” button. The air fryer will automatically begin cooking the item that requires more time first, then pause and start the second basket at the appropriate moment so they both finish together. You’ll see the countdown for both baskets, and the unit will indicate which basket is actively cooking.
Pairing Foods and Best Practices for Smart Finish
Choosing the right food pairings is key to making Smart Finish truly effective.
- Consider Cook Times: Foods with vastly different cooking times (e.g., a thick cut of meat vs. delicate greens) are perfect for Smart Finish.
- Temperature Compatibility: While Smart Finish allows different temperatures, try to pick foods that cook well within a similar temperature range if possible, even if their times differ. For example, chicken and potatoes often do well around 375-400°F (190-200°C).
- Prioritize Longer Cooks: Generally, place the food with the longest cooking time in one basket and the shorter-cooking food in the other. The air fryer will automatically start the longer cook first.
- Shake Reminders: If a shake reminder is set, it will still apply individually to each basket’s cooking cycle, ensuring even results for both components of your meal.
For example, you could put seasoned frozen chicken legs in one basket for 25-30 minutes at 380°F (193°C) and fresh broccoli florets in the other for 10-12 minutes at 375°F (190°C). Engage Smart Finish, and both will be done simultaneously.
Maintaining Your Air Fryer: Cleaning and Care
Proper cleaning and maintenance are essential for the longevity of your Gourmia 10 Qt Dual Basket Air Fryer and to ensure hygienic food preparation. Neglecting cleaning can lead to unpleasant odors, smoke, and decreased performance.
Daily and After-Use Cleaning
The most important cleaning happens immediately after each use.
- Unplug and Cool: Always unplug the air fryer and let it cool completely before cleaning. This prevents burns and electrical hazards.
- Remove Baskets and Trays: Once cool, remove both cooking baskets and their crisper trays.
- Wash Baskets and Trays: Wash these components with warm water and a mild dish soap. A non-abrasive sponge or brush works well to remove food residue. For stubborn, stuck-on food, you might need to let them soak in hot, soapy water for 10-15 minutes. Many Gourmia baskets and trays are dishwasher-safe; check your specific model’s manual to confirm. If they are dishwasher-safe, place them on the top rack.
- Wipe Down Interior: Use a damp cloth or sponge to wipe down the inside of the air fryer, including the heating element area (once fully cool). Avoid harsh scrubbers on non-stick surfaces.
- Clean Exterior: Wipe the exterior with a damp cloth to remove any splatters or fingerprints.
Deep Cleaning the Interior and Heating Elements
Periodically, your air fryer will benefit from a more thorough deep clean, especially if you notice lingering odors or visible grease buildup.
- Ensure Unit is Unplugged and Cool: This is paramount for safety.
- Clean Baskets and Trays Thoroughly: As above, remove and clean these parts. For extra tough grease, a paste made of baking soda and a little water can be gently applied, let sit for a few minutes, then scrubbed and rinsed.
- Tackle the Interior Cavity: Use a damp cloth or sponge with a small amount of mild dish soap to wipe down the inner walls. For sticky grease, a solution of water and vinegar (1:1 ratio) can be effective. Avoid spraying cleaners directly into the unit; instead, spray onto a cloth.
- Cleaning the Heating Element: This is a crucial area. Grease can build up on the heating coils, causing smoke during future cooks. With the unit unplugged and completely cold, gently turn the air fryer upside down (if safe to do so and stable) or tilt it to get a better view of the heating element. Use a soft brush (like a dedicated cleaning brush or a clean toothbrush) or a damp cloth to gently wipe away any visible grease or food particles from the coils. Be very careful not to bend or damage the heating element. Do not use excessive water.
Odor Removal and Prevention
Lingering food odors are a common air fryer issue, especially after cooking strong-smelling foods like fish or garlic.
- Lemon and Vinegar Trick: After cleaning, place a small, heat-safe bowl with 1/2 cup of water and a few lemon slices, or 1/4 cup of white vinegar, into one of the baskets. Run the air fryer at 350°F (175°C) for 5-10 minutes. The steam will help neutralize odors.
- Baking Soda: A sprinkle of baking soda in the empty, clean baskets (left overnight) can absorb odors. Just rinse it out before the next use.
- Immediate Cleaning: The best prevention is always cleaning your air fryer baskets right after each use.
Storing Your Air Fryer
Once clean and dry, store your Gourmia air fryer in a dry, cool place. Ensure all parts are fully dry before reassembling to prevent moisture buildup or mildew. Keeping it on your countertop is often the most convenient option, as it encourages more frequent use.
Troubleshooting Common Air Fryer Issues
Even with proper use, you might encounter a few hiccups with your Gourmia 10 Qt Dual Basket Air Fryer. Knowing how to quickly address them can save time and frustration.
Uneven Cooking or Lack of Crispness
This is often the most common complaint with air fryers and usually has simple solutions.
- Overcrowding: The air fryer needs space for air to circulate. If the baskets are too full, food will steam rather than crisp. Cook in smaller batches if necessary.
- No Shaking/Flipping: For small items, shake the basket at least once during cooking. For larger items, flip them.
- Too Little Oil: A light coating of oil helps promote browning and crispness. Use a spray bottle for even application.
- Inconsistent Food Size: If pieces are drastically different in size, they will cook at different rates. Try to cut food into uniform pieces.
- Not Preheating: As discussed, preheating helps achieve that initial crisp. Don’t skip it.
White Smoke Coming from the Air Fryer
A small amount of steam is normal, especially with high-moisture foods, but persistent white smoke indicates an issue.
- Excess Fat: If you’re cooking fatty foods (like bacon or chicken gizzards), dripping fat can burn on the heating element or in the bottom of the basket. Line the bottom of the basket (under the crisper tray) with a piece of foil or a compatible air fryer parchment paper (ensure it’s designed for air fryers and doesn’t block airflow; see Can You Put Parchment Paper in an Air Fryer?).
- Grease Buildup: If the heating element or interior cavity has accumulated grease from previous cooks, it will burn and smoke. A deep clean, as described above, is necessary.
- Food Residue: Bits of food stuck to the heating element from previous meals can also burn.
Air Fryer Not Turning On or Not Heating
If your air fryer seems lifeless, check these common points:
- Power Connection: Ensure the unit is securely plugged into a working wall outlet. Try a different outlet to rule out an issue with the power source.
- Basket Insertion: Most air fryers have a safety mechanism that prevents them from operating if the baskets aren’t fully and correctly inserted. Push them firmly until they click into place.
- Overheating Protection: If the unit overheated, it might have a safety shut-off. Unplug it and let it cool down for at least 30 minutes before trying again.
Food Sticking to the Crisper Tray
This is frustrating, especially with delicate foods.
- Oil or Spray: Ensure you’re lightly oiling or spraying the crisper tray before adding food, especially with raw proteins or batters.
- Parchment Paper: Using air fryer-safe parchment paper can prevent sticking and make cleanup easier. Just make sure it’s the right size and doesn’t cover too much of the basket to impede airflow. You can also learn more about using parchment paper safely in your air fryer.
- Flour/Breadcrumbs: A light dusting of flour or breadcrumbs on certain foods can create a barrier that prevents sticking.
Maximizing Your Air Frying Experience
Beyond the basic functions, a few extra tips and considerations can help you get the absolute best out of your Gourmia 10 Qt Dual Basket Air Fryer.
The Right Amount of Oil
Air fryers use significantly less oil than deep frying, but a little oil is often still necessary. It helps achieve that golden-brown crisp and can enhance flavor.
- Light Coating: Aim for a light, even coating. A spray bottle filled with your preferred cooking oil (like olive, avocado, or canola oil) works best for this. You want to lightly coat the food, not drench it.
- Tossing: For vegetables or smaller items, toss them in a bowl with a teaspoon or two of oil before adding them to the basket.
- Non-Stick Spray: Use non-aerosol, pump-style oil sprayers. The propellants in some aerosol sprays can damage the non-stick coating over time.
Preventing Overcrowding
This cannot be stressed enough: overcrowding is the number one reason air-fried food fails to crisp. When you pack the baskets too full, the hot air cannot circulate effectively around each piece of food. This leads to steaming, not frying, resulting in soggy food.
- Single Layer: Ideally, food should be in a single layer in the basket, with some space between pieces.
- Batch Cook: If you have a large quantity of food, cook it in batches. The dual baskets of your Gourmia air fryer make this much more efficient, especially with the Match Cook feature.
Accessory Use: What’s Safe?
Many accessories can expand your air fryer’s capabilities, but safety is paramount.
- Bowls and Ramekins: Small, oven-safe bowls made of glass, ceramic, or metal can be used in the air fryer to cook items like baked eggs or mini gratins. Make sure they fit without touching the sides or top of the air fryer, allowing air to circulate. You can find more details on what bowls are safe to use.
- Parchment Paper and Foil: As mentioned, these can help with cleanup and preventing sticking. Always use air fryer-specific parchment paper that has holes, or crimp foil around the food to ensure air circulation. Never let parchment paper or foil touch the heating element when the air fryer is empty or during preheating, as it can ignite. Understand the specifics of using paper products safely.
- Racks: Some air fryers come with multi-layer racks to increase cooking capacity. These are useful for dehydrating or cooking flatter items simultaneously.
Converting Oven Recipes to Air Fryer Recipes
Most conventional oven recipes can be adapted for your air fryer, but there are a few rules of thumb:
- Temperature Reduction: Generally, reduce the oven temperature by about 25-50°F (15-30°C). So, if an oven recipe calls for 400°F, try 375°F in the air fryer.
- Time Reduction: Air fryers cook faster. Reduce the cooking time by 20-30% initially and check for doneness frequently. For example, if an oven recipe takes 20 minutes, start checking at 14-16 minutes in the air fryer.
- Shake/Flip: Remember to shake or flip foods halfway through the air frying time, which isn’t always necessary in a conventional oven.
Exploring Different Foods
The Gourmia 10 Qt Dual Basket Air Fryer is incredibly versatile. Experiment with a variety of foods to discover your favorites.
- Proteins: Chicken wings, thighs, cutlets, ham steak, fish fillets, smoked sausage.
- Vegetables: Bell peppers, asparagus, broccoli, carrots, sweet potatoes, acorn squash.
- Frozen Foods: French fries (frozen steak fries, specifically), chicken nuggets, fish sticks, waffles, spring rolls, taquitos, Uncrustables.
- Reheating: Excellent for reheating leftovers like pizza, wings, or crab rangoon, restoring their crispness better than a microwave.
- Dehydrating: Some models have a dehydrate function, which can be great for making things like beef jerky.
Frequently asked questions
How do I know if the Gourmia air fryer baskets are properly inserted?
You’ll typically hear a click when the baskets are pushed firmly into place. Most air fryers have a safety mechanism that prevents them from starting if a basket isn’t fully seated, so if it won’t turn on, check the basket placement first.
Can I open the baskets to check on food during cooking?
Yes, absolutely. It’s safe to open the baskets at any time during the cooking cycle to shake, flip, or check the doneness of your food. The air fryer will automatically pause and resume cooking once the basket is reinserted.
Why is smoke coming from my air fryer, even after cleaning?
If you’ve cleaned the air fryer thoroughly and are still seeing smoke, it’s often due to cooking very fatty foods. Fat drips into the bottom of the basket and can burn. Try placing a small piece of foil under the crisper tray to catch drips, ensuring it doesn’t block airflow or touch the heating element.
What’s the maximum amount of food I can cook in each basket?
The Gourmia 10 Qt Dual Basket Air Fryer has a total capacity of 10 quarts. For best results, avoid filling each basket more than halfway and ensure food is in a single layer whenever possible. This allows for optimal air circulation and crisping.
How do I convert a deep-frying recipe to an air fryer recipe?
For deep-frying recipes, you’ll use much less oil, typically just a light spray or toss with a tablespoon or two. Reduce the cooking temperature by about 25-50°F (15-30°C) and the cooking time by 20-30%, checking frequently for doneness.
Is it safe to use metal utensils in the Gourmia air fryer baskets?
It’s best to avoid metal utensils as they can scratch the non-stick coating on the baskets and crisper trays. Opt for silicone, plastic, or wooden utensils to protect the surface and extend the life of your air fryer’s components.
Your Next Steps with the Gourmia 10 Qt Dual Basket Air Fryer
Taking the time to understand your Gourmia 10 Qt Dual Basket Air Fryer, especially its unique Match Cook and Smart Finish features, makes all the difference in your cooking results. From initial setup to mastering timed meals and keeping the unit pristine, you’re now equipped to enjoy crispy, delicious food with ease. Don’t be afraid to experiment with different foods and settings; the dual-basket design offers incredible flexibility for everyday meals and entertaining alike.




