Removing grease from an air fryer takes about 15 to 30 minutes for a standard cleaning. You need hot water, dish soap, and a non-abrasive sponge. If you cook fatty foods often, knowing how to remove grease from an air fryer keeps the machine running safely and stops old oil flavors from ruining your next meal.
This guide walks through the exact steps for washing the basket, wiping down the interior walls, and dealing with baked-on residue that refuses to budge. It also covers what to avoid so you don't scratch the non-stick coating or damage the heating element.
Supplies That Safely Cut Through Air Fryer Grease
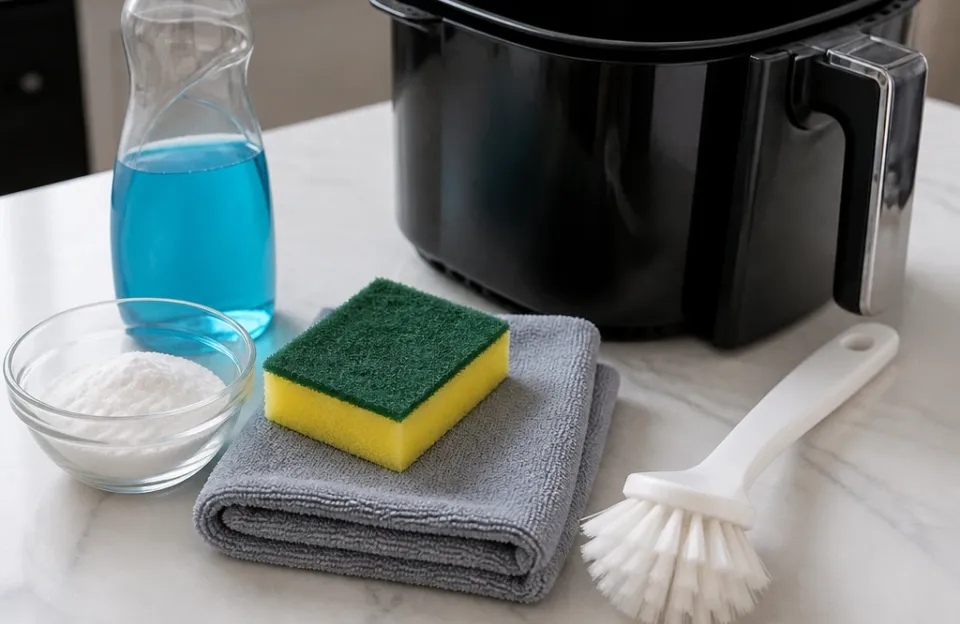
You don't need heavy-duty oven cleaners for this job. Most commercial degreasers are too harsh for the non-stick surfaces inside these appliances. Stick to basic kitchen supplies that break down fat without scratching.
- Dish soap. A standard liquid dish soap designed to cut grease works perfectly.
- Hot water. Heat softens solidified fat much faster than cold water.
- Soft sponge or microfiber cloth. Avoid the rough scouring side of a sponge. Non-stick coatings scratch easily, and once scratched, they peel.
- Baking soda. This is your main tool for stuck-on, hardened grease spots.
- Soft-bristle brush. An old toothbrush or a dedicated nylon pastry brush reaches into the mesh or corners of the basket.
- Paper towels. Useful for wiping out loose crumbs and excess oil before you start scrubbing.
Keep steel wool, abrasive scrub pads, and metal utensils far away from your machine. Scratching the coating creates places where grease traps itself permanently. If you routinely cook high-fat meals like crispy chicken wings, having these supplies ready makes cleanup much faster.
Removing the Basket and Tray for Washing
Unplug the machine first. Never attempt to clean any part of an appliance while it is plugged in. Let it cool down completely if you just finished cooking.
A hot basket dropped into cold water can warp the metal.
Pull the basket out and separate it from the outer tray or drip pan, depending on your model. Some machines have a single drawer, while others have a crisper plate that lifts out of the bottom. Take everything apart that the manufacturer allows you to remove.
Tap the basket gently over the trash can to knock out loose crumbs. Wipe the inside of the main unit with a dry paper towel to pick up any stray bits that fell through the basket during cooking. Getting the loose debris out now prevents it from turning into a muddy paste when you add water.
Soaking the Removable Parts to Loosen Fat
Fill your sink or a large basin with very hot water. Add a generous squirt of dish soap. Submerge the basket, tray, and any removable plates.
Let them soak for 10 to 15 minutes. This soaking period does most of the work for you. The hot, soapy water penetrates the grease layer and separates it from the metal.
If you're dealing with thick, carbonized buildup from weeks of neglect, you might need to let them soak for up to 30 minutes.
While the parts soak, move on to the inside of the main unit. Don't leave the parts sitting in dirty water for hours, as the suspended grease can settle back onto the surface.
Wiping Down the Interior Walls and Heating Element
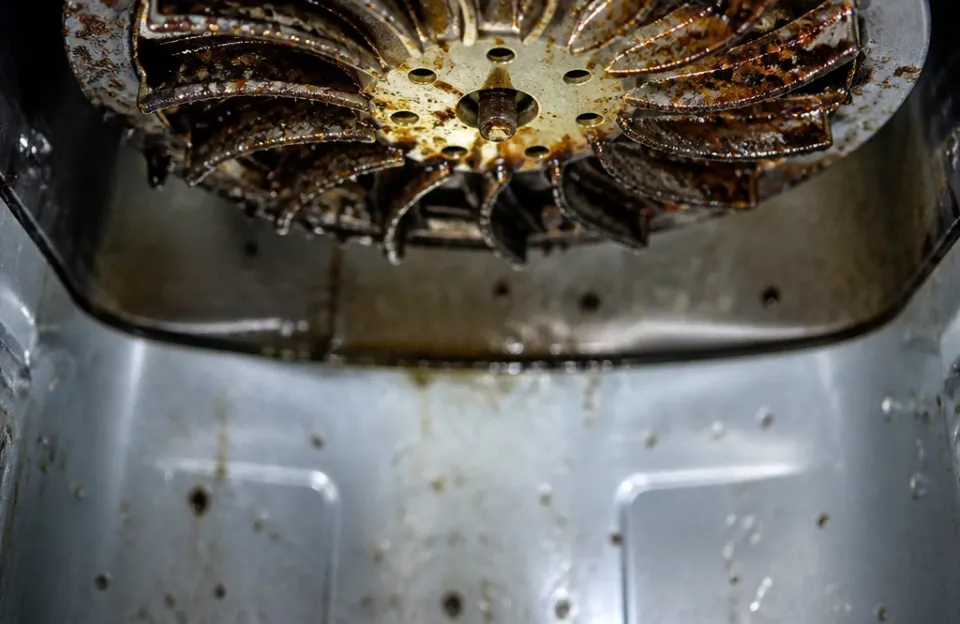
The inside of the machine catches splattering oil every time you cook something fatty. Over time, this thin layer of grease turns sticky and brown.
Dampen a microfiber cloth or soft sponge with warm, soapy water. Wring it out thoroughly so it is damp, not dripping. Water dripping into the internal electronics or the fan motor will ruin the appliance.
Wipe the interior walls, the bottom of the chamber, and the inside of the door if your model has one. Work in small circles to lift the grease off the surface. Rinse your cloth frequently in clean water.
You'll likely need to rinse it several times as the cloth picks up dark, oily residue.
Pay close attention to the area around the heating element at the top. When you cook items that splatter, like bacon strips, tiny droplets of fat fly upward and stick directly to the coil or the metal shield above it. When you turn the machine on next time, those droplets burn and create smoke.
Wipe around the heating element very gently. Do not bend the coil. Do not push hard against the protective mesh.
If grease is baked directly onto the heating element itself, use a barely damp cloth and wipe lightly. Manufacturers generally advise against applying liquids directly to the heating components. Check your specific user manual for guidance on the element.
For general safety standards regarding electrical appliance maintenance near heat sources, refer to guidelines from the Consumer Product Safety Commission.
Scrubbing the Basket Without Ruining the Coating
After the 15-minute soak, pull the basket out of the water. Most of the grease should slide right off when you run your soft sponge over it. Wash the inside, the outside, and the handle.
Flip the basket over and check the bottom. Grease often pools around the rim and the feet of the basket. Use your soft-bristle brush to get into the corners or the perforated holes where food tends to stick.
Rinse the basket under warm running water until all the soap suds are gone. Soap residue left behind will smoke and smell terrible the next time the machine heats up.
Dry the basket and tray completely with a clean towel before putting them back together. Leaving them wet promotes rust on any exposed metal edges and can cause water spots on the non-stick surface.
How to Remove Grease From an Air Fryer When It's Baked On
Sometimes a regular soak doesn't work. If you forgot to wash the basket after making a batch of marinated drumettes, the sugars and fats caramelize together and form a hard, dark crust.
Make a paste using three parts baking soda to one part water. It should be thick enough to spread, similar to the consistency of toothpaste.
Apply the paste directly to the stubborn grease spots on the basket or tray. Spread it evenly over the problem areas. Let it sit for 15 to 20 minutes.
Baking soda is mildly alkaline, which helps break down acidic grease bonds, and its slightly gritty texture provides gentle abrasion without scratching the non-stick finish.
After waiting, take your damp sponge or soft brush and scrub the paste in circular motions. The hardened grease should begin to flake off. Rinse thoroughly with warm water.
Repeat the process if a spot is particularly thick.
Using Steam to Soften Stubborn Interior Residue
If the inside walls of the main unit have thick, sticky grease that won't wipe away with a damp cloth, try a steam method.
Pour about half a cup of water into the bottom of the basket. Place the basket back into the machine. Turn the air fryer on to 400°F (200°C) for three to five minutes.
The water will boil and create steam inside the closed chamber.
Turn the machine off and unplug it. Open the drawer carefully, as hot steam will rush out. The steam loosens the dried grease on the upper walls and the ceiling of the interior.
Once it cools enough to touch safely, wipe the interior down again with your soapy cloth. The grease comes off much easier after being steamed.
| Cleaning Method | Best Used For | Time Required | Risk to Coating |
|---|---|---|---|
| Hot soapy soak | Routine grease removal | 10-15 minutes | Very low |
| Baking soda paste | Hardened, baked-on fat | 20-30 minutes | Low |
| Steam method | Sticky interior wall residue | 5-10 minutes | Very low |
| Commercial degreaser | Extreme neglect (use cautiously) | Varies by product | Moderate to High |
Drying and Reassembling Your Machine Properly
Moisture is the enemy of the electrical components hidden behind the interior walls. Before you put everything back together, verify that every piece is bone dry.
Wipe the basket, the crisper plate, and the outer tray with a dry towel. Leave them out on the counter for another 10 minutes if you aren't sure they are fully dry. Water trapped beneath the crisper plate can pool at the bottom of the unit during the next preheat cycle, causing loud popping noises or steam burns.
Slide the tray and basket back into the machine. Ensure they click into place properly. A misaligned basket blocks airflow, which leads to uneven cooking and causes more grease to splatter sideways instead of dripping down into the catch pan.
Store the appliance with the drawer slightly open if it sits unused for long periods. This allows air circulation and prevents stale odors from developing inside the closed chamber.
Why Regular Degreasing Prevents Smoke and Bad Flavors
Skipping the cleaning step after cooking fatty foods causes immediate problems. Old grease reheats rapidly. It hits its smoke point long before your fresh food finishes cooking, filling your kitchen with acrid, gray smoke.
That burnt oil flavor transfers directly to whatever you are cooking. You might notice a bitter, rancid taste on delicate items like zucchini slices or reheated leftovers because they are absorbing vaporized old fat.
Grease buildup also acts as an insulator. Thick layers of carbonized oil on the heating element or the interior walls change how the machine reflects and distributes heat. Your food might take longer to crisp, forcing you to run the machine hotter and longer, which wastes electricity and strains the fan motor.
Keeping the interior clean maintains the exact airflow dynamics the manufacturer designed. If you rely on your machine for quick weeknight dinners, like getting salmon fillets cooked fast, a clean heating element guarantees accurate temperatures.
Mistakes That Damage the Non-Stick Surface
People often ruin their baskets trying to get them clean. Knowing what to avoid saves you from buying a replacement drawer.
- Using aerosol cooking sprays directly on the basket. Many commercial cooking sprays contain lecithin and propellants that bake into the non-stick coating, creating a gummy residue that standard soap cannot remove. This buildup looks like grease, but it is actually destroyed coating. Use a pump oil mister or brush oil on manually.
- Scrubbing with the rough side of a sponge. Those green scouring pads are made for stainless steel pots, not PTFE or ceramic coatings. One aggressive scrub leaves micro-scratches where future grease will permanently anchor itself.
- Putting the basket in the dishwasher. Even if the manual claims the parts are dishwasher safe, the combination of extremely hot water and harsh dishwasher detergents degrades non-stick coatings rapidly over time. Hand washing takes two minutes and extends the life of the basket significantly.
- Submerging the main base unit in water. The base contains the motor, fan, and wiring. Wipe it down only. Never dunk it.
- Ignoring the drip pan. Many people wash the basket and forget the outer tray underneath it. All the rendered fat drips into that tray. If left unwashed, it smokes heavily during the next use.
For detailed care instructions specific to your model, always check the documentation provided by food contact surface regulations or the manufacturer's official guidelines regarding approved cleaning agents.
Adjustments for Different Air Fryer Styles
Not every machine has the same shape, and the design changes how you approach the grease.
Basket-style models, which look like large coffee makers with a pull-out drawer, concentrate most of the grease at the bottom of the outer tray. The focus here is pulling the tray out and washing it thoroughly after every single use.
Oven-style models with racks and glass doors spread the grease differently. Fat drips from the top rack down onto the food below or onto the bottom heating element. These require a removable drip tray at the very bottom.
You also have to wipe down the glass door, where grease splatters become highly visible and bake on quickly due to the proximity to the heating elements.
Dual-basket models have twice the surface area to clean. Pay attention to the divider between the two baskets. Grease tends to collect in that seam.
Wipe it down carefully with a damp cloth rather than pouring water over it, as the electronics connecting the two zones often run through that central partition. If you own a specific countertop model like the Ninja AF101, consult its specific manual for any unique crevices where oil collects.
Frequently asked questions
Can I use vinegar to clean grease out of my air fryer?
Yes, white vinegar cuts through light grease effectively. Mix equal parts water and white vinegar, dampen a cloth, and wipe the interior walls. Vinegar is especially useful for removing lingering food odors trapped in old grease.
Avoid using undiluted vinegar directly on the heating element, as the acid could potentially corrode unprotected metal parts over time.
Is it safe to put the air fryer basket in the dishwasher?
Most manufacturers state the removable parts are dishwasher safe, but hand washing is strongly recommended. Dishwasher detergent is highly abrasive, and the prolonged heat cycle breaks down the non-stick coating much faster than gentle hand washing. If you must use the dishwasher, place the basket on the top rack and skip the heated dry cycle.
Why does my air fryer smoke every time I turn it on?
Smoke usually means there is leftover grease on the heating element or pooled in the bottom drip tray. When the machine heats up, that old oil burns and smokes. Unplug the unit, let it cool, and thoroughly wipe the ceiling around the heating coil and wash the bottom tray.
Cooking fatty foods without emptying the drip tray between batches is the most common cause.
How do I get sticky residue off the outside of the machine?
Exterior grease happens when steam vents release oily vapor that settles on the plastic housing. Wipe the outside with a cloth dampened with warm water and a drop of dish soap. For stubborn sticky spots, rub a small amount of cooking oil onto a paper towel and buff the sticky area.
The fresh oil dissolves the polymerized sticky grease, allowing you to wipe it away cleanly before washing the spot with soapy water.
Should I clean the air fryer after every single use?
Yes. At a minimum, wash the basket and wipe out the bottom tray after every use. You don't necessarily need to deep-clean the interior walls and heating element daily, but letting fat sit in the basket overnight makes it much harder to remove later.
A quick wash immediately after cooking while the residual heat is still present makes the whole process take less than two minutes.
Keeping Your Machine Clean Long Term
Learning how to remove grease from an air fryer is mostly about timing. The faster you address the oil after cooking, the easier it wipes away. Letting it sit allows the fat to oxidize, harden, and bond to the metal.
Keep a designated soft sponge near your sink specifically for your air fryer parts. This prevents accidental cross-contamination with the heavy scouring pads used for cast iron or stainless steel pans.
A quick wipe-down of the interior walls once a week prevents the slow accumulation of invisible grease films. By staying ahead of the buildup, you protect the non-stick coating, stop unwanted smoking, and keep your food tasting exactly the way you seasoned it.