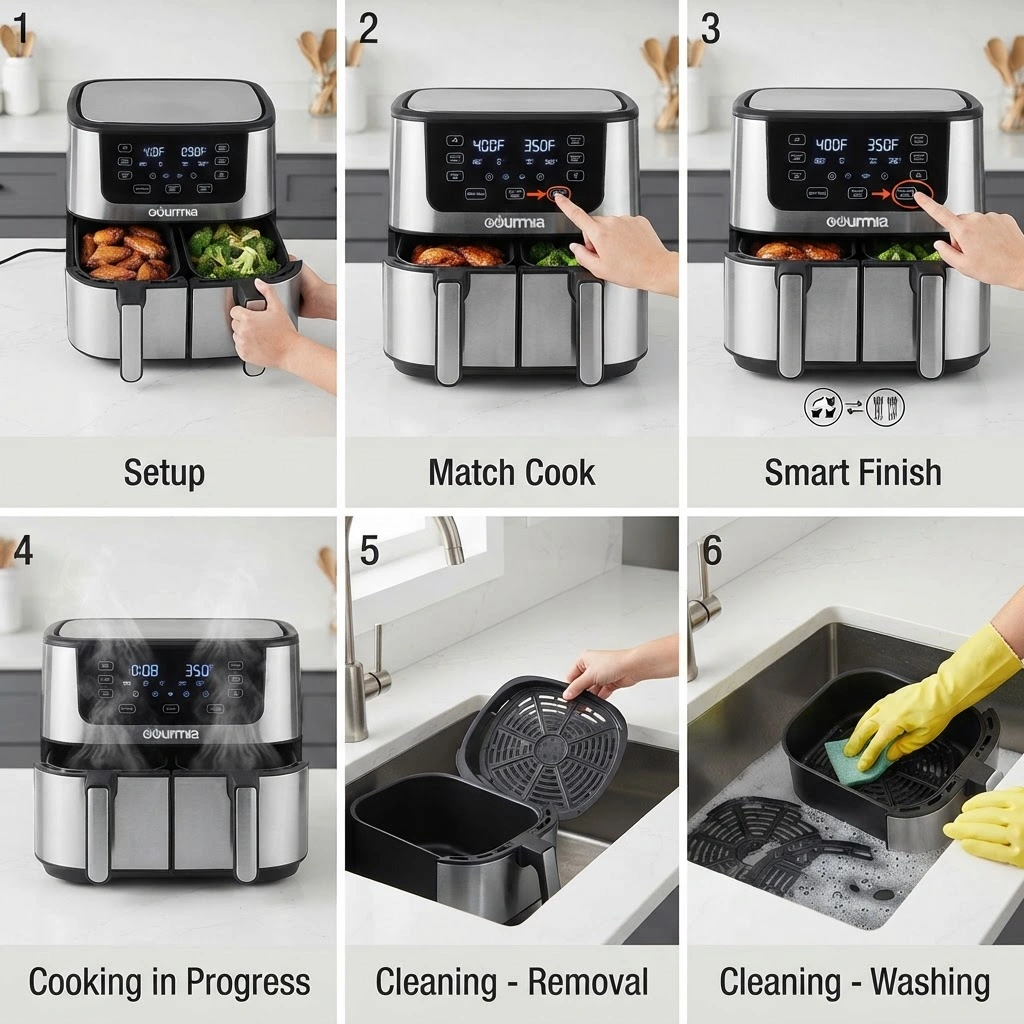
Set the Gourmia 10 Qt Dual Basket Air Fryer on a level, heat-resistant surface with at least 10 cm (4 inches) of free space above and around all sides, away from walls and other appliances. Tap the power icon, choose a zone, set the temperature and time, and start cooking. Use Match Cook when both baskets need identical settings, and Smart Finish when the two baskets need different settings but should finish together.
The two baskets work independently, so you can cook one zone on its own or run both at once with separate settings. This guide covers setup, the control panel, each cooking mode, cleaning, and troubleshooting, with clear notes wherever the exact behavior depends on your model or manual.
Setting Up Your New Gourmia 10 Qt Dual Basket Air Fryer
A few setup steps protect both the appliance and your cooking results. Do these before your first meal.
Unboxing and Initial Inspection
Remove the air fryer unit, both cooking baskets, and both crisper trays from the packaging. Check for visible damage such as dents, cracks, or loose parts.
Remove all packing materials, including protective films and inserts, from the unit and from inside the baskets. Keep the packaging for a short while in case you need to return the unit.
Choosing the Right Location
Place the air fryer on a flat, stable, heat-resistant surface such as a countertop or sturdy island. Do not place it against a wall or against other appliances, and leave at least 10 cm (4 inches) of free space above and around all sides. This clearance supports airflow and heat dissipation.
Avoid spots directly under overhead cabinets, since hot air vents from the unit. Plug the air fryer directly into a wall outlet where possible. Extension-cord ratings and outlet requirements for this model are not confirmed here, so check your manual and the rating label on the appliance before using an extension cord.
Cleaning Before First Use
Remove both baskets and crisper trays. Wash them in warm, soapy water, rinse thoroughly, and dry completely. Wipe the exterior of the main unit with a damp cloth. Never immerse the main unit or its power cord in water.
Whether the baskets and trays are dishwasher-safe varies by model, so confirm this in your manual before placing them in a dishwasher. This guide does not prescribe a first-use burn-off cycle, because the stored manufacturer guidance does not confirm one for this model. Follow the first-use instructions in your manual.
Understanding the Control Panel
Tap the power icon to begin operating the unit; the Zone 1 button light will blink. Beyond that, the panel gives you zone selection, temperature and time adjustment, and the two coordination modes. Button names and layout can vary between Gourmia dual-basket models, so match what you see to your manual.
Typical controls include:
- Power icon: turns the unit on and off.
- Zone 1 and Zone 2 buttons: select which basket you are programming.
- Temperature and time controls: set your own values for each zone.
- Preset functions: the GAF966 offers presets plus customizable temperature and time settings.
- Match Cook: copies settings so both baskets cook identically.
- Smart Finish: coordinates two different settings to finish together.
- Start/Pause: begins or pauses the cooking cycle.
The GAF966 also lists saute, bake, roast, broil, dehydrate, reheat, and keep warm among its functions. Presets are starting points; you can adjust temperature and time after selecting one.
Mastering Basic Cooking with Your Dual Baskets
Basic cooking comes down to three habits: program each zone deliberately, leave room for air to circulate, and turn or shake food partway through.
Preheating
Preheating is listed among the GAF966’s features. If your model offers it, preheat before adding food for more even results. If it does not, follow the preheat guidance in your manual rather than assuming a fixed time.
Setting Time and Temperature
- Select a zone: press the Zone 1 or Zone 2 button.
- Set temperature and time: use the controls or choose a preset, then adjust to your target values.
- Start: press Start/Pause.
Repeat for the second zone if you are cooking two different foods with separate settings. Your recipe or the appliance’s guide supplies the actual times and temperatures; this article does not prescribe food-specific values.
Shaking, Flipping, and Turning
Hot air circulates around the food, and turning items partway through helps them brown evenly. The GAF966 includes a turn reminder for even cooking. When it prompts you, shake small items such as fries or nuggets, and flip larger pieces such as chicken thighs or steak with silicone-tipped tongs.
Avoid overcrowding. Food packed too tightly blocks airflow and steams instead of crisping. Use a single layer where possible and cook in batches when needed; the dual baskets make batch cooking easier.
Utilizing Match Cook for Identical Batches
Match Cook synchronizes the settings of both baskets so they cook at the same temperature and time.
What Match Cook Does and When to Use It
Set your cooking profile once, and Match Cook applies it to both zones. Use it when you are splitting one large batch of the same food between the baskets, such as a bag of fries or a tray of wings, or whenever you want both zones to run identically and finish together.
This mode removes the need to program each basket separately for the same result.
Step-by-Step for Match Cook
- Distribute the food: divide it evenly between both baskets without overcrowding.
- Select Zone 1: press the Zone 1 button.
- Set your program: choose a preset or set temperature and time manually.
- Activate Match Cook: press the Match Cook button so the Zone 1 settings copy to Zone 2.
- Check the display: both zones should show the same settings.
- Start cooking: press Start/Pause.
Tips for Success with Match Cook
- Keep the food identical: same type and similar size in both baskets, so one shared setting suits both.
- Divide evenly: even portions cook more consistently.
- Respect the turn reminder: shake or flip both baskets when prompted.
Utilizing Smart Finish for Coordinated Meals
Smart Finish lets two different foods finish cooking simultaneously, each with its own settings.
What Smart Finish Does and Its Benefits
You program each basket separately, and Smart Finish coordinates them so both foods are ready at the same moment. That suits a protein in one basket and a side in the other, such as chicken with golden potatoes or Brussels sprouts.
The main benefits are timing and convenience: one appliance manages both components, and you avoid serving a cold side while the main waits.
Step-by-Step for Smart Finish
- Load the baskets: place the longer-cooking food in one basket and the quicker item in the other.
- Program Zone 1: select the zone, then set its temperature and time.
- Program Zone 2: select the second zone and set its own temperature and time.
- Activate Smart Finish: press the Smart Finish button to coordinate the two programs.
- Start cooking: press Start/Pause.
The exact way the unit staggers the start of each zone, and how the display indicates a waiting basket, can vary by model. Follow the on-screen prompts and your manual for the specific sequence.
Pairing Foods for Smart Finish
- Match settings to each food: give each basket the time and temperature that food needs.
- Put the longer cook first: the food that takes longest generally belongs in the basket that starts earlier.
- Keep temperatures sensible: foods that cook at similar temperatures pair most easily, even when their times differ.
- Watch the turn reminder: it applies to each zone’s cycle as programmed.
For cook-time guidance on specific foods, see this Gourmia 10 Qt dual basket cook times and temperature chart.
Maintaining Your Air Fryer: Cleaning and Care
Regular cleaning protects performance and flavor. Unplug the unit and let it cool completely before any cleaning.
After-Use Cleaning
- Remove the baskets and trays: take out both cooking baskets and crisper trays.
- Wash them: use warm water, mild dish soap, and a non-abrasive sponge. Soak stubborn residue in hot, soapy water.
- Check dishwasher safety: confirm in your manual whether your baskets and trays are dishwasher-safe before dishwashing them.
- Wipe the exterior: use a damp cloth on the outside of the unit.
Never immerse the main unit or power cord in water.
Cleaning the Interior
Wipe the interior cavity with a damp cloth and mild dish soap, avoiding abrasive scrubbers on non-stick surfaces. This guide does not include a heating-element cleaning procedure or odor-removal methods that involve heating liquids inside the unit, because those steps are not confirmed for this model. For interior and heating-element cleaning, follow your manual’s instructions and avoid touching the element with excessive moisture.
Odor Prevention
The simplest defense against lingering odors is cleaning the baskets and trays after each use and letting all parts dry fully before reassembly. Store the unit in a dry, cool place.
Troubleshooting Common Air Fryer Issues
Work through likely causes first, then escalate. For a broader guide, see this Gourmia dual basket air fryer troubleshooting resource.
Uneven Cooking or Lack of Crispness
- Check for overcrowding: crowded baskets trap steam; cook in smaller batches.
- Turn the food: shake small items and flip larger ones, using the turn reminder.
- Use a light oil coating: a thin, even layer helps browning.
- Cut pieces evenly: uniform sizes cook at similar rates.
Smoke from the Unit
Persistent smoke usually points to grease or food residue burning on a hot surface. Unplug the unit, let it cool, and clean the baskets, trays, and interior. When cooking fatty foods, check your manual for guidance on catching drips. Do not line baskets in ways that block airflow or let foil or parchment touch the heating element.
The Unit Will Not Turn on or Heat
- Check the power: confirm the plug is secure in a working outlet, and try another outlet.
- Check basket seating: push both baskets firmly into place; a basket that is not fully seated can prevent operation.
- Check for overheating protection: if the unit shut off, unplug it, let it cool, and try again.
Food Sticking to the Crisper Tray
Lightly oil the crisper tray before adding food, especially proteins and battered items. Air-fryer-safe parchment can reduce sticking when used so it does not cover the basket or contact the heating element; see this guide to using parchment paper safely in an air fryer.
When to Escalate
If the unit displays an error code, shuts off repeatedly, or does not heat after the checks above, stop using it and consult your manual, then contact Gourmia support. Error codes and safety shut-off behavior are model-specific and are not confirmed here, so the manual is the authoritative source.
Maximizing Your Air Frying Experience
A few habits carry across every mode.
Use Oil Lightly
A light, even coating of oil encourages browning. A pump-style sprayer or a quick toss in a bowl with a teaspoon or two of oil works well. Check your manual for guidance on spray products before using aerosols on the baskets.
Prevent Overcrowding
A single layer with space between pieces gives the best crisping. When cooking large quantities, batch the food; the dual baskets make this more efficient, especially with Match Cook.
Use Safe Accessories
Small oven-safe bowls made of glass, ceramic, or metal can hold items like baked eggs or mini gratins, provided they fit without touching the sides or top. For details, see which bowls are safe to use in an air fryer.
Parchment and foil can help with cleanup, but keep them clear of the heating element and never let them block airflow. These materials are not suitable for an empty preheat. Learn more about using paper products safely in an air fryer.
Adapting Oven Recipes
Oven-to-air-fryer conversion is approximate, not a fixed rule. Start with a slightly lower temperature and shorter time than the oven recipe specifies, then check doneness frequently and adjust. Your manual and recipe source should guide the actual numbers.
Exploring Different Foods
The Gourmia 10 Qt Dual Basket air fryer handles a wide range of foods. Cook-time guides can help you plan each basket:
- Proteins: ham steak and smoked sausage.
- Vegetables: bell peppers and acorn squash.
- Frozen foods: frozen steak fries, waffles, taquitos, and Uncrustables.
- Reheating: pizza, wings, and crab rangoon.
- Dehydrating: beef jerky on models with a dehydrate function.
Match Cook or Smart Finish?
Choose Match Cook when both baskets hold the same food and should cook identically. Choose Smart Finish when the two foods need different times or temperatures but should be ready together. That single decision covers most dual-basket meals.



