You pulled the roast at exactly 145°F, let it rest, and sliced in only to find the center is still raw. Or maybe you followed the recipe to a T, but the chicken breast came out dry as a bone despite the screen saying it was just right. It feels like the tool failed you, but usually, the hardware is fine.
The problem is almost always where you put the probe. A shift of just half an inch can be the difference between a perfect meal and a food safety risk.
Quick Answer:
A meat thermometer reading is wrong when the probe tip misses the thermal center, touches bone, or rests in a fat pocket. To get an accurate result, you must insert the sensor into the thickest part of the muscle, away from bone and gristle, ensuring the “sensing notch” is fully submerged. In thin cuts, you should insert the probe through the side rather than the top to reach the cold spot.
The Science of the “Cold Spot”
Every piece of meat has a thermal center, often called the cold spot. This is the point furthest from the heat source that takes the longest to reach a safe temperature. If you don’t hit this exact spot, your thermometer will give you a reading from a shallower, hotter area.
This leads to a false sense of security, as the very middle of the steak might still be undercooked.
Heat moves from the outside in. As the exterior of a steak hits the pan, the energy transfers through the moisture and fibers toward the middle. Because meat isn’t a perfect uniform cube, the geometric center isn’t always the thermal center.
Factors like bone conductivity and fat distribution change how heat flows. If your meat thermometer reading is wrong, it’s likely because the tip of your probe is measuring a zone that has already been exposed to more heat than the core.
Most modern digital thermometers use a thermistor or a thermocouple. A thermocouple measures at the very tip, while a thermistor might measure an average over the bottom half-inch of the probe. If part of that sensing area is sticking out into the air or sitting in an air pocket inside the bird, the reading will be a mix of the meat temp and the oven temp.
This is why depth of insertion is just as vital as horizontal placement.
The Physics of Heat Transfer in Protein
Muscle fibers contain a high percentage of water. Water is a decent conductor, but it also creates steam and evaporation. As the outside of the meat dries out, it forms a crust that eventually slows down heat transfer.
Meanwhile, the center stays moist and cool.
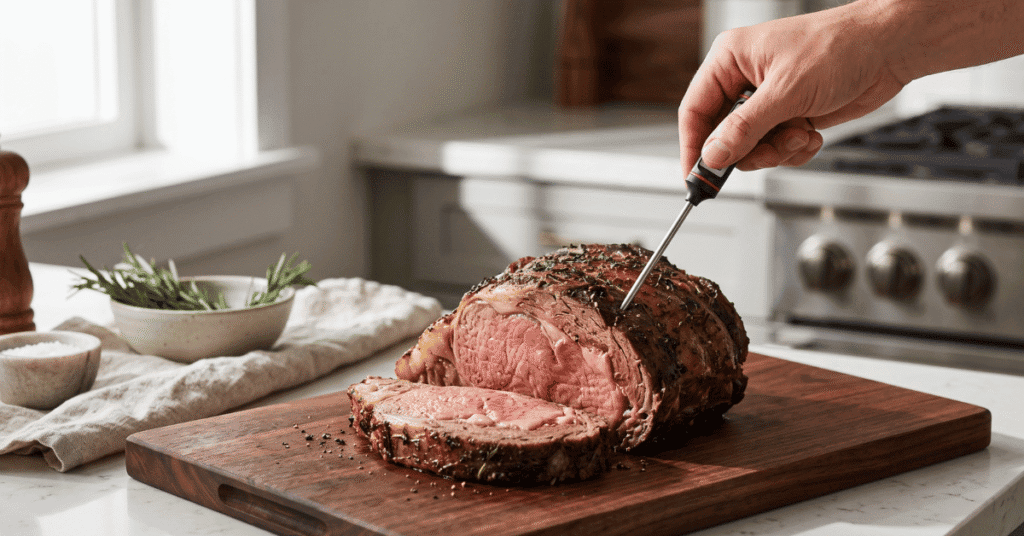
If you place the probe too shallow, you are measuring the “outer core.” This area might be 10 to 15 degrees hotter than the true center. For something like a medium-rare prime rib, that 15-degree gap is the difference between pink perfection and a grey, overdone disaster. Relying on a shallow poke is the number one reason home cooks miss their target temperatures.
How Different Gauges React
Not all probes are built the same. An old-school dial thermometer (bimetallic coil) requires you to submerge the probe at least two to three inches to get a reading. If you use one of these on a thin burger, it is impossible to get an accurate number because the sensor is too long for the meat.
Digital instant-read versions are much more forgiving, but they still have a “sensing zone.” On many popular models, there is a small dimple or notch about half an inch up from the tip. That entire section must be inside the meat. If the notch is visible, your meat thermometer reading is wrong because it is picking up ambient heat from the grill or oven.
1. Touching Bone: The Heat Conductor Myth
Many people are told to “stay near the bone” to check for doneness, but this is a mistake. Bones do not heat up at the same rate as muscle. In fact, bone is porous and acts as an insulator in some cases, or a heat conductor in others, depending on the cut and the cooking method.
If your probe tip touches a bone, the temperature will spike or dip unnaturally. According to USDA Food Safety guidelines, you should always insert the thermometer into the thickest part of the meat, avoiding bone, fat, and gristle. When the metal tip hits a hard surface like a femur or rib, it measures the temperature of that solid object, not the meat surrounding it.
Why Bone Conducts Differently
Bones are filled with marrow and have a different density than lean muscle. In a high-heat environment, a bone can actually shield the meat directly next to it, keeping it cooler for longer. Conversely, in a long braise, the bone might heat up and stay hot, giving you a higher reading than the actual meat fibers.
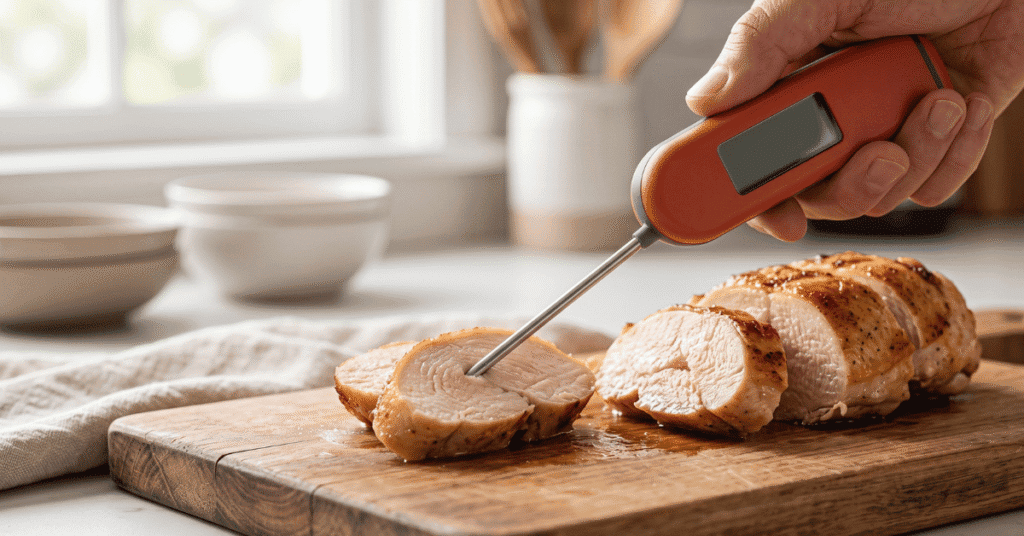
When temping a turkey, the common error is hitting the hip bone or the ribs. If you feel a “crunch” or a hard stop, pull the probe back half an inch. You want the tip to be suspended in the softest, thickest part of the thigh or breast.
If you stay against the bone, you might pull the bird out at 165°F only to find blood near the joints because the bone was hotter than the meat.
The Problem with Gristle and Connective Tissue
It isn’t just bones that cause issues. Large deposits of fat or heavy connective tissue (gristle) can also throw off a sensor. Fat renders at specific temperatures and can act as a pocket of hot oil inside the meat.
If your probe lands in a glob of fat, the temperature will appear much higher than the lean muscle nearby.
If you get a reading that seems suspiciously high for how long the meat has been cooking, move the probe. A quick second check an inch to the left or right can confirm if you were sitting in a fat pocket. A consistent reading across two different spots is the only way to be sure you have the right number.
2. Incorrect Depth in Thin Cuts
Thin cuts like skirt steak, pork chops, or burger patties are the hardest to measure. If you try to poke the thermometer straight down through the top, the tip will likely go all the way through and touch the hot pan, or it will be so close to the surface that it measures the air.
For any meat under an inch thick, you must use the “side-entry” method. This involves inserting the probe through the side of the cut so the sensor stays in the middle of the meat for a longer distance. This ensures the entire sensing zone is surrounded by the protein you are trying to measure.
The Side-Entry Technique
Pick up the meat with tongs to steady it if necessary. Slide the probe into the side of the burger or chop, aiming for the center. By going in sideways, you have a much larger margin for error.
Even if you are slightly off-center, more of the probe is submerged in the meat, which helps the sensor stabilize.
This is especially important for fish fillets. Because fish is delicate and thin, a vertical poke often yields a “false high” because the sensor is too close to the heat of the grill grate. Side-entry allows you to find that translucent center that indicates the fish is just about to be done.
Dealing with Irregular Shapes
Some cuts, like a butterflied leg of lamb or a tri-tip, are thick on one end and thin on the other. If you only measure the thin end, the thick end will be raw. If you only measure the thick end, the thin end will be leather.
The goal is to measure the thickest part to ensure safety, but you should also be aware of the “gradient.” Check the thickest section for your target temp, but move the meat away from direct heat if the thin sections are climbing too fast. If your meat thermometer reading is wrong in one spot but right in another, it usually means your heat distribution is uneven.
3. The “Notch” Factor: Missing the Sensor Zone
Every thermometer has a specific area where the actual measurement happens. In many digital probes, this is the first half-inch of the tip. However, in dial-style “leave-in” thermometers, the sensor can be two inches long.
If you don’t bury the probe deep enough to cover the entire sensor, the math the thermometer performs will be skewed.
A thermometer doesn’t just “see” a temperature; it reacts to thermal energy. If half of the sensor is exposed to the 350°F air in your oven, and the other half is in 140°F beef, the display might show 210°F. You see a number way past the “done” stage, but the meat is actually still rare.
Instant-Read vs. Leave-In Probes
Leave-in probes (the ones with a wire that goes to a base unit) often have a longer sensing area. These are great for big roasts but terrible for chicken wings or small steaks. If you are using a leave-in probe, make sure it is pushed deep into the center of the roast.
Instant-read thermometers are designed for quick checks. They usually have a very small sensor at the very tip, making them the best choice for checking multiple spots quickly. Even so, you should look for the “sensing notch” on the stem of the probe.
If your meat isn’t thick enough to cover that notch, your reading won’t be accurate.
Calibrating for Accuracy
Even with perfect placement, a thermometer can be off due to calibration issues. Most professional chefs recommend an ice-water bath test. Fill a glass with crushed ice and just enough water to fill the gaps.
Stir it and let it sit for a minute. Put your probe in (making sure not to touch the glass). It should read exactly 32°F (0°C).
If it reads 34°F or 30°F, your thermometer has shifted. Some digital models allow you to reset the calibration. If yours doesn’t, you simply have to do the mental math.
If your meat thermometer reading is wrong by two degrees in ice water, it’s likely off by that much at cooking temps too.
4. Measuring Too Early or Too Often
Physics dictates that every time you poke a hole in meat, you lose a bit of moisture. While one or two pokes won’t ruin a steak, stabbing it every three minutes will. More importantly, checking too early can lead to “false plateaus.”
During the cooking process, meat reaches a “stall” where the temperature stops rising as moisture evaporates from the surface. If you see the temp stuck at 150°F and keep poking it, you aren’t getting a wrong reading, you’re just seeing the reality of evaporative cooling. The mistake is reacting to this by cranking the heat, which eventually results in an overcooked exterior.
The Carry-Over Cooking Factor
One of the biggest “errors” isn’t the reading itself, but how the cook interprets it. If you wait until the thermometer says 160°F to pull a piece of beef, it will likely end up at 170°F after resting. This is called carry-over cooking.
The larger the piece of meat, the more residual heat it holds. A massive brisket might rise another 10 degrees after it comes off the smoker. If you don’t account for this, you’ll think your thermometer was wrong because the meat seems overdone, when in reality, the thermometer was right at the moment you checked it.
You just pulled it too late.
Air Pockets and Cavities
When cooking poultry, the biggest placement error is ending up in the empty cavity. If the probe passes through the breast meat and enters the hollow center of the chicken, it is measuring the hot air trapped inside the bird.
This usually results in a reading that is much higher than the meat itself. Always ensure the probe is firmly lodged in muscle fibers. If the probe feels “loose” or moves too easily, you are likely in a cavity or a pocket of melted fat.
Practical Steps for Perfect Placement
To avoid these errors, follow a consistent routine every time you cook. These steps apply to almost all proteins and will significantly improve your accuracy.
- Identify the thickest part: Before the meat goes on the heat, look at the shape. Find the area furthest from the surface.
- Locate the bones: If you’re cooking a T-bone or a bone-in breast, visualize where the bone sits so you can aim away from it.
- Insert past the center, then pull back: A pro tip is to push the probe slightly past where you think the center is, then slowly pull it back. Keep an eye on the display; the lowest temperature you see is the true “cold spot.”
- Use the side-entry for thin cuts: Never go top-down on a burger or a thin fillet.
- Clean the probe between checks: If you probe a raw-ish center and then check a different spot, old bits of cool meat or juices on the probe can slightly lag the next reading. Wipe it down.
| Meat Type | Best Placement Spot | Avoid |
|---|---|---|
| Whole Turkey/Chicken | Thickest part of the inner thigh (don’t hit bone) | Empty body cavity or wing tips |
| Steaks/Chops | Side-entry into the center | Fat caps or bone surfaces |
| Roasts/Brisket | The very center of the thickest muscle | Large fat seams (the “deckle”) |
| Fish Fillets | Thickest part, inserted from the side | The thin tail section |
| Burgers | Side-entry to the center | Coming in from the top |
Common Placement Misconceptions
Many people believe that “if it’s hot to the touch, it’s done.” Touch is a terrible indicator of internal temperature because your skin only senses the surface. Others believe that if the juices run clear, the meat is safe. While often true for chicken, it is not a scientific measurement.
Another misconception is that the thermometer works instantly. Even “instant-read” models usually take 2 to 5 seconds to stabilize. If you pull the probe out the moment the numbers start moving, you aren’t getting the final temp.
Wait for the numbers to stop jumping.
Frequently Asked Questions
Why does my thermometer show a different temperature when I move it just a little bit?
Meat is not a uniform material. It is a complex mix of muscle, water, fat, and bone. Heat does not move through these materials at the same speed.
If you move the probe half an inch and the temp jumps 10 degrees, you likely moved from the true center (the cold spot) toward the outer edges or a fat pocket.
Can a cold probe throw off the reading?
If your thermometer has been sitting in a cold drawer and you stick it into a steak, the metal probe itself has to heat up before the sensor can give an accurate reading. This is why you should wait a few seconds for the display to stabilize. The mass of the probe is small enough that it won’t “cool down” the meat, but the probe needs time to reach equilibrium.
Does it matter if I temp meat while it’s still on the grill?
Yes and no. You can temp meat on the grill, but be careful of “flare-up” heat hitting the probe stem. If flames are licking the top of the thermometer, it can heat the metal of the probe and conduct that heat down to the sensor, giving you a false high.
Try to shield the thermometer from direct flame while taking a reading.
Why is my chicken still pink if the thermometer said 165°F?
Pinkness in chicken can be caused by several factors other than temperature. Young chickens often have porous bones that leak marrow pigment into the surrounding meat, causing a purple or pink tint even when fully cooked to a safe 165°F. As long as your meat thermometer reading is wrong-free (meaning you placed it correctly in the thickest part of the thigh and breast), the color is not always an indicator of danger.
Worth Remembering
Getting a perfect reading is more about technique than how much you spent on your kitchen gadgets. Even the most expensive digital tool will give you bad data if you jam it against a rib bone or let it sit in an air pocket.
Always aim for the thickest muscle, use the side-entry method for thin items, and always double-check by moving the probe slightly to find the lowest number. If you master these small adjustments, you’ll stop second-guessing your gear and start trusting your results. Reliable cooking starts with accurate data, and accurate data starts with where you put the probe.