Unplug the air fryer and let it cool completely, then remove loose crumbs with a soft brush and wipe the element gently with a barely damp cloth. Never pour or spray water onto the element, never submerge the main unit, and dry everything thoroughly before plugging the appliance back in.
That is the whole method in three sentences. The rest of this guide explains why each step matters, how to handle baked-on grease, and which common cleaning habits quietly damage the coil.
Why the Top Coil Collects So Much Grease
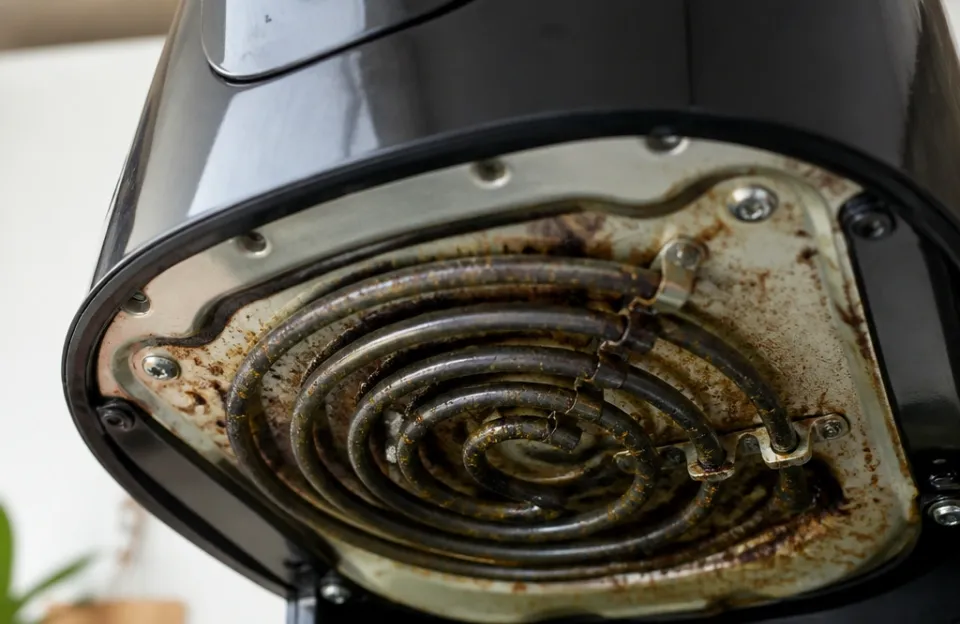
Every time you cook, the fan pushes hot air down through the element and around the food. That moving air also carries oil vapor upward, and much of it condenses on the coil and the metal shield around it. Over weeks of cooking wings, fries, or battered fish, that film carbonizes into a dark crust.
That crust is a frequent reason air fryers start smoking mid-cook or develop a burnt smell. The residue reheats with the element and smokes before your food is anywhere near done. Dark or chemical-smelling smoke is a warning sign worth acting on.
The basket is easy to see, so it gets washed after every use. The element sits above the basket, out of sight, so it gets ignored until the smoke starts. Cleaning it is not hard, but it rewards patience more than scrubbing force.
Supplies for Cleaning the Air Fryer Heating Element
Gather these before you start:
- A soft brush, such as a clean toothbrush or a pastry brush
- A microfiber cloth or paper towels
- A small bowl of warm water with a drop of dish soap, plus a second bowl of plain water
- Baking soda (optional, for stubborn spots)
- A flashlight or your phone light to see the coil clearly
Manufacturers generally advise against harsh chemicals on the element because residues can linger and transfer to food on the next cook. Skip steel wool, metal scrubbers, and hard-bristle brushes. Ninja also cautions that coarse scourers can damage nonstick parts of its air fryers.
One note on placement: not every air fryer puts the element in the same spot. On most Ninja models it sits above the basket slot, while on the Ninja Double Stack it is on the back wall. Check your manual or look inside the cavity before you start reaching upward.
How to Clean an Air Fryer Heating Element Safely
1. Unplug and Let It Cool Fully
Pull the plug from the wall, not just the power button. Then wait until the element is completely cool to the touch. The element holds heat longer than the basket, and touching a still-warm coil is a genuine burn risk.
There is no single verified cooling time that applies to every model, so judge by touch and give it more time than you think you need. If the housing feels cool but you are unsure about the metal, wait longer.
2. Turn the Unit Over Gently
Tipping the air fryer upside down gives you a clear line of sight to the element. Do this on a stable, non-slip surface, and be careful not to tip it while any liquid is present. Applying excessive cleaning solution to a tipped unit can let liquid seep into electrical components.
If your model has the element on the back wall, as with the Ninja Double Stack, you may be able to clean it without tipping the machine at all.
3. Brush Off Loose Crumbs First
Dry cleaning comes before any moisture. Use the soft brush to sweep crumbs, dust, and flaking residue off the coil and the surrounding metal. Working over a trash bin or a towel saves cleanup.
Do not press hard. The coil and its coating are not built to take lateral force, and a bent element is a replacement job.
4. Wipe with a Barely Damp Cloth
Ninja recommends wiping residue from the unplugged, cooled element with a very slightly damp cloth or paper towel. Wring the cloth until it is almost dry, then wipe along the coil rather than scrubbing across it.
If the cloth picks up grease, rinse it and wring it out again. Keep the moisture level low throughout. Never pour or spray water directly onto the element.
5. Work Around the Fan Opening
Do not spin the fan blades with your fingers or a tool. There is no verified evidence that manual rotation damages the motor or sends a harmful charge back through the wiring, so treat this as a gentle-handling rule rather than an electrical warning. Blades are thin, the bearing is small, and a bent fin throws the fan off balance.
Wipe the visible blades and the grille around them with the damp cloth. If grease has built up behind the grille, leave it for a professional or check your manual for approved access; do not pry the assembly open.
6. Dry the Coil Thoroughly Before Plugging It In
After any wet cleaning, dry the element completely with a fresh microfiber cloth or paper towel. Then let the unit sit open for a while before use.
Never plug the machine back in while moisture remains near the element, and never run electricity through a damp coil. This step is where rushed cleanings cause real damage.
Dealing with Stubborn Grease That Won’t Lift
Polymerized grease turns into a varnish-like layer that a damp cloth will not touch. A gentle paste approach helps, but keep it controlled.
- Mix baking soda with a little warm water to form a thick paste.
- Dab, do not slather, the paste onto the crusty spots with a soft brush.
- Let it sit for about 15 minutes.
- Wipe gently with a damp cloth, then wipe again with a clean damp cloth to lift residue.
- Dry the element thoroughly before use.
The paste recipe and dwell time here come from general cleaning guidance, not a manufacturer specification. Check your manual first, and test on a small, out-of-the-way spot if you are unsure.
The rinse matters as much as the paste. Leftover baking soda dries into a chalky film that can scorch onto the coil and flake into food. When in doubt, wipe twice and dry completely.
For general stainless steel surfaces, baking soda and vinegar pastes are a known approach, though abrasives like steel wool and bleach should be avoided. Vinegar is acidic, so keep it off any coated or aluminum element unless your manual approves it.
Mistakes That Damage the Heating Coil
- Spraying water or cleaner directly on the element. Liquid runs into the wiring.
- Using steel wool or hard brushes. These scratch the coating and create spots where food sticks permanently.
- Cleaning while warm. The burn risk is real, and rapid cooling can stress the metal.
- Submerging the main unit. Only the basket and crisper plate are meant to get wet.
- Leaving moisture behind. Trapped water near the element is an electrical hazard.
- Using harsh oven cleaners. Residues can linger and end up in your next meal.
Signs the Heating Element Is Failing
Cleaning solves smoke caused by grease, but not every smoke problem is dirt. Stop using the appliance and consult your manual or a technician if you notice:
- Dark or chemical-smelling smoke, as opposed to the gray haze from burnt food.
- A coil that stays cold while the fan runs, or heats unevenly across its length.
- Visible cracks, blistering, or a coating flaking off in patches.
- Repeated tripped breakers or burning smells from the housing rather than the cavity.
If a thorough cleaning removes the smoke, the problem was residue. If the smoke returns immediately on the next cook with a clean element, the cause is mechanical or electrical, and further cleaning will not fix it.
How Often You Should Wipe Down the Coil
There is no fixed number of uses that fits every kitchen. Judge by how dirty the element actually looks and how often you cook greasy foods. Someone making flour-coated wings weekly will need to wipe the coil far more often than someone reheating leftovers.
Ninja recommends cleaning the air fryer after every use for optimal results. That applies mainly to the basket and crisper plate, which are removable. For the element, a quick visual check after each session and a proper wipe when you see film or specks is a workable rhythm.
A short schedule that fits most households:
- After every use: wash the basket and crisper plate.
- Every few uses: shine a light on the coil and brush off crumbs.
- When film appears: do the full damp-cloth wipe.
- When crust forms: use the baking soda paste method.
Making Future Cleanings Easier
A few habits reduce how much grease reaches the coil:
- Shake excess oil off food before it goes in; heavy coatings spatter more.
- Avoid overfilling the basket, which pushes food closer to the element.
- Line the basket only with accessories approved for your model.
- Wipe the inside of the cavity, not just the basket, when you notice condensation.
If you own a specific model such as the Ninja AF101, checking its support page for the approved cleaning method is a sensible first step, since element designs and coating materials vary widely.
Cleaning the element is not a deep, technical job. Unplug it, let it cool, brush off the loose bits, wipe with a barely damp cloth, and dry it completely. Do that consistently and you will spend less time fighting smoke and more time actually cooking.